<< Previous | Garden Scale | Beginnings | New Beginnings | Third Incarnation | Additions | Station | Pond | Downtown | Expansion | Tower | Future | Next >>
Additions To Our Model Railroad Empire
I'm having fun with this... We're having fun with this
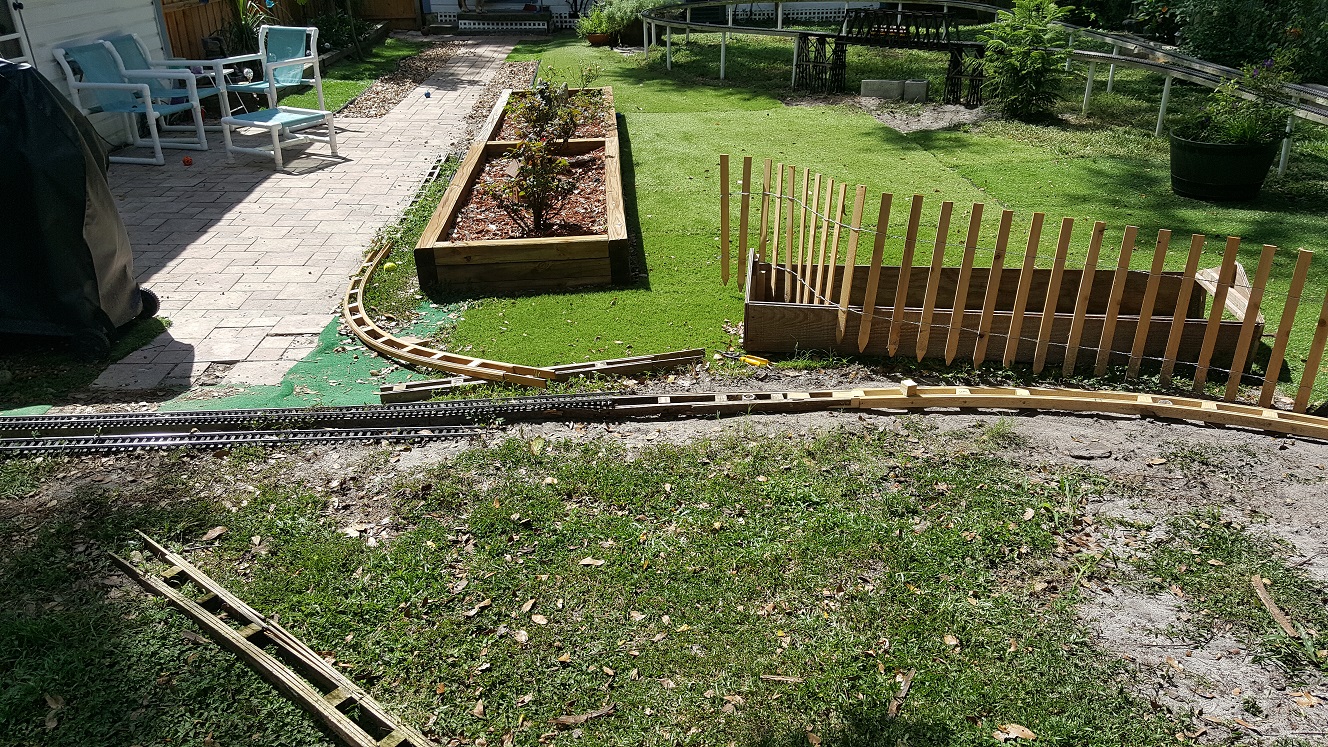
We've come a long way from our garden scale "empire" that started on the pool deck of our house in Wekiva. As we "remade" our back yard here in Mount Dora, we added raised beds for plants, a few at a time. We added a paver patio by the garage, and a walkway there from the back "porch", and eventually another raised bed alongside the patio. Even a sunsetter awning to shade the patio! What had once been sod was slowly eroded and beaten back to the dirt beneath the dogs constant pounding and digging. We were saddened that all of the work up to then was to allow us to put down sod, now seemingly all for nothing. We just couldn't seem to get away from that dirt, and that was the problem. Artificial turf was the solution... The stuff is thick, like carpet, and holds up to the constant wear and tear from our 100# german shepherd "pup".
Adding a Station Siding...
(Sunday, 8 July 2018)
We've accomplished little else than the kitchen remodel this year, and it's taken nearly every weekend since
Christmas just to get it all done. Don't get me wrong, that "little else" was a LOT! As with everything else,
you can
read about that here too. And while I still needed to replaster the hallway where we closed off the doorway
from the kitchen, the kitchen is done and back in operation. I was hoping to get back to working on the railroad
sooner, but between having to spend every weekend on maintenance at the other house and the disaster left in my
office and the garage from all the kitchen remodelling here, it seems there's always something else that needs
done first. But most of that is finally starting to happen.
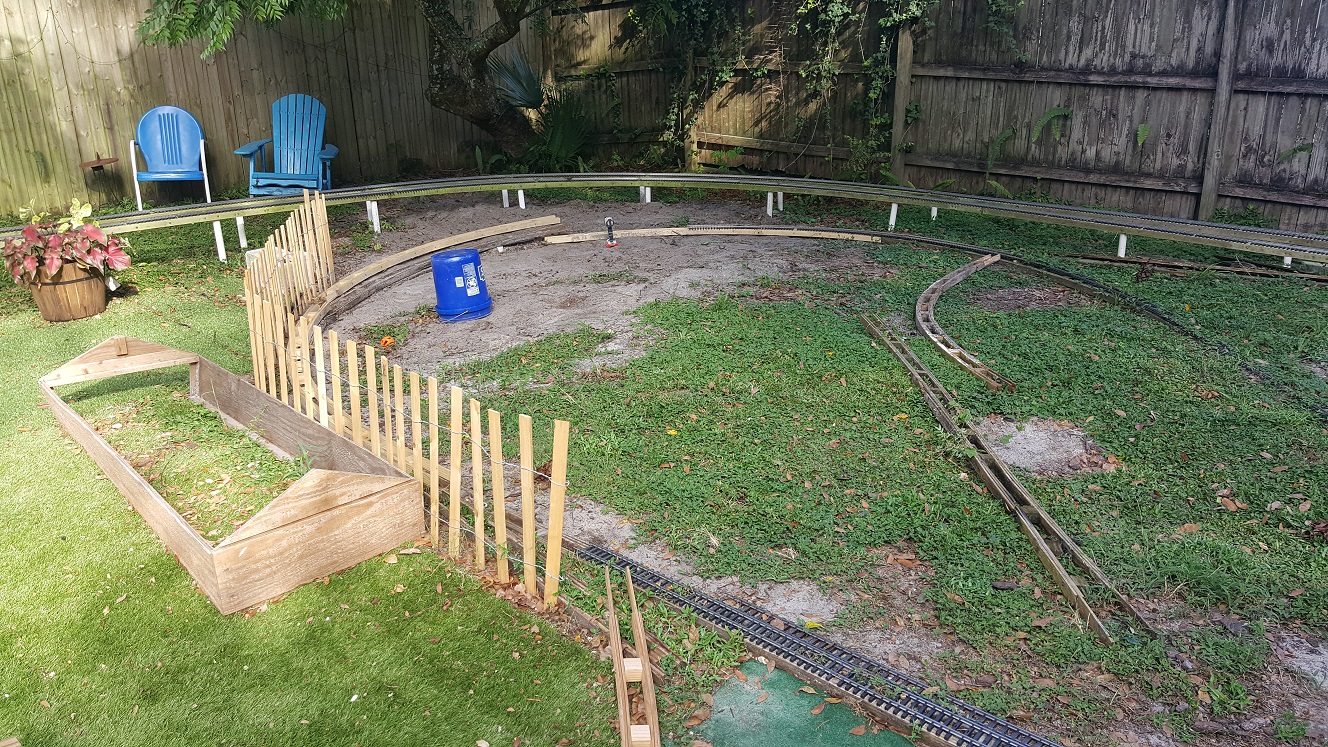
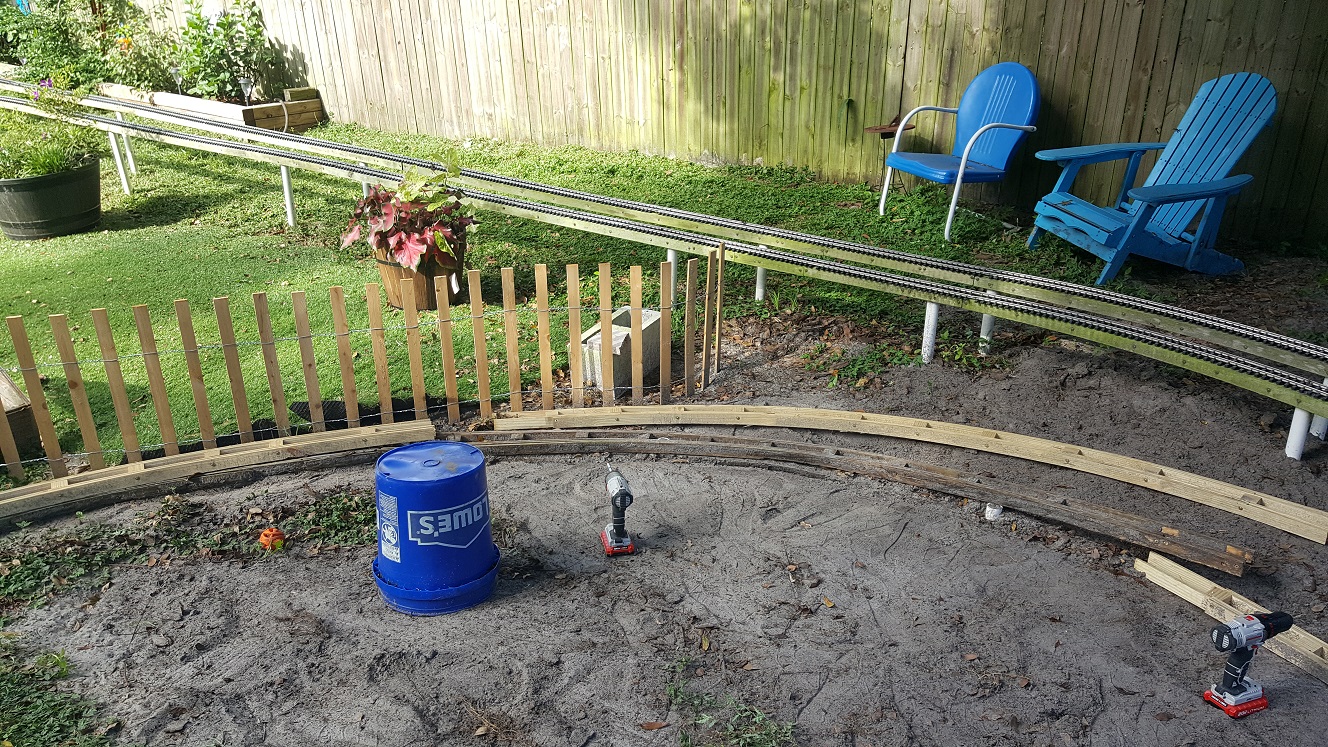
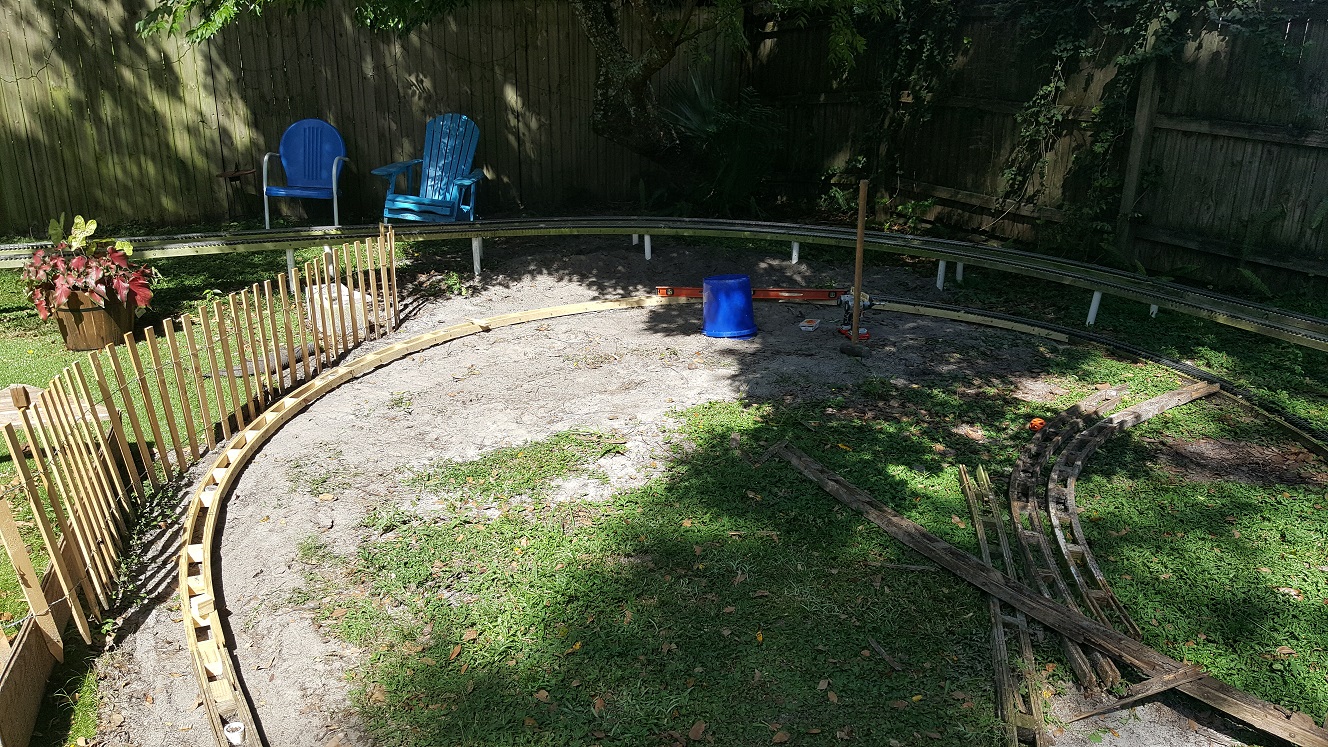
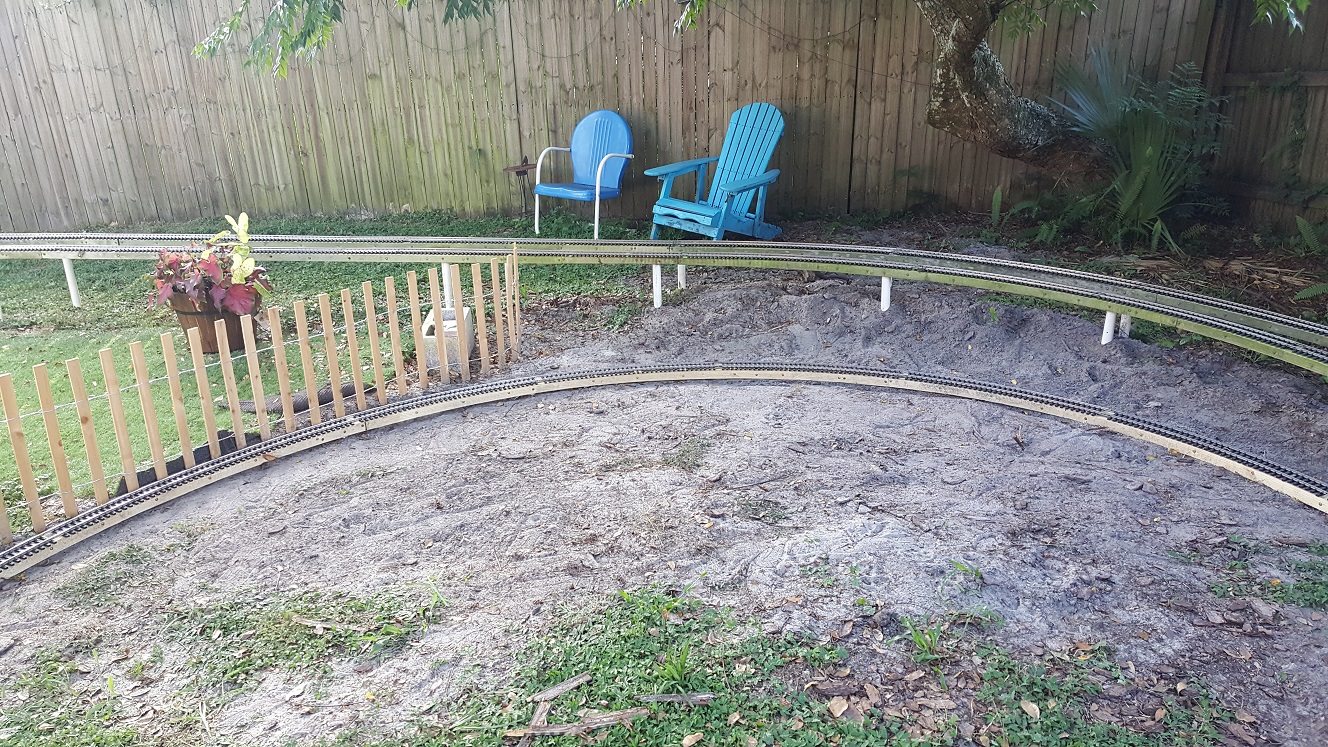
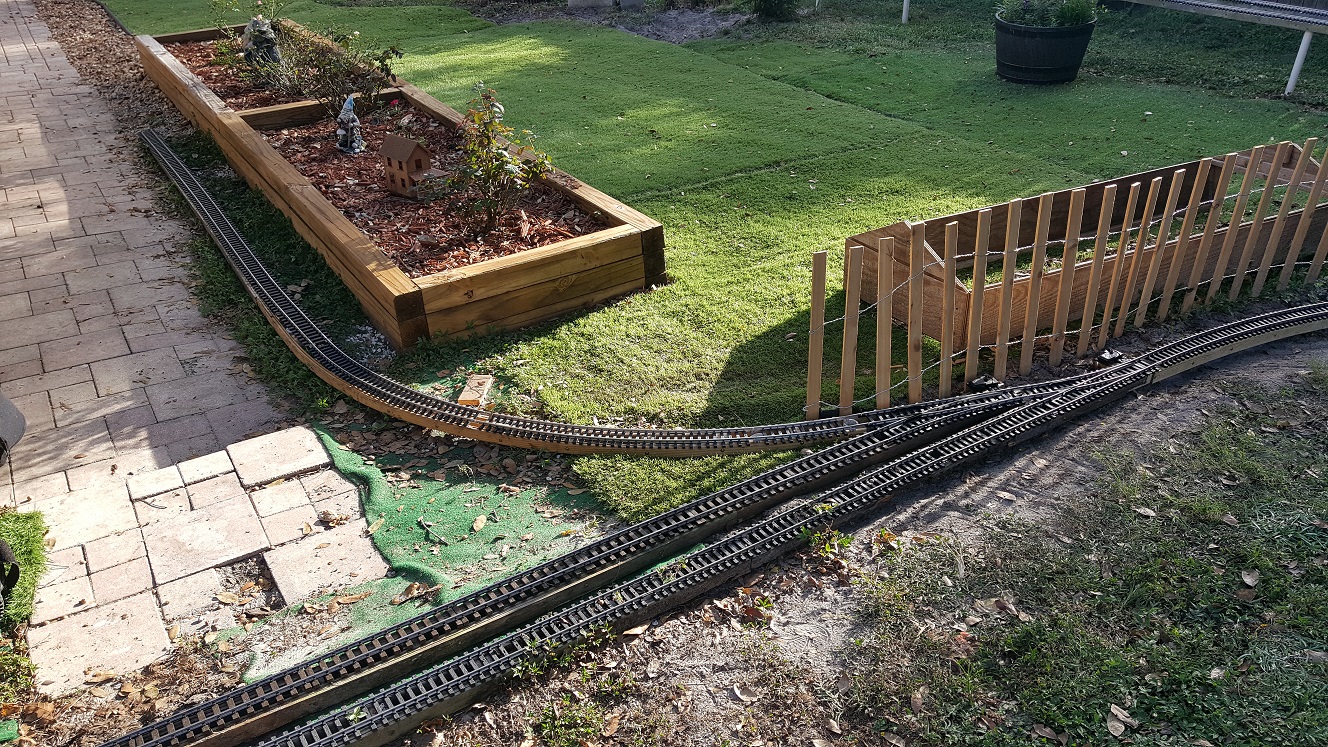
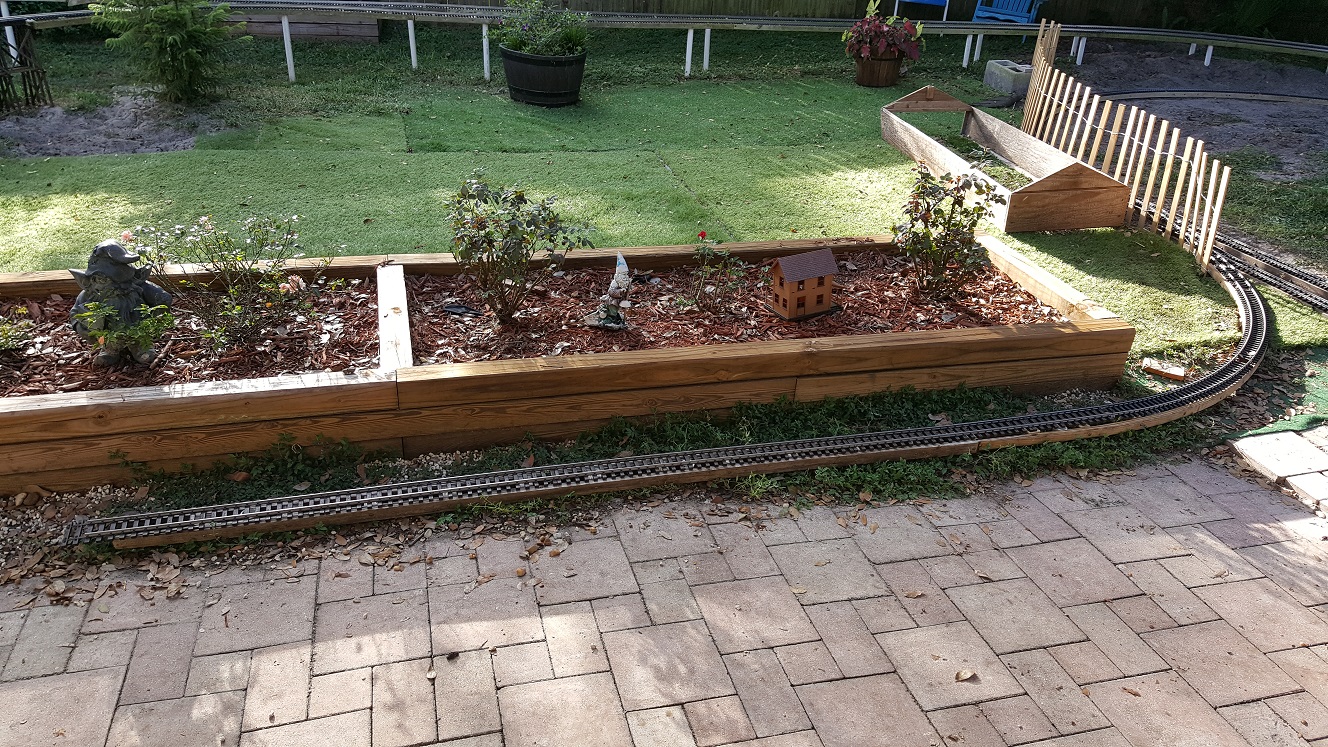
I've long wanted to "decorate" the 4x4s that frame the raised bed planter along the patio to make it look more like a train station, or other such massive building, that would be right at home on the railroad. When we first put it in, I left about a foot between it and the edge of the patio, for two reasons. First was so the 4x4s didn't sit at the low point of the drainage along the low edge of the patio slope. Second was to leave room for gravel and a siding to that station, once the 4x4s are properly decorated that is.
By placing a roof or similar type of structure to overhang the top edge of the 4x4s, and a platform along the side, it would give the appearance of a protected passenger platform. Shallow relief panels with doors and windows would further enhance the illusion of a passenger station platform. In the center, where 4x4s cross between the two long sides, a turret or other structure such as a clock tower would disguise the fact that it's just 4x4s, giving the illusion of one massive structure. The fact that roses are growing out of what would be the courtyard would be the only giveaway that it wasn't really a building, but a planter. That's the plan anyway. Here's a picture of what I'm talking about.
Sidetracked...
Now on to the the siding... Pun intended. And that's where everything grinds to a halt. Without more track, it's really not possible to add a siding to the station. So to that end, I begin yet another search for stainless steel track. The first hit the search returns is for H&R Trains over in Tampa, not eBay like it usually does. So I have a look. Great. I can get one foot long sections or ten foot long sections of straight track, nothing in between. They want over $13 for the one footer and $125 for the ten footers. And I used to complain about having to pay more than $10 a foot just a few years ago!
Then there's shipping. I know I can probably have a lot more of the one footers shipped for the same price as a ten footer, mainly because the shipping industry penalizes the oddball form factor, long and skinny, as well as the weight. But I don't want to have to put together a bunch of short pieces of track using those split-jaws clamps. Out of curiosity, I use the online comment form to submit a question as to how much shipping would be from there, Pinellas Park, FL to here, Mount Dora, FL.
The question comes back "how much were you looking to buy"? That's a good question. I reply somewhere between 50 and 100 feet. The reply comes back, $331. Ouch. I tell them it looks like I'll be better off filling up the truck and driving over there to fetch it. One good thing that came out of it was they quoted me a 15% discount off the price. They said it was currently on sale, but I didn't see anything about it on the site, so I'm wondering if it was to help offset the shipping cost so as not to lose the sale. The other issue is they are about to move to their new location. The only thing stopping them is waiting for a new roof to be put on at the new location.
I say they, but I've been corresponding with Sharisse, and she's been very helpful. Cheerful in fact. Very pleasant and understanding. I bet it's not often they, I mean she, gets to hear I'll just come by and pick it up. So I ask if she can fix me up an invoice with the discount and offer to pay with my credit card to hold the order if need be. She asks when I would be picking it up... Looks like Saturday I'll be travelling to Tampa. I call the next night, once I'm home from work, and pay for the order - all 100 feet of it, over $1100 of track. I had also followed a couple of eBay auctions for my favorite Aristocraft stainless steel track. I missed my chance to "buy it now" on a box of 4½' track. And for $6 a foot no less!
I bid the buy it now amount and was winning the auction for less than that, but it was over at 4:00 AM, and some guy "snipes" me by $3 at 1:00 AM. I was thinking I could still do the buy it now once someone had bid on it, since no one had bid on it until two days before the auction was over. I figured I'd just watch it and see if anyone else was interested, but that's not the way it works. I'm kicking myself for not just doing the buy it now when I first saw it and had the chance. At the time, there was also a box of 5' track, for not quite $10 a foot, including the $47 shipping. But it was from the same seller, and also over at 4:00 AM. I have no way of knowing, but it looks like the same guy that sniped me got that other box as well. Needless to say, not another single piece of stainless steel track of any kind has come up since then...
<< Previous | Garden Scale | Beginnings | New Beginnings | Third Incarnation | Additions | Station | Pond | Downtown | Expansion | Tower | Future | Next >>
Off To Get More Track...
(Saturday, 14 July 2018)
Saturday morning and I'm off on an adventure to pick up my track from H&R Trains over in Tampa. I fill the tank,
a little over $86 in gas, an head out for the highway. It's a bit of a trek, a little over two hours, but I finally
manage to make it there. I had looked at the map before I left and wondered if I would be able to turn in on the left,
or if I needed to turn off down a side street beforehand and make my way there from behind. The Waze app has me going
the back way, down 34th street, but I'm able to turn into the parking lot from there, not circle around like
it wanted me to. I walk in and the first thing I ask is do they have a bathroom, thinking about the "no, we just go out
back" answer to that stupid question, but I have a travel mug worth of coffee to get rid of.
Having taken care of business, I have a look around and browse the store. There is a large Lionel section, and a smaller garden scale section on one side of the store, and about an equal sized HO and N scale section on the other, with a little brio play area off the end for the kiddies. In the middle is the checkout desk and office area, with a maintenance and repair area for Lionel across from that. As I said, they're moving soon, so I'm glad I got to see it before it was gone. After moving past the checkout area for the third time, the lady behind the counter asks if I need any help. I let her know I need to pick up the track and she picks up the phone to call back to the office I'm assuming. Shortly after, I get to meet Sharisse, and she points out the rails laying on the floor along the wall on the HO side. She grabs some boxes of the tie strips and says I can pull around to the other side of the store to load the truck.
Ann had said to see if they had any figures or buildings, two things we'll need sooner than later if we're going to build the town. I found a mailbox and a mailman, along with some other things I'll need, but no buildings other than two that are not really what we're looking for. They're not really those kind of buildings, more of an infrastructure type and small. Too small. We need something on a grand scale, even if it's just a couple of two story houses. But why the mailman you may ask... Well, that's a long story, but suffice it to say that both Ann's father and mine worked at the post office, as did my grandfather. Even my grandmother worked there when my grandfather was away serving in the Navy during WWII. The short answer is the mailman and mailbox have special meaning for us.
All in all, I'm there less than half an hour, including loading the track in the truck and strapping a red bandana on what's left sticking out of the bed. I chat with Sharisse a bit about how she was over in our neck of the woods back in April to shoot pictures for a wedding with our new train, the Clinchfield "F" unit loaner engine, as the backdrop. She also tells me about a model railroad club over there that let's you bring your own garden scale equipment and run it on the layout. I ask if it's live steam, but she says the only place she knows that does that is the larger, ride on scale. We part with her asking if I want her to add my email to the club's mailing list and I say sure.
I get the feeling she wants to chat more, but I'm itching to get home and lay some track. Maybe she was just happy to have someone else to talk to other than the typical clueless or complaining customers. Dunno. I can't see things even when I'm looking right at them. I can say I wish I would have stayed and chatted a little longer though. Guess I'll have to go visit them at their new location sometime here in the near future. The drive home is just as long as it was getting there, with all the traffic snarls in all the same places, maybe even heavier as I'm getting near Kissimmee. Good thing I get off I-4 and head north on the 429 before it gets unbearable near Disney and the attractions.
Once home, I unload the 20 pieces of 10' long, .332 profile, stainless steel rails. I end up standing them up in the garage and bringing the rest of the treasure in the house. I bought an extra ten tie strips, thinking I could replace those tie strips from the 1' sections I had "borrowed" to repair and replace the aged and cracking ones on the 5' pieces I bought on eBay years ago. The individual 1' rails were still sitting in the box the originals came in, but that would have to wait. I have to finish the SketchUp models for the station. After all, now that I have track, I need a station. I came up with a design that looks like it will work and transfer sections of it to the raised bed drawing to see how it looks. From a certain angle, it looks like a metal roof over a... well, a missing passenger station platform and siding.
I can't wait to assemble a section of the new flexible track. It's not long before I grab a couple of rails from the garage and a couple of tie strips from one of the boxes and start to put one together. It really wants to flex on me, but once enough tie strips are holding it from twisting, it's easy to just slide another one right onto the rails. Now I have a 10' long piece of flex track sitting on the living room floor, and the dirty hands to prove it. I take the track outside and place it next to the long stretch of track near the planter where it will become the siding to the car barn. Pay no mind to that carbarn sitting in the yard next to the track, it's just there to protect (what's left of) the track for the "oops loop".
When I say protect I mean keep the puppy, all hundred pounds of him, from trampling and further damaging the curved track part of the loop. Ann and I have discussed adding buildings for the town that will soon live inside that loop. With all this new track, I could actually make it the parallel track plan back to the upper loop as I originally envisioned, but for now the least "disruptive" approach is to leave the oops loop in place and just cut in the switches and siding to the planter, er... station. I have the roof trusses "crudely" planned, but the design could use some refining, and I still need to get some measurements first. By now it's late and I'm bleary eyed from looking at the computer all evening. Tomorrow.


 July 2018
Track Planning...
(Sunday, 15 July 2018)
To finish the design for the station roof trusses, I have to know how high the siding will be off of the ground. Where
will it sit? Should I add the platform support to the truss support? Do I even need a platform? It's time to put the
computer away and do some "prototyping" with the new track. Now on to the new siding... Or "in the hole" in the vernacular.
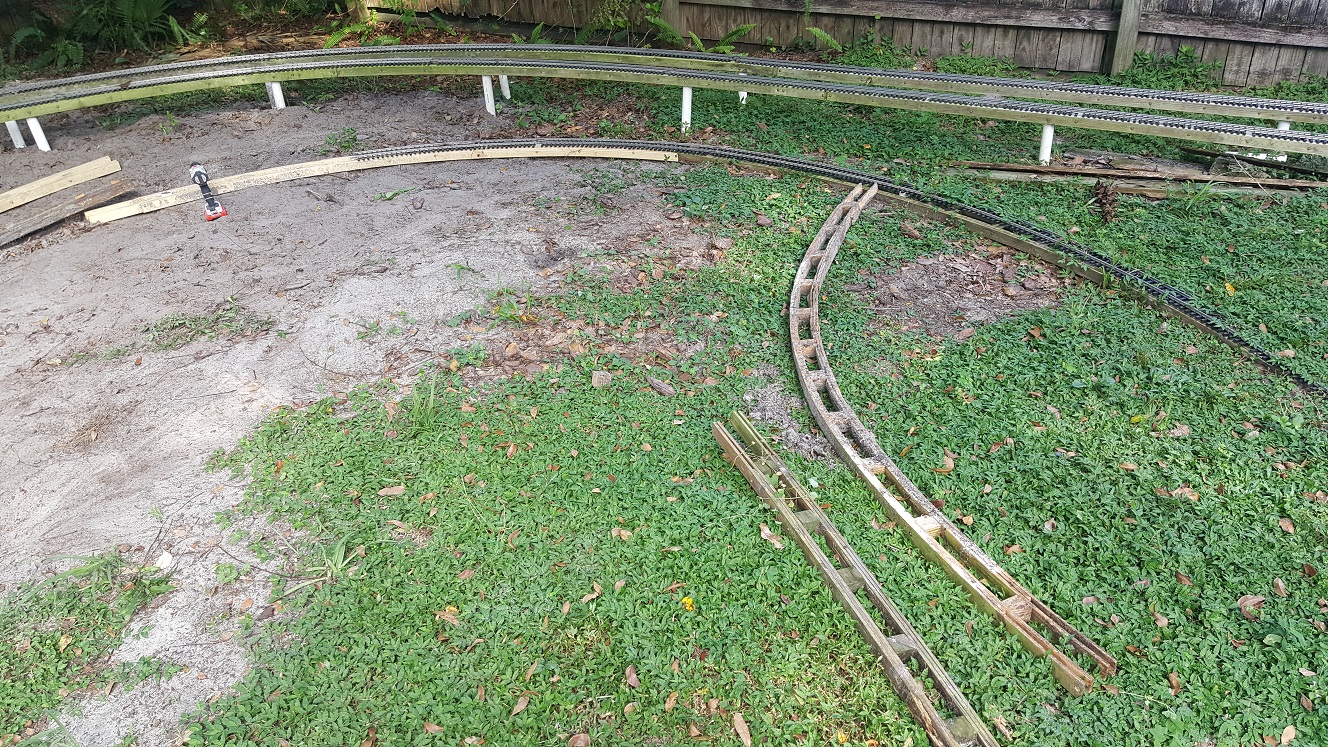
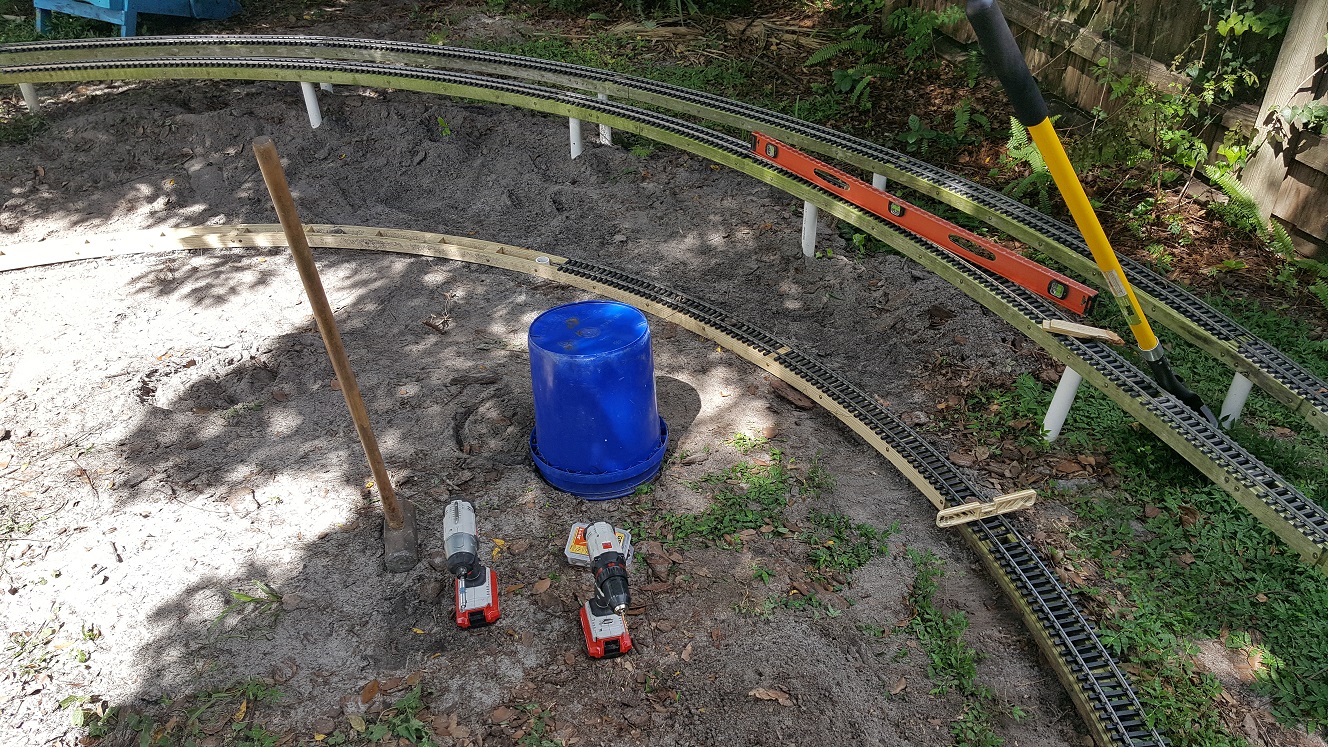
Just eyeballing where the siding goes, it looks like using a couple switches and some 10' diameter track, it should fit.
I'll need another 10' section of flex track for the station siding though. Back in the house, two more rails and
ten more tie strips later, I'm back outside with the new siding.
Next I grab a couple of switches and some 10' diameter curves and a chunk of 1' track. I'm not ready to cut in the track just yet, but I am able to lay the right hand switch where it will eventually sit, then a 1' section then a left hand switch to provide the siding to the car barn behind the garage. Now I'll need that 1⁄3 curved section and a couple more to get me over to the station siding. It all goes together and looks like it will fit fine. The only issue is the "rolling hills" effect getting there. Again, I have to know how high the siding will be off of the ground once it gets there. Knowing how high the mainline is would be a good start. Using the four foot level, I'm able to rough guess how high up on the raised bed planter the mainline comes to, in two steps anyway.
A couple of wood blocks later, to support the curves over the "bumpy" terrain, and it's time to see where the platform will be. I guess that another 4x4 lower will do, since the mainline's not quite at the middle of the planter's middle 4x4. I'll need to calculate how low that stretch of track will be and how much of a grade I'm looking at. History has shown that a grade of much more than 1% will be a problem, even with only a few coaches attached. For now, I'm just recording all the "crude" measurements on a paper tablet, with an even "cruder" drawing of the siding placement and mainline with respect to the planter. It's good enough for now, and holds the information I'll need to add this to the computer model.
(Saturday, 21 July 2018)
I brought in the switches, and other pieces of track for the siding to the station, to
lay them out on the 2' x 4' chunk of cabinet grade plywood leftover from doing temporary countertop duty in the kitchen.
It lets me try some different arrangements without all the hassle of sweating my butt off outside in this Florida summer heat.
Only today, it's the relentless Florida thunderstorms forcing us indoors. The only worry is the dogs getting into their "playful"
mode and tearing up the track. Well, they don't tear up the track, but Maya plops down on the plywood and moves it around enough
that I have to scold her... That's okay though, it's close enough to bed time for Ann and them that soon enough I'm left alone
to arrange track without their help.
(Sunday, 22 July 2018)
I've been busy with finishing up the hallway plaster over the last week or so. I did make progress on the station models in
the evenings though. First I added the layout I had to the model. It looked like it would fit outside. After much research
online on exactly what radius the track was, I was able to determine it would not fit. Most of what I found
online was six to nine years old on the mylargescale forums, so none of the links worked.
For this reason I try to archive an entire site, mainly because who knows whether it will be available years, or even months
from now? I say this because I joined a site with a newsletter when we first got into garden scale. It was $2 a month, and
I figured it wasn't going to break the bank. One month and two newsletters later and the entire site was defunct! Simply
folded. Gone for good, with nothing but a severely foreshortened archive in its place. Thankfully I didn't have to chase
down and cancel an automatic credit card payment. I was saddened by it though...
All I really wanted to know is what is the actual size of a piece of Aristocraft 10' diameter stainless steel track? Its nominal size is 10' diameter, but its actual size is a radius of 1500mm (59.055"), through the center of the track. Another one of those "why in the...?" things. Now that I had that, drawing it up showed another disparity, the curved route through the switch was not 20° as I first thought. That's twice I've made that mistake now. The first time was when I cut a 30° section of that track into a 1⁄3 piece and a 2⁄3 piece, only to find out that neither of those pieces correctly solved the problems I was trying to solve...
First was how to make those wide radius switches look like a section of 10' diameter track. Second was the "parallel" track adapter, or how to return to parallel with the tangent (straight) portion from the curved turnout section. Turns out it's 18°, not 20°. So now I have this 1⁄3 section with two little legs rail clamped to it to make it 12°, the two little legs I cut off the 2⁄3 section to make it 18°. I tried to figure it out using a calculator, then proved it using SketchUp. The 18° segments fit the actual measurements of the switch.
Anyway, now that I had what I needed, I found that the original plan I had laid out in the backyard was not going to work. While I had the switches laid out on the plywood, I noticed that the side the throw was on for the left hand switch would interfere, so I swapped it to the other side. That allowed me to move that switch to connect immediately to the right hand one, without the need for the 1' section in between. Removing the original and adding the new approach showed it would fit nicely.
(Friday, 27 July 2018)
I know
I need to get the template for making the stringers out of the shed and I get that much done, but when I see how badly destroyed
the existing curve of the oops loop is, I'm just a bit less motivated having to once again realign the track with the underlying
stringers. But now the rails are so badly bent and the tie strips so badly broken it just breaks my heart. I really need
to get that tavern done and block the dog's access to the track. For now I have the original car barn sitting there, but it isn't
enough to keep the recurring damage from happening.
(Sunday, 29 July 2018)
I finish putting the stringer together for the siding to the station and lay the track sections on it. Somehow it still
doesn't look like it will fit? I think part of the problem is the 10' diameter template may need more "pre stress" built into
it. That is to say I think these slats are getting close to their bending limit and they want to spring back into shape more
than the wider diameter curves do when removed from their templates. When I take out these 10' stringers, they immediately
"snap" to a wider diameter, whereas the 14' and 20' tend to hold their shapes fairly well, with much less springback.
If I were to make the template so that is was, say 9½' diameter instead of 10', would the stringer snap from the 9½' diameter to 10', instead of from 10' to wider than 10' like it is now? What I usually do to make up for that "spring" is to plant the posts at the proper diameter, then bend the stringer to shape when fitting it to the posts. I may have to do that this time as well, but these are going to be short, ground level posts this time and I'm not sure how far in the ground I'll have to plant them to keep everything in place.
Cutting In The Station Siding
(Saturday, 4 August 2018)
I'll need to remove a 2' section of track and replace it with the right hand switch and a chunk to fill the remaining not quite 6" section to the start of the oops loop curved track. I'll probably replace the damaged sections of curved track too, but I'm thinking I may just try to fix the tie strips for now, until I have something to keep the dogs from destroying the new track as well. Next I place the left hand switch and the 10' stretch of flex track for the siding to the car barn. Now I can place and bend the 10' flex track for the station siding. While I have the track bender out, I need to remember to try to straighten out the 3' section that got bent when the huge branch fell on it thanks to hurricane Irma. I also need to remember to use the insulated track joiners and run separate feeders to the sidings in the proper places.
That takes me back to needing to come up with a plan for the "control tower", my closer to 1:1 scale interlocking tower to house my power packs and other controls. The idea is to have a central point for all the wiring and controls to come together at. I still need to figure out how all of this will connect. I'll definitely want to install a dedicated in use feed on the back corner of the garage for the electrical power I'll need. But for now, I'll just be happy to have that siding to the station installed. I'll be even happier when I can run trains again! So why can't you run trains? I thought you said you could run trains again?
I could... Until today. I decided I wanted to try to cut in the new switches and station siding today. But like everything else, and especially when it comes to doing railroad, something else has to happen first. At least in this case, it's more railroading stuff. When I sit down on my bucket to remove the track joiners, I see that the 2' staight section and most of those curved sections leading up to it have been damaged, badly damaged. Upon closer inspection, there does not appear to be a single tie holding the entire semi-circle of track to the stringers left intact. That's right, those ties are still screwed down to the stringers, but they are no longer connected to the track. They've been torn free of the rails!
Nearly the entire loop of track is just "floating" on top of the stringers. So here's the "short" version of how that happened: One hundred pound german shepherd "puppy" playing ball in the back yard... We have this "toy" Ann found called a "ChuckIt". It's a plastic "thrower" arm and a rubber ball, about the size of a tennis ball. The thrower has handle at one end and a molded cup at the other that kind of "snaps" over the ball, enough to hold it and let you pick it up, then "chuck it" for the dog. Pretty simple, and it's more wrist snap than throwing arm, so as long as the dog keeps bringing the ball back you can "chuck it" over and over again without your throwing arm getting tired.
So every time our pup chased the ball and planted to stop at tracks, so to speak, he would throw a little more dirt over the tracks and push a little bit more of a mound up in front of them (or hollow out a bit more of a spot behind them). Over time, he slowly broke every one of those ties loose and pushed the rails out of their "chairs", as they are sometimes called. He even managed to somehwat straighten the 20' diameter curved sections! And I thought swinging that 8# sledge hammer was a lot of force... Needless to say, before I can do anything else, I'll need to take that track up and repair the tie strips and re-set the stringers.
So is there anything else I can do before I start that, like set the stringers for the new siding in place while I'm at it? Not really, but I notice that even one of the 10' diameter curves I just had sitting on the new stringer for the siding also has the tie strips ripped away from the rails and needs fixed too! Well, it's obvious I have some track to fix before I can figure out where that new switch is going to sit. It's getting to be the time of day where the sun is shining directly on the section of yard that I'm working in, so time to move indoors in the air conditioning until the sun moves more to the west and shades my work area again. As I'm collecting up all those track sections, I realize the straight one isn't 2', but rather 3' long. No wonder it didn't look like the siding would fit when I tried to lay it out!
A Maintenance Delay...
Once inside, it's a slow process of removing the rail joiners, and tiny screw holding it in place. Then flip the track over and remove the tiny screws holding the tie sections to the rails and slide them off. Then wash the dirt out of the tie strip and let it dry while repeating on the next tie strip section. I could only remove two tie strip sections at most, leaving enough to hold the rails together while I slid the cleaned tie strips back over the rails and through the chairs properly. Then put all the screws back in and flip it around and repeat. Then repeat for every track section. It's a long, slow, laborious process. A process that placing the track on stringers to begin with was supposed to help avoid. It didn't...
So now that the sun has moved my work area back into the shade, I look at trying to shovel out all the dirt in and around the stringers. I move some of the dirt, but it's not until then that I reailze the rest of the curved track in that loop isn't screwed down to anything anymore either and more pieces need repaired. Back to sitting on the bucket and removing the rail joiners, adding three more 14' diameter curved sections to the repair pile. Meanhile, the pup is bringing me the ball and I'm throwing it toward the house, just to give me a few more seconds digging out the dirt from the stringers. As I'm digging, I'm seeing that having the dirt pretty much covering the stringers has prematurely rotted them.
When I originally installed the stringers, I left them ever so slightly raised off the ground, with the 1¼" PVC posts holding the stringers just above the dirt, since the 2x4s I started with were not rated for ground contact. The idea was to ballast them with stones to allow for drainage and keep them from rotting. Never happened. Then the puppy essentially buried them in dirt. In any case, I'm seeing that they're cracking and flexing way too much to use reliably and will (eventually) need replaced. This whole loop was a means to an end anyway. An afterthought if you will. Looks like it's time to give it more thought... I'm thinking for now, just get the dirt moved and go from there. I grab the sledge hammer and "bop" the posts a bit lower all around. As I'm setting the stringer lower, mainly by stepping on the posts, I'm listening to them crack and watching them crumble right under my feet.
Now that I'm back to the straight section, it needs dug out too. It's the hottest part of the day now and time to head back inside with the track that needs fixed and get that done. This time, I wash the dirt off the track first, then take things apart and refit the tie strips. I have stacks of "like new" track sitting on Ann's chair. I say like new because some of the ties on these tie strips look like they've been run over by a bus, and not a greyhound... A german shepherd! They will still work fine, and you'll never see them once they're ballasted, even if you're looking. It just further underscores the need for buildings or other traffic blocks in front of and around the track to protect it from heavy "puppy" traffic.
That's about it for the railroad for today though. I opened up the SketchUp files for the station and 10' diameter template with the idea of laying out the stringers for the siding, but that's as far as I get with that. It seems like these drawings are a lot easier if I break them up into a one per piece, then add all the pieces together once they're done in the final mockup. I think there's a way to replace the old model with the new one if a piece gets updated, but I always end up having to look it up since it doesn't happen all that often.
(Saturday, 15 September 2018 or Sunday, 16 September 2018 or was it labor day?)
Ann and I headed to Lowe's early this morning, I think it was Saturday. I wanted to get some ground contact rated
pressure treated 2x4s to rip into slats for the replacement stringers and she wanted to get something else, I forget
now. I also grabbed a couple more boxes of deck screws for putting the stringers together, a nice piece of clear pine
1x4 to transform into the bathroom threshold, and more 1¼" PVC pipe for posts. Unfortunately, they didn't have
any ground contact rated 2x4s. I could have gotten the 2x10 in ground rated, but I already have a hard enough time
with the weight of the 2x4 at the end of the rip cut without an outfeed table.
I got the hallway hatch finished, and the extra piece of ¾" x 2' x 4' furniture grade plywood needed to go out to the garage, which gave me an idea... If I clamp it to the underside of the bench top, then clamp an "outrigger" leg to it, will that be good enough to serve as an outfeed table? One way to find out! Sure enough, it's low enough the end of the 2x4 doesn't catch on it, yet tall enough to support the 2x4 near the end of travel. An added bonus is the edge of the bench acts as a stop to keep the 2x4 from falling off the back of the saw table. The only thing I don't like is I still have to make sure the carriage door is open to have enough room to start the 2x4 against the fence and into the saw blade at the start of cutting. Maybe someday I'll come up with a way to raise the saw above the bench tops so I won't need to do that. The A/C in the garage already works hard enough just to keep it cool without having the doors open.
I start by ripping the edge of a 2x4 square, then flip it over and rip it to 1-5⁄8" wide, the width the spacer blocks need to be when assembling to stringers. Pretty much the outside diameter of the 1-¼" PVC posts. This 2x4 just happens to be wide enough to get another one that wide out of it, so another pass through and I have enough stock to fill the "spacer bin" more than once. But first, I'll need a whole bunch more slats... More than the none that I have now. Next 2x4 gets squared off then ripped into as many ¼" wide slats as possible. repeat for the next two and I now have probably just enough to finish those stringers. I got the economy ones this time, meaning more knots, but only lose about five or six slats to breakage. It's already getting too hot to do more in the garage, so time for a break.
I manage to get one of the 20' diameter stringers together. This time, like all times past, I have to mark where to cut off the longer slats so that they all line up at the 8" offset. Different than all times past, I write down the measurements to remove per slat position, so that next time, All I'll need to do is chopsaw them to length and assemble. Having to mark and remove and cut and reassemble once or twice isn't really that much more time, but across all the stringers I've made so far, it's a substantial time savings. Anyway, with that one done, I shift my attention to the 14' diameter version, again noting the lengths to remove before assembling in the jig. I'm glad I did, because it looks like I'll need another one this size...
I didn't think the remaining curved track of the loop was damaged, but when I set the first 14' diameter stringer in place, I notice the entire string of track is just lying on the ground, with even some of the straight sections ripped free of the ties still screwed to the old stringers. I have just enough slats to put together one more of the 14' stringers. That's as far as I can get, opting not to replace them as hot as it is out here. I look at what needs done for the station siding, but realize until I get the new stringers and the repaired track installed, I won't know where to place the turnout. It will have to wait.
 September 2018
I've been workin' on the railroad...
(Saturday, 22 September 2018)
We get started early this morning. I'm outside in the backyard before 8:30. It's going to take some doing to get all
of these rotted stringers replaced, and the sooner I get started, the better off I'll be. It's already hot and humid,
but much less so than it will be a few hours from now. I already finished putting together the new stringers just placed
them on top of the rotted ones they'd be replacing, all three of them. I start with the first 14' stringer of the loop
past the 20' diameter stringer, still in place with the track falling off of it, so I can get the track off the ground
sooner than later. Seems like a good idea at the time... First I put the first coat of finish on the bathroom threshold.
I'll check back on that later.
First I have to get the extra dirt out of the way, filling in the hole where Ann had taken out the pony tail palm we thought got frozen out last winter. It survived, both the freeze and the transplant, but left a hole that Brigel likes to dig in. Well, there's not much of a hole left now! I have to take out what's left of the roots I thought I had already removed. After that, the first stringer goes in quickly. Of course, dislodging that root and tossing it immediately triggers Brigel's "Root Radar" and he's on the scene. He finds the huge root I dug out a month ago just now, sitting by the hole I've just filled in with dirt. And of course, he's doing what any dog with "Root Radar" would do with a root in the dirt, drag it through the dirt and dig it up!
I give him a stern warning to stop digging and he just looks at me with those puppy dog eyes, then lays down in the dirt. "Good boy!" I tell him. Not long after, he's ready to play ball again. So back to throw the ball, get another screw in, throw the ball, drill another hole, throw the ball... You get the picture. Eventually he lays down on the back porch step with the ball and rests for a bit. It's hot for him too. The next stringer takes more digging, but goes in easily, after lining up the splines with the previous stringer that is. Once those splines are drilled and screwed together, I bend the stringer to fit over the posts and drop it in place. That leaves the last 20' section to replace.
This last one is a bit more complicated because of the "mini picket fence" Ann installed to keep the puppy from just plowing over the track. I need to move the last section of it out of the way so I can match the splines and connect them together, after I move more dirt out of the way. As I bend it around to match the posts, I hear a loud "crack" from the previous stringer. Careful inspection reveals nothing? Shrugs... I would have expected that from the old straight stringer I'm about to join with this new one. The old one is fragile and needs a delicate touch to keep from doing any more damage to it. It will be good enough for now, but eventually at least a short section of it will need replaced as well. I end up having to snip the ends of the new 20' section to get it to fit together nicely, but eventually it does and I screw everything together.
By now the shade has moved away and I'm working in the sun. Maybe I should have started at this end and worked my way around to what would still be the shady spot? Oh well, time to check the grade... I quickly check it with the level and a couple of those scrap ¼" slats that broke at the knots as a spacer. A half an inch over the 48 inches the level is long is roughly a 1% grade, the ruling grade on this railroad, at least for now. Alright, it's really 1 in 96, not 1 in 100, but close enough. The stretch from where the new turnout will be installed to most of the way through the 20' diameter curves is level, just starting uphill near the start of the 14' diameter curves. It then goes uphill at 1% until it reaches the 20' diameter curves at the other end, where it levels out then starts downhill again.
There was only one place where I had to dig down a little more to achieve that constant 1% uphill grade, but now it's good. I usually run the trains in the downhill direction on that loop, but with the new station siding, the trains would have to back out onto the main and push back uphill along that section before throwing the switch to normal and proceeding in the forward direction again. Well, assuming the track gets put back down and the new siding gets installed, which it does. After cooling off a bit, I grab a handfull of the track that I fixed the tie strips on and head back out to install it. For today, I just lay the track on the stringers and slide the rail joiners together later, after the sun has moved the work zone back into the shade. Tomorrow is another day. I did manage to get the final coats of finish on the threshold, sanding between coats of course!
(Sunday, 23 September 2018)
We get another early start this morning. Before I get started connecting the track together, I check on the bathroom
threshold. It's ready to go so I take it inside and put it in place. That will do nicely! Next is installing those
damned tiny screws that Arisocraft track uses to attach their rail joiners. Most of them go right back in, but a few
are stubborn, usually because the hole in the end of the rail is out of place just enough that the opening in
the joiner still interferes with the threading the screw into the rail. Thankfully it's just the one place, and the
remaining connections will use the "split-jaw" clamps. The new flex track sidings will use the insulated rail joiners
so that trains can park on the siding with the block de-energized so they aren't powered. This isn't a problem with
DCC, but I'm still using strictly DC "through the rails" power.
That 3' section of track, the one I thought was a 2' section, has been replaced with the new turnout and another piece to make up the entire length. I lucked out with an old section of track I had cut for the original pike over at the old house... It ended up being just the right length! It had the old stainless steel "plate and screw" rail joiners still attached to it, the ones I decided to try since they were cheaper than the SplitJaw ones. Yeah, much cheaper! So cheap that even after chasing the threads in the plate, and applying anti-sieze to the screw threads, they still galled and siezed...
Once that happens, the joiner is pretty much scrap since any further attempts to free the screw will result in snapping it off in the plate. Add to that the fact that the quality control on the placement of the holes in the plate was pretty much non existent. It looks as if someone used a hand drill to make them, without even using a center punch to align the drill bit, let alone use a guide for the drill bit! And I already said that I needed to chase the threads with a tap, so they probably didn't tap them straight to begin with. Anyway, I learned my lesson the hard way at the other house and have bought the SplitJaw clamps ever since.
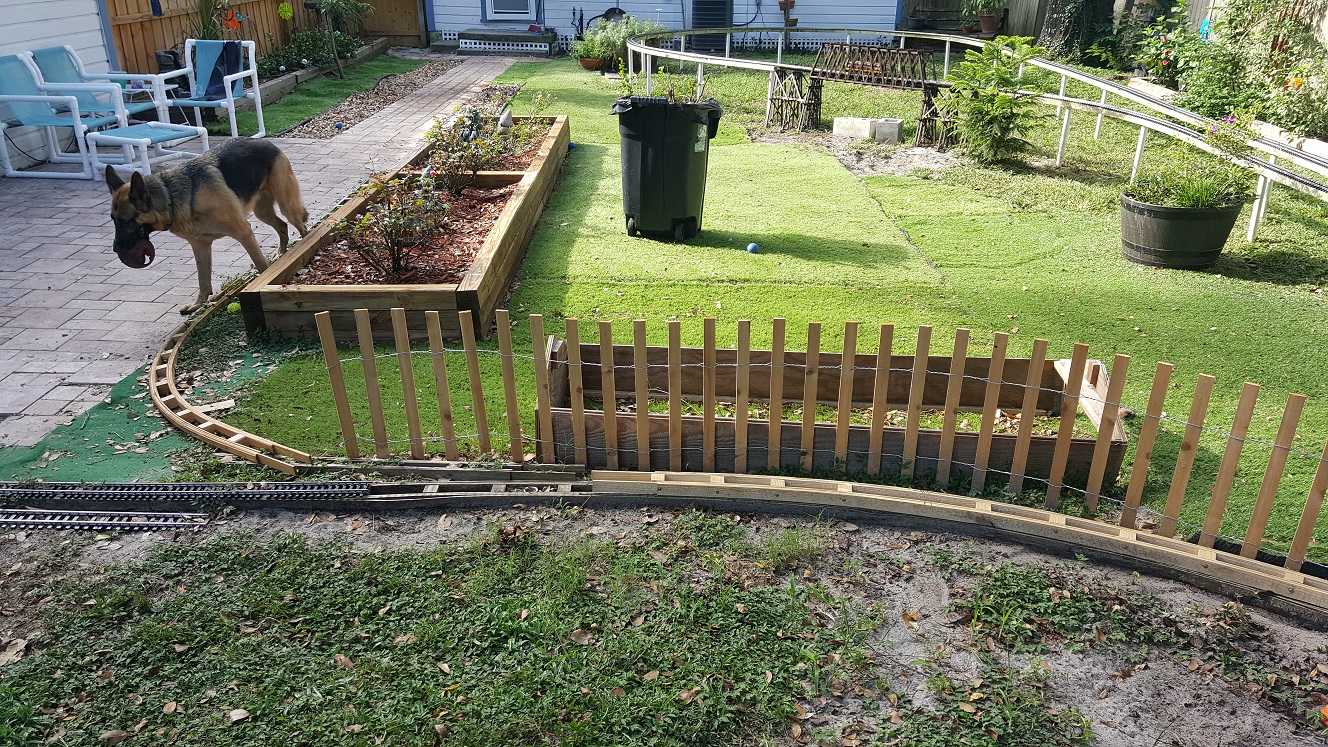
With the new turnout in place, I add another turnout from the first to connect the two sidings I'm after, one leads to the "station" and the other leads to the "car barn". The station is really just the raised beds along the long edge of the patio. The car barn is another leftover from the other house and an ill conceived attempt at storing the train cars and engines outside. It was a good start, but it ended up not being tall enough, having to sit up on a raised foundation of sorts for the engine smokestack to clear. It's just a couple of leftover pieces of wood siding fastened together, with a scored and folded piece of cardstock sheathing for a roof. Just the wood part of it is sitting out in the elements, the roof needing a more weather resistant approach.
That weather resistant apporach was originally going to be all the aluminum cans that I cut into pieces, annealed, then "crimped" to appear as corrugated metal panels. Never really went ahead with making the roof, for a number of reasons. First, the cardstock would not hold up to the elements for long, even with an actual metal roof attached. Second, the car barn is just a couple of thick pieces of wood siding, way out of scale, and with no windows... Not the best choice for what we're trying to model. Besides, I wanted a clerestory, lined with windows along the top. For now, it acts as a good block to keep the dog from destroying things more, but that's about it. I guess I could adapt it to become the start of the Village Inn, but it would still need windows and a roof. I think if I put a "roof" on anything, it will be the station platform, since we now have a station siding!
With the turnouts in place and a couple pieces of 10' diameter track as a guide, I can see the stringer I made for the curved portion has "sprung" outward quite a bit and I'll need to drive in some posts to help "coerce" it back into shape. I have one piece of PVC left that's already cut to size for a post and use it to anchor one end of the curved stringer. As I try to bend it into shape, all I end up doing is rotating the other end around it, knocking eveything I've already carefully aligned out of whack. I guess I should have known that would happen. As I'm ready to head outside the fence to grab a piece of the new PVC pipe I bought that's sitting along the driveway since I bought it, I notice I already have a piece of pipe laying behind the garage...
Cool. That will save me a trip. I mark and cut it, but as I'm cutting it, I realize it's the thin walled stuff and there's a reason why it's sitting there behind the garage. Oh well, it will be good enough to keep the curved stringer from rotating around the first post, but now I'll have to grab a new piece of PVC pipe to finish this up. I mark and cut another 8" post, then place it and the stringer in position, then drive it home with the sledge hammer. There. That much is done. Now to attach the straight stringer section and get the posts for it installed too. So far though, it looks like a good fit and just about where I wanted it. The only thing I'm not liking so far is the fit of the partial 10' diameter piece. It already looks like a Frankenstein monster, but still needs something to make it right.
Looks like I'll need to add about a 6" section of straight track between the turnout and the curve of the station siding. That will have to wait until I finish installing the stringers though. I connect the splines of the last straight section to the curved section, drill and screw them together. Next I cut three more posts and place one where it completes the curve and anchors the straight leg along the "station platform". I measure the distance from the side of the planter to the post and place the next one about the middle of the stringer and drive it in too. It goes in kind of crooked, but it's good enough for now. I measure and drive in the last post at the end of the stringer. I was worried the plastic patio edging "keepers" would be in the way of driving the posts in. Maybe it was why that center one went a bit crooked, but that's the only trouble I have driving those posts.
I reattach the long section of flextrack but it still looks wrong. I grab a piece of the 1' section rail, find the middle, and cut it in half with a hacksaw. More like I score it, then snap it in half, then file it smooth, but you get the idea. Armed with the two pieces of rail, I swap them for the stubby ones on the switch adapter track, and voila! The fit is perfect. The curves line up and so does the long, straight section of flextrack. All that remains now is to level the siding stringers and attach the track to them. I start at the top of the curved section with the level. I "shim" it up with a chunk of 2x4 and it's just about a perfect 1% downhill slope toward the station. I leave the 2x4 in place while I adjust the height of the post, then screw them together.
The next section requires nearly 2-½" inches to maintain the 1% grade, and the height of that post needs adjusted as well. I finally have to weed the stones along the station siding. I end up with a big pile of green that I've watched take over, slowly but surely, all summer long. I pour a handful of stones into the center of the post that needs raised and pack them down using a long screwdriver until the post no longer sinks back down into the hole. This section needs to be level, so I raise the stringer to where it needs to be and screw it into the post. Rinse and repeat for the remaining posts and weeds and that's done. The last part is the car barn siding that runs parallel to the existing mainline, but I'll have to reuse the decrepit stringer I found... Over by the start of the bad section of the loop that had been sitting out in the weather for years.
I start screwing all the track back by removing all the weeds along the stretch in front of the shed, by hand at first, then switching to swinging a flat prybar between the stringer and the ground. The curved end acts like a miniature hoe and the flat end easily gets the dirt out from under the stringers. Once that's done, it looks like that section is sinking in the middle. A quick check with the level shows I'm right. It's down at least 4", but a nearby brick serves as a handy shim to raise the track back to level again, with a slight uphill grade entering those first 20' diameter curves of the loop. I start to drive in new brass screws along that section, where the ties have been ripped from the track, but are still connected to the stringers. I decide to use more screws than last time, so we'll see how that works out in the long run.
I quickly work my way around to the sidings, and even though the car barn stringer isn't connected to any posts, I screw the flex track to it just to keep the dogs from knocking it loose. We'll see how that goes short term too, with the intention of adding more turnouts and single ended sidings and a real car barn in the near future. For now, everything is back together and the new sidings are installed and usable. Now if I could just get my super detailing done on the flea market find locomotives, I can actually run trains again! Well, if I wire those blocks up I can... Guess a control tower is in the near future too.


Before all of that though, I think we need a station for that new siding...
<< Previous | Garden Scale | Beginnings | New Beginnings | Third Incarnation | Additions | Station | Pond | Downtown | Expansion | Tower | Future | Next >>