<< Previous | Garden Scale | Beginnings | New Beginnings | Third Incarnation | Additions | Station | Pond | Downtown | Expansion | Tower | Future | Next >>
Adding A Station To Our Barkyard Railroad Empire
We're having too much fun with this...
Our latest garden scale additions have been to our new old house - a two bedroom, one bath bungalow in Mount Dora. It was built circa 1925, at least, we're pretty sure it was. The records say it was built in 1925, but there was this fire, a fire that destroyed all of the records previous to 1925. But I digress...
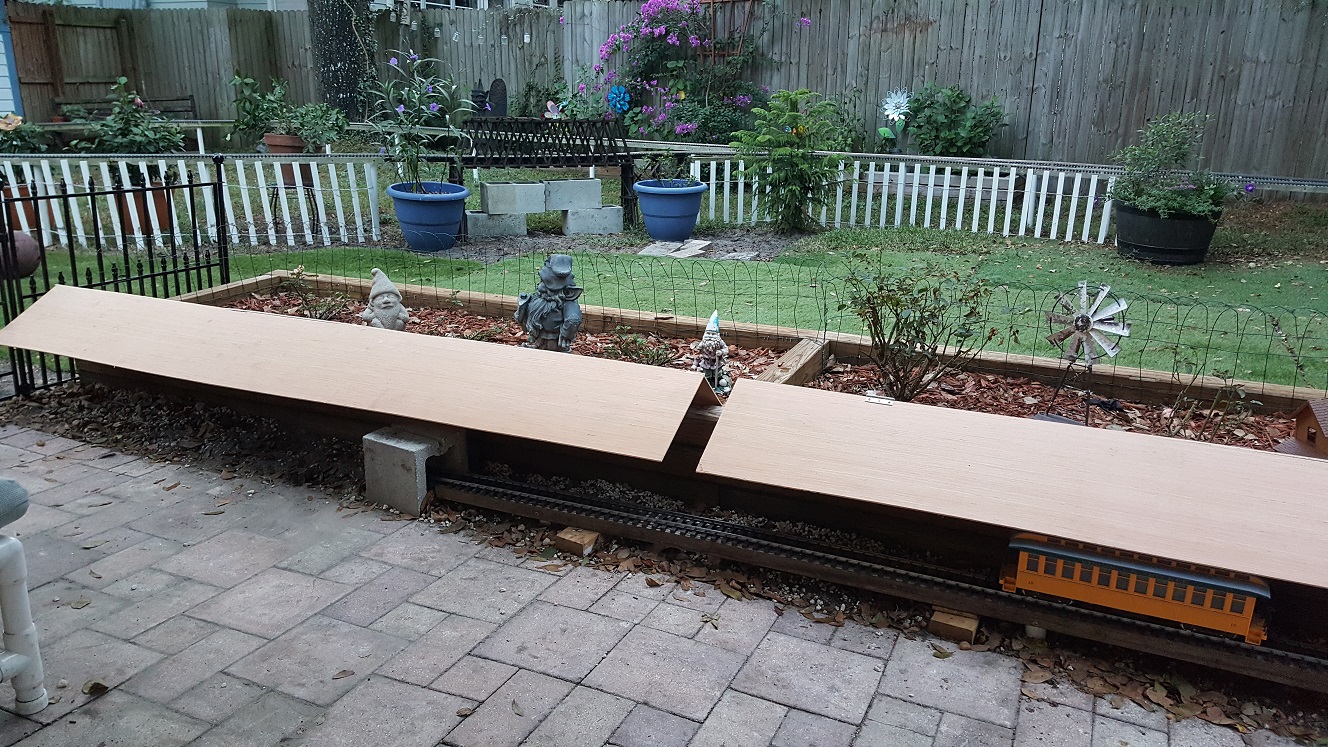
If you've been following along, you know we've been busy restoring the lower loop section damaged by the dogs and adding a "station siding". While it's enjoyable to just sit and watch the train go round and round, it would be even more enjoyable to have a station stop to break up the monotony, and a station to go with that siding. That, and a way to park the cars outside in the "car barn", so as not to have to put everything away everytime we run trains. At least, that's the idea. Having to repair most of the lower loop, a part of the layout that had already been finished, cost us the month of September in constant effort on the weekends.
Both loops were supposed to be one on top of the other at the near end of the yard, with the lines crossing each other, at grade, on the far end where they would loop back around. But I ran out of track! So we have just the "dogbone" arrangement for our current incarnation, not the folded dogbone I had planned. That lasted for a while, in the middle of rennovating our kitchen, until I finally bought another hundred feet of track that is. But we wouldn't even be talking about this had I not bought the track...
Now I have the track, but we've already made the area between the loops a place for the dogs to play. We don't want to tear that all back up or make it any smaller, but we had to do something about the constant pounding the track was subjected to, being destroyed in the process. The dirt was getting mounded up around the track too, causing the stringers to rot. They were never meant to be in contact with the ground, but rather raised just off the ground by the supporting PVC posts, then ballasted with gravel. The ballast was still sitting in the bags I bought for, and brought from the other house... That gravel was added along the planter to help control the dirt, but soon became a haven for weeds to grow in. That is, until I installed the station siding.
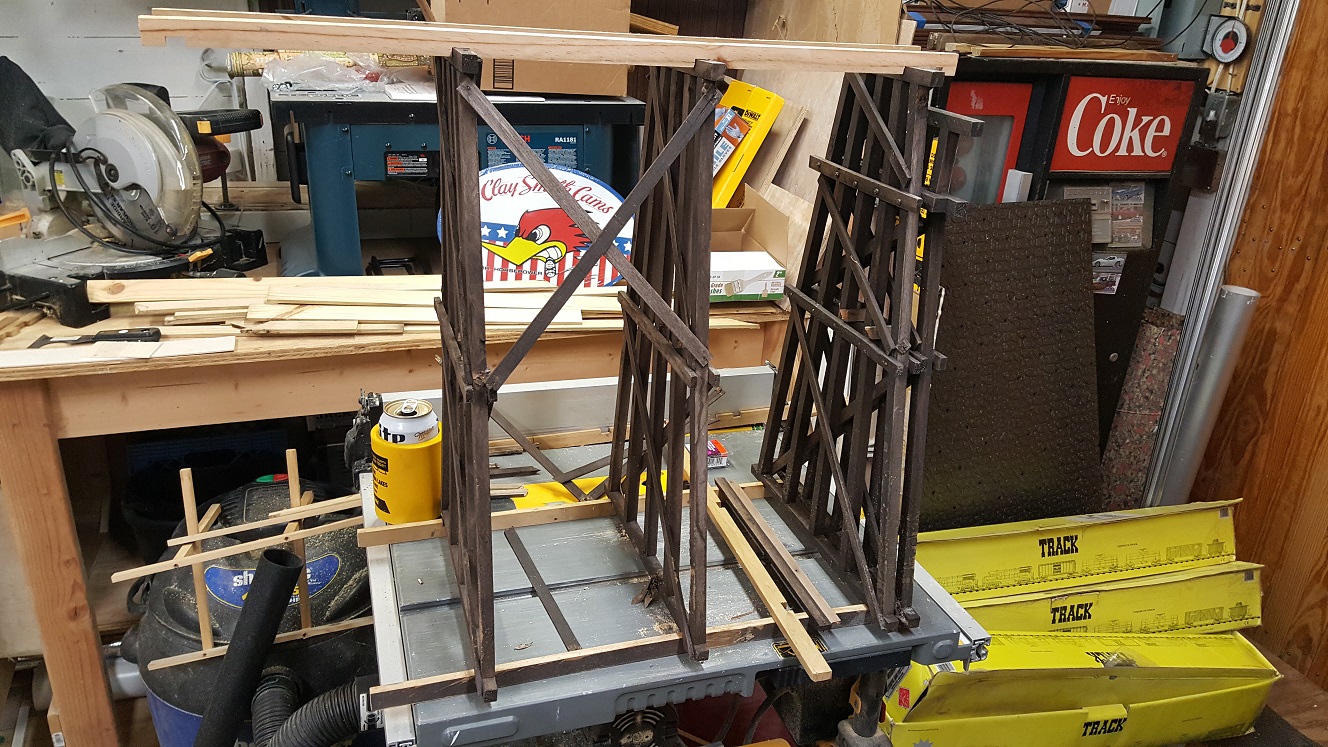
I've been researching plans online for the proper architecture. I had already started a SketchUp model of the 4x4 planter, as well as a very basic roof truss. I was looking for a "fancy" style support or truss, like the "gingerbread" you see in a lot of old architecture. I found a few examples with, and quite a few without, and all of them using the "cantilever" principle. That is to say the support extends 2⁄3 of the way out, with the remaining 1⁄3 of the load "cantilevered" over the support point. So far I've modified the roof truss model to use that approach, without worrying about all the fancy "gingerbread" just yet.
I'll probably build a(nother) template to help assemble the roof trusses. At first I was thinking about using some of the simulated corrigated roofing panels I've been making from annealed aluminum cans and a heavy duty "crimper", but I didn't see a single station that used that sort of roofing. Maybe because it looks cheap, or maybe because on the prototype, long term maintenance associated with that type of roofing is more expensive than the alternatives? So now I'm thinking I have all these copper sheets I got from Skycraft, back when Courtney thought she needed them, and that would really add to the illusion of "grandeur" of the station.
With my plans expanded so that I could begin to show Ann what I'm talking about, it's time to start laying down the groundwork for a siding to the soon to be station. I came up with a way to make the roof on one side of the support a 1:1 slope, and the other side that extends over the "platform" a 1:2 slope, I think they call it 1:2 and 1:4 pitch? Each support will be an 11" long piece of ½"x½" material, also used in the trestle bents, notched to fit together at right angles to give a 3½" long section on one side and a 7" long section on the other. Here's a picture of what I'm talking about.
I plan to put together a 12" long section of supports and trusses, repeating the supports every 6". The supports connect together through a set of truss support beams on either side along with a ridge beam along the top. The truss members (rafters) will be made of ¼"x½" material, also used as sills for the trestle bents, perhaps smaller. The beams will be the same ½"x½" material, again, perhaps smaller. The ridge beam will be the 3⁄8"x¾" material also used for trestle stringer members. I would say perhaps smaller, but for all the material I already have cut for building trestles and such, it makes sense to use those and not have to rip a bunch more stock of slightly different sizes, only to have to classify and store them separately...
(Sunday, 30 September 2018)
About all I got done yesterday was organizing in the garage. It was starting to get hot in the garage early in the afternoon, and I was really starting to sweat. Time to head inside. The rest of the day is pretty much inside the house. So already this morning I've retrieved the outside timer for Ann since she put up the Halloween decorations yesterday while I was busy in the garage. While it's just cool enough to sit outside and enjoy a cup of coffee on the patio together, it's already 80°, but feels like 85° out there and it's only 9:30 AM! I need to finish up and get going on whatever I'm doing outside before it's 95°, and feels like 110°!
So today is more of the same, except for beneath the benches, cleaning out and reorganizing the shelves. I'm able to consolidate a lot of the garden scale stuff in the back corner, where the templates sit above it on the bench top. The idea is to free up the storage space where the (now empty) boxes of track are. There are still some boxes with track in them, but at least five other boxes are now empty. That should make room for the plumbing toolboxes, now "trapped" behind the shop vac and table saw, making for much easier access. By the time I get to that point, around 1:30 PM, the garage is already 82°. Even sitting on the floor, I'm sweating, and it's time for a break!
<< Previous | Garden Scale | Beginnings | New Beginnings | Third Incarnation | Additions | Station | Pond | Downtown | Expansion | Tower | Future | Next >>
I went back out later and decided to run the wire to the track so I could control the railroad just sitting on the patio. Since it will be some time before the control panel is complete, let alone designed and started, I just ran the one 14# speaker wire, crimping ring terminals on one end to go under the split-jaw clamp screwheads, and split terminals on the other that connect to the power pack. While I was out there, I prepared the train for running. We're having grilled steaks for supper, so I figure since we're going to be outside, I might as well run the train. I wanted to test out my latest retrofit of the blue B&O engine.
It pulls really nice now, without the "wobble" I noticed from my less than successful attempt at refashioning the original base to fit the new mechanism. With the new mechanism fitted back into the new base, it really runs much better. The only problem I'm having is that blasted front pilot truck wanting to derail all the time. I'll have to check the spring pressure and the tracking of that truck frame to see why it keeps "climbing off the rail". I switch to the flea market find that looks like Ann's engine, but it seems to be struggling, even without the track cleaning caboose attached. I had just placed it on the rails when the steaks were done, but have to wait until we're done eating to come back out and run it.
After watching it chug slowly along a few times around the layout, it was time to put it away. Nick was just leaving and Ann was inside cleaning up so it was just me. About the time I was closing up the garage, Ann comes out and is disappointed I had already put the train away. Now I feel bad, but I told her I heard Nick leaving and figured she was inside cleaning up. I would have gotten everything back out, but Ann pretty much decides to pack the dogs back inside, so I follow them in. That's it for this weekend. I'll be hating myself for not devoting it to finishing the taxes two weeks from now though...
(Sunday, 14 October 2018)
Taxes are finally done and filed! HOORAY!!! Now I can get back to working on the railroad (and about a dozen and a
half other things I've put on hold because of the taxes). One of those things is getting the garage reorganized to
better fit the tasks that need accomplished. I also need to finish those push shoes I started ages ago. And take
all those carboard boxes and put them in the recycle bin. And put the rest of the stuff... I think you get the idea.
My goal today is to get something more done on the barkyard railroad. I bring up the plan for the station
platform roof trusses and note the measurements.
Once inside the garage is when I realize all of those things I just listed would need done before I can get to my table saw to do any work on those roof trusses. I decide I've had enough of moving those push shoes out of the way until next time they're in the way again. They've been cut out for nearly a year now, and besides, I just got a splinter handling them. I grab the new palm sander and some 100 grit and go to town. It's that time of day that unless I'm standing right next to the window A/C unit, it's nearly as hot inside the garage as it is outside, so I immediately break out in a sweat, doing nothing more than holding a palm sander against a chunk of wood...
Once I'm done with all four of them, I head inside to get some water and cool off a bit. I hang my now drenched T-shirt on the hook and drape a towel over my leather recliner to relax a bit. I'm back and forth with whether I really want to go back out and sweat my butt off again or not. Eventually the "pup" makes up my mind for me... I grab a clean work shirt and head outside with him to get him out of Ann's hair while she's trying to make dinner. I get him started with his "jolly ball" then head into the garage to cut the scale lumber to size for the station roof supports.
Well, at least I get set up to cut the scale lumber. I grab my miter gauge from the shelf and set my saw fence for 12". Next I grab one of those "partial" bundles of scale 12x12s and cut the four of them into 12" lengths. At least the first one anyway. Ann comes out to tell me food is ready when I am. I told her I would finish up the other three and head in. Just as we finish eating, Nick is back from his "Dyno Days" adventure. We sit and talk for a while, then I head back out to finish up those roof supports. This time I'll be setting the location, width, and depth of the cut, to dado lap two of the 12" lengths together.
For that I'll need the stop for my miter gauge, also sitting on the shelf, but the rest of the pieces are still in the box the miter gauge came in. I find the single rod and the adjusting screws and set the stop for 7¼". Then I set the fence to just about a kerf width shy of 7¾". It takes some doing, but I use scrap to get the cut depth just about perfect. As perfect as I'm going to get with a ¼" deep cut in stock ripped to ½" wide with a 10" table saw blade. The other part of the equation is the width and location of the cut. To fine tune those, I'll need to use two pieces of the actual cut to length stock. I wish there was an easy way to set the fence to include the kerf width. There probably is, I just don't know the "trick"... Yet.
As usual, I'm off by just about a saw kerf, even though I thought I allowed for it. I end up making one of the pieces useless, but at least now I have a nice tight fit, and right where I want it! I finish up notching all the rest of the cut to length pieces and realize the glue and the brad nailer are still in the house... One quick trip inside and I have both, and some wetted paper towels for "mopping" up any excess glue. I don't have a jig to make sure they're square, but I'm able to use the miter gauge and the saw blade to hold the two glued pieces in place, square, while I drive in a brad. One by one I continue to assemble the pieces, and end up using the one that I had cut too wide just to have an even number of assemblies when finished.
I stack them, one on top another on the bench, and notice that they all have a slight variation in their "squareness". We can't have that! I need to depend on them all being identical, and square, when I add the support beams for the rafters. I grab a couple of pieces of scrap 1x4 and a couple of quick clamps to hold all the legs parallel to each other. Repeat for the other set of legs, using the square edge of the 1x4 as a reference. Even if they aren't prefectly square, they'll all be identical, and the eight of them will allow me to assemble a four foot section of rafters. That's about as far as I get. It's already getting late and I need to go inside to get cooled off and cleaned up.
Well, Nick has other plans for me, so to speak. We sit and watch some Vintage Machinery videos on YouTube and chat until about 10:00 PM. I decide to just make the coffee and hit the hay. I'll worry about not getting cleaned up tonight and the dirty sheets tomorrow. As I'm telling Ann about it the next morning while getting ready for work, she tells me if I strip the bed, she'll throw them in the washing machine and set the timer to start them around 5:00 PM. I tell her maybe a little earlier so they're done by 5:00 PM when I get home. Then I decide to just skip it and tell her not to worry about it, I'll get it when I get home. Well, when I get home, the bed's been stripped and the washer has about 25 minutes remaining in the cycle. Thanks Honey!
(Saturday, 20 October 2018)
We're working on the back yard early this morning and getting things squared away for more artificial turf. Ann
ordered some more from Amazon and it was supposed to be here by now, but they decided Monday would work better,
so... In preparation for installing the new turf, we're removing the middle planter along the fence that
adjacent to the driveway. Ann wants to finish removing the river rocks she and Nick put in along the walkway some
time back, over a year ago. Unfortunately, with the "puppy" tearing around the backyard, they continually need
"cleaned up" and swept back into the "channels" on either side of the walkway.
Ann had started to remove the stones and replace them with turf the weekend before, but didn't have enough to finish even one side. My job, well, jobs, are related to removing and rearranging the 4x4s around the planters to make it look like we planned it that way. Even though it was supposed to be cooler today, it's not, and soon we're both drenched with sweat. We were going to open the house up, but when we saw that the A/C was ready to kick on already, decided not to. Our "treat" of cooler weather the other day was just enough of a taste to make us want more.
While I don't plan on reworking the pavers around the back porch I end up having to, trying to get the 4x4s on the corner of the plater squared away, mainly because of the way the new gutter had washed out beneath them. I had already cut a new piece of 4x4 for the other end, and had to add another chunk on this end to take the place of the dirt that had been washed away. Ann finished what she could do by then and was waiting on me to finish. She wasn't pleased that I told her I wasn't going to redo the pavers, then redid the pavers... Eventually we finish everything for the planters and are done outside, for awhile anyway.
I start working on the station roof truss stuff, shortly after I get the garage squared away enough to start cutting more scale lumber. I select three of the straightest stringer pieces I can find that are at least four feet long. Amazing how wood warps over time, even when it's straight when first cut. These pieces are roughly 3⁄8" x ¾", and will connect all eight of the roof supports together, every 6". I know there is no way I'll be able to hold all of those pieces in place at 6" apart, let alone reliably, without a jig or fixture of some type.
I have one more piece of the scale stringer material that's not quite long enough to use for the roof structure, but will certainly be long enough to slot for the ½" roof supports and use as a jig to hold them. I set up the fence on the saw and start cutting ½" slots every 6". Once I get further along than the fence supports, I flip it around and start working the other direction toward the other end. It takes a bit of doing, but a short time later I'm sitting on the patio in front of the planter drilling and screwing it all together, constantly interrupted by Mr. Jolly Baller. That's okay, we've strategically placed things to keep him from getting too close.
That is, until Ann throws it into the planter I'm working in... It bounces off of the plastic house and almost knocks what I'm working on off the edge of the planter. I'm more than a bit perturbed and Ann looks horrified that I'm going to yell. I do tell her she's done more damage with that one throw than the dog has done so far, but leave it at that. The problem is the Jolly Ball itself and the way it impacts off of everything. The approach trestle on one end of the bridge has yet again been destroyed. While we're watching the pup jolly ball into the still intact trestle, I mutter some comment about how it's about to be destroyed and the bridge falling when he "herds" it to the other end and knocks out the last remaining trestle bent from beneath that end of the bridge!
We both know it's an issue and discuss our options. My idea is to get some more of those potted Norfolk pines, like the "mini Christmas trees" you find around this time of year. Well, it's not even Halloween yet, but we all know Christmas keeps coming to stores earlier and earlier every year... Ann thought using some more of those "mini picket fences" was the way to go. She and Nick picked up some white ones, like the ones out front, and put them in. They look nice, and they help to disguise the fact that the track is just floating there in midair above the ground on posts, helping conceal those white PVC posts as well. But we still need something to help protect those trestles without hiding them. As an interim solution, we move the big flower pots to either end of the bridge.
Thankfully the "strategically placed defenses" around the outside A/C unit and the decorative bench and such are doing their jobs. Nick reworked one of them around the A/C, but again, they're doing their jobs. Unfortunately there is nothing to stop a direct advance down the walkway toward the patio and planter where the station will be. So as I'm sitting there trying to finish assembly on the roof structure, I'm being bombarded again and again by a Jolly Ball barrage, throwing it away from me each time.
I'm finally overcome by the frustration, yelling about how much I hate that "F" bomb "Jolly Ball" and how next time I'm throwing it away... Ann and Nick aren't happy, but they can tell I'm not happy either. I end up breaking the makeshift jig trying to remove it from the partially assembled structure. Then I drop a quick clamp on the other end of it, snapping it into pieces. I am quickly coming to the realization that this structure is way too fragile and I'll need to come up with a different design if it's to survive.


We decide it's a night to dine out at Froggers, then hit the Hobby Lobby afterward so I can get the super glue I need for those flea market find super detailing projects... Over $500 later, we make it home with a bunch of new Christmas stuff, and quite the haul of model paints, model planes, and train stuff I found. That was some expensive super glue!
(Sunday, 21 October 2018)
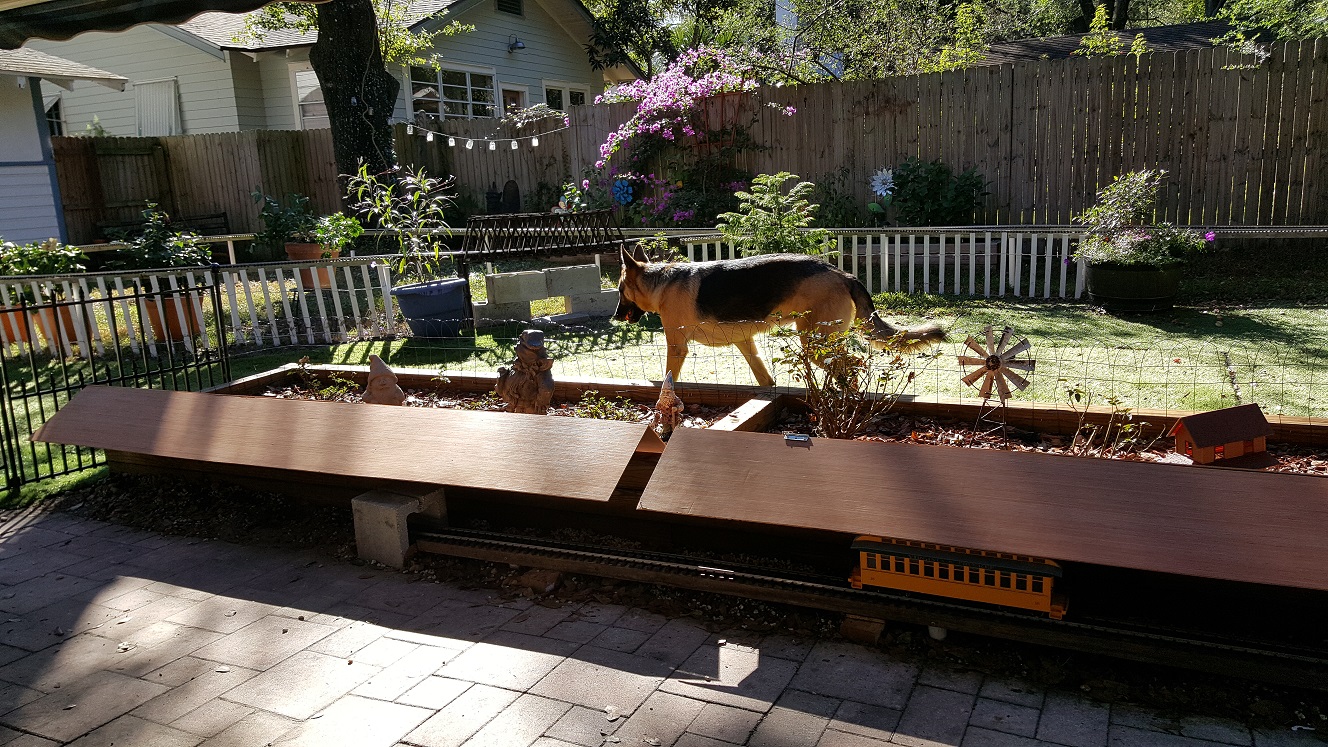
That weather we were expecting yesterday is finally here today! Hooray! We spend most of the day outside. We're
happy and Brigel is even happier. Ann and Nick install
a "Jolly Ball" defense gate to protect my delicate station roof support monstrosity. It keeps the Jolly Ball out
most of the time, and definitely stops a direct assault. Ann is rearranging the solar lights, as in throwing
them in the trash, like I'm throwing away the blue rope lights I've had in a box since I called The Little Grass Shack
my home. Ann is stunned. I tell her I haven't done anything with them since then, except keep moving them out of the
way, and I need the smaller box for the edison lights that used to hang under the awning.
Now she's interested in hanging those on the fence along the driveway and moving the jar lights from there to the other side of the yard between the tree and the fence over there. Then she's asking if I have another timer. Sure do. The joke is "use my EE skills" to make that happen... Long story, short one is related to work and I may relate it to you some day.
(Saturday, 27 October 2018)
It's cooler again this weekend, so the plan is to get the barkyard squared away, but Ann has a hair appointment this
morning at 11:30, so we'll be pushing that off until tomorrow so she doesn't have to worry about getting dirty just
to have to get cleaned up again. I decide it's time to get some more done on that station roof. After the "failure"
of the first design, or rather the "overly delicate rivet counter detail design", it's time for a more robust approach.
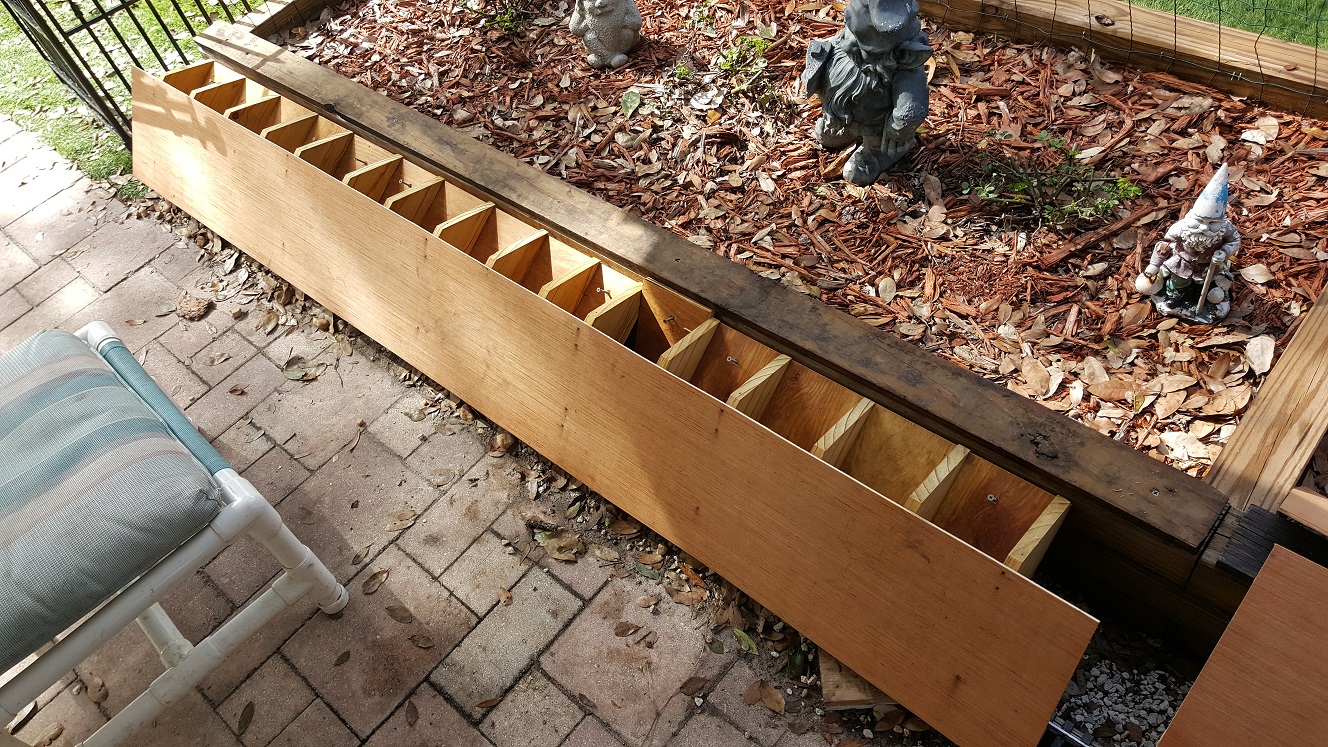
I decide that ¾" plywood ought to stand up to the pounding better than the delicate bits and pieces and sticks
and stuff... The new design uses wedges cut from 1x4 stock and screwed to the plywood base every 6". Each base is 24"
long and will be screwed into the planter 4x4s. The weakest part will be the ¼" plywood roof deck itself.
I have a couple of 10' pressure treated 1x4s "over the rafters" in the garage and grab one down, after a quick trip in the house for the short ladder that is. I have to open the carriage doors to get it down and leave them and the side door open for that wonderful cool breeze blowing through. It's so nice I don't even have the air conditioner on and yet I'm still working up a sweat. Using the miter gauge on my table saw, the plan to to cut the 45° pieces using both ends and both sides of the single angle cut to make as many cuts as possible without having to reset everything. I cut 8 of those and 6 of the 63.4° angles... Alright, I rounded it to 63° because it doesn't have to be exactly 1 / 4 pitch. Now it's time to assemble the first one.
I quickly realize that attaching the two angled pieces every 6" is taking more steps, more screws, and more time than I really want to take if I want to make a bunch of these things. The revised design simply has one 1x4 piece with the two different angles on either end. It takes a bit longer having to set up the saw to cut the other angle every time, but saves a lot of assembly time. One nice bonus of having solid 1x4 in the middle instead of a gaping hole is the ability to clamp the end piece in place while drilling pilot holes for the screws. Another bonus is the ability to clamp a slat across the ends and shim between it and the rest of the "interior" ones to hold them in place as well.
So with that all figured out, it becomes an assembly line. Almost. I need to cut more of the plywood bases and make some spacers out of the remnants, roughly 6" wide, to avoid having the angle block "rafters" butting up to one another on the ends. The planter is 16' long with a divider across the middle, so I figure a 16" x 16" square of plywood will make a nice base for the main clock tower / turret, but it ends up pushing everything apart just a bit more than I want. 12" x 12" should work better and makes for an easy to piece together base assembly. Since no one will ever see under there, unless they're lying on their back on the patio, it can stay ugly. The fancy roof supports and the low relief panel along the platform will more than make up for what these assemblies lack in detail... Eventually.
Speaking of the platform, I'm pretty sure I measured out 8" from the planter when placing the track and stringers, so a half height concrete block should be just about the right size. Guess we'll see. I get a couple more done, then another couple, and before I know it, I'm done with the entire length of the planter! I had sliced a couple of pieces of foam core to "fold" over the first couple of finished bases, but don't have enough to do but one more, and it's nowhere near enough to cover the entire 16'. I ask Nick if he'll help me spot ripping the 4x8 sheet of ¼" plywood into individual roof panels. It's large and flimsy and we have a few moments where the cut gets out of line, but get it done in moments. It took longer to move the truck down the driveway and move the saw out of the garage and set it up than it did to cut.
My idea to use the small brass hinges I thought I had stashed kind of goes out the window when I can't find them. I have larger ones, but they're overkill for the job. After doing just one set of 8' long panels with just the two hinges, I decide to do the other one later, if at all. I end up just tacking the other lengths in place with brad nails. I am reluctant to do even that much since it all needs to come back off to get a coat of linseed oil tomorrow. For now, I'm just happy to have it all together.
(Sunday, 28 October 2018)
We get the yard prepped and the new turf down in about two hours, leaving the rest of the day to get things done. To
Ann, it means shopping and such. To me, it means more barkyard railroading. I didn't plan on it, but I spent most
of rest of the day getting
a coat of linseed oil on the station roof. Every last piece of it! I took it all apart, nail by nail, screw by
screw. I wanted to ensure that every part had a generous soak of linseed oil in hopes I won't regret using plywood
out in the elements. I really need to figure out how I'm doing the metal roofing, be it copper or aluminum or
whatever. At that point, I'm hoping that the underlying structure will be protected from the elements enough to
not have to worry about it. I'll be happy if it survives the Jolly Ball. Time will tell.


(Sunday, 4 November 2018 - Fall Back)
Just got done setting the clocks back an hour as Nick and Ann are off on another adventure to Brooksville,
a bit over an hour away. They're looking for a puppy buddy for Brigel. They hit me with this "desire" for a
new German Shepherd puppy for Nick when I got back from 29 Palms, but had said 22 December, not TODAY. It's
all very "sketchy" though. They only have the address of a gas station near the location, not the
actual address... The seller only wants cash and it just isn't sitting right with me... But I'm the
only one having misgivings about it, and Nick is relying on his pistol and concealed carry to protect them
if anything's amiss. Let's hope I just worry too much.
And it turns out I do worry too much. Ann just called and they're on their way home with a new puppy buddy for the boy... Still waiting for the picture she's sending to get to my phone though. Going to hop in the shower so I can take Brigel over to Nick's when they get back with the new puppy so they can meet over there. Guess we'll see how this turns out in a little bit. He looks cute from the picture, but I can't really see his face all that well, since he's looking down. It's not long and I get the call to bring the boy over to Nick's place to begin the "introductions"...
After a brief scare with hackles raised and the puppy retreating in fear, they eventually do the nose to nose, and Brigel is wagging his tail with his hackles still up? Dunno, but soon enough he's more interested in the big JollyBall than the puppy. And the puppy is really interested in what his "big brother" is up to with that toy he's herding around the yard and those whining noises he's making as he does it. Soon enough, he's tired out and we're heading back to the house. After helping Nick set up the dog crate I took over there, Ann's home too. Then Ann's off to the grocery store and I'm off for a haircut.
Once we're home, it's not long before the Nick is over with the puppy too. Welcome Klaus!. He and his big brother are soon running around the back yard, chasing after one another. I worry that Brigel still thinks he's a puppy, a big puppy without realizing it, and that the little guy will get hurt. Turns out the little guy knows how to get out of the way. In fact, he nips at his "big brother", then runs and hides behind me on the back stoop. It just warms my heart seeing the two of them together, getting along.


(Saturday, 10 November 2018)
I've been trying to get the super detailing done on the one flea market find Santa Fe ten wheeler for what seems like ages now, but
I'm still no closer to that. Rather than take the entire weekend to rush job it, I decide to just pair one of the new mechanisms with
one of the super detailed shells. All I'm missing are the air tanks, which I borrowed from the other flea market find Santa Fe engine.
After all, I don't need two identically numbered engines. It's bad enough I have a bunch of identically numbered cars... I mate the
two halves, connecting all the wiring between the two, having to rework the air tanks to better fit the new shell.
Fortunately all the Southern Pacific Coast (SPC) markings are only on the tender, which I already swapped details from to the Santa Fe tender. I soon have what amounts to a brand new engine, already super detailed, and ready to run! It will be the first time in a long time we've run the trains! The day is half over, but we have our work for the weekend done already, so we sit and watch the trains run the rest of the day. We enjoy watching the pups play as well. The weather is perfect.
(Sunday, 11 November 2018)
More train watching and chatting about next steps for the railroad.
(Sunday, 18 November 2018)
Ordered the Lionel scale F3 A-A set and powered B unit along with two dozen 37" pieces of gargraves flex track for Nick for
Christmas. Ann told me not to buy the F3, but I went ahead and bought it anyway. Even if I don't give it to him for Christmas,
I'll still have it for him. Also got myself a garden scale NW2 set and a NYC bay window caboose. Now I need a NYC steam engine
to go with it! Hopefully I can get some of the shelf brackets put together for Nick's around the living room layout before
Christmas so he can run trains by then. Guess we'll see...
On the agenda for today is revising the station roof again. Yes again. When I tried to pull the train in under it last weekend, it got "stuck", where the plywood was too low and the engine was catching on it. I was afraid of that. I bought a couple of pressure treated 1x4s when we were at Lowe's getting the fence panels for Nick. While he and Ann are over at his place, installing the rest of the fence, I'll be installing those 1x4s under the station roof plywood to raise it another ¾". After they get a coat of linseed oil that is. And to do that, I'll need the sawhorses and my "portable work bench top" to set on them from the garden shed.
I notice the 1x4s I bought quite a while back that are still there on the ground as I'm walking past them with the plywood bench top in hand. I figure rather than leaving them there to slowly rot, I'll use them, and keep the new ones for something else. After all, you'll never see them once they're covered by the roof. They're a bit dirty and look as if they've already started to rot, but again, they'll be covered and oiled, so hopefully it won't be a problem. I also bought another gallon of linseed oil when we were at Lowe's... Turns out it a good thing I did, because these boards are drinking it in. I'm used to new boards soaking in the first coat slowly, then having the next coat start to "gloss over". Not these old boards. They take coat after coat after coat and are still drinking in all that I'm giving them.
I get to the point with both of them that even though the grain parts would continue to soak in more, the sap parts are finally starting to gloss over. Time to move on to the next step, remove the steeper pitched back roof panel to allow access to the screws, and remove them and the plywood frames. Leaving the front roof panel nailed in place allows me to move the entire 8' long assembly as one piece. I allow the assembly to "tip over" the edge of the 4x4 it's resting on and lean against it instead. Now I can screw one of those 1x4s in place on top of that 4x4 and linseed oil the other side. Same drill. It's drinking in the linseed oil like a sponge...
Eventually it's time to reattach the roof frame and after carefully measuring to make sure I have the 6" clearance I need for the (eventual) clock tower, I screw it all back down. One down. One to go... I repeat the process for the other side and soon enough I'm ready to test. I have to redo all the "fancy" jumper wiring I've done to power the station siding and clean all the sand off the rails the dogs have dug up, but now I can run the train down the siding under its own power. It bucks and jerks and has starts and fits the whole way there, but at least now it fits under the station platform roof. With that all done, I try to run the train around the loop a few times, but I'm constantly having to go give it a helping hand and push it along.
It would seem it wasn't the best idea to leave the new engine out in the elements all week since it doesn't appear to be working all that well anymore. Guess I'll be taking it apart and cleaning out all the sand and corrosion. Sigh. Live and learn. I just park it under the station roof and head back in the house. Eventually, Nick and Ann are done with the fence and are back over with the puppy.
Nick installed the new kitchen track lights.
(Monday, 19 November 2018)
Taking today off to go with Nick to pick up his new roller doors down by the airport. I was planning on taking the week off,
but need to be available for everyone else on the team and save the PTO for Christmas.
Watching the pups so Nick and Ann can go to PetSmart and Wally World.
(Tuesday, 20 November 2018)
Ann and I are waiting for the rain to pass so we can get the kitchen door off the hinges and ready for paint stripper. And
waiting... And waiting.... Looks like that's a tomorrow thing. In the breaks in between, Ann and I manage to get most of the
little "Christmas trees" planted. Then the rain starts again. Ann decides to stay out and between the raindrops gets the rest of
them planted.
(Thursday, 22 November 2018 - Happy Thanksgiving!)
Started out the morning by watching the Macy's Thanksgiving Day Parade. Courtney joined us shortly after the parade started
and we had some pumpkin spice and orange rolls with our coffee. Once she left for home, Nick and I got started installing his
roller doors... We pretty much spend the remaining time off finishing up the door installation and hanging the Christmas
decorations.
IT SNOWED IN KANSAS CITY!!! (Sunday, 25 Nov 2018) IT'S SNOWING IN DESHLER!!! (Monday, 26 Nov 2018) New NW2 Rio Grande set from Charles Ro arrives. (Tuesday, 27 Nov 2018)
(Saturday, 1 December 2018)
Can't remember much... Ann and Nick took Klaus to get his shots right about the time of the parade, so traffic was bad.
Also something going on at the high school. Don't remember if it was today or not. I'm assuming it was today, and the band
was assembling for the parade, at least that's what the band calendar shows...
(Sunday, 2 December 2018)
Went with Nick to get the drywall and stuff. Brought home my tools and gloves and the lumber to rip for Nick.
Had to repair the trestle for the bridge approach to free up the top of the table saw for ripping the "shim" pieces Nick needs for trimming out his garage doors and windows.
Watched the pups while Ann and Nick went to Wally World to get me a Christmas tree to take to work tomorrow.
(Saturday, 8 December 2018)
Once we're up and moving, Ann and I are watching Klaus for Nick so he can get more done on his garage. Ann is doing
the laundry and vacuuming, while I'm trying to get more of the office squared away, and the rest of what needs to go
back out to garage taken there. Every time I step foot out the back door, the dogs are in hot pursuit, if not beating
me outright...
I want to get some of the shelf bracket parts ripped from the 2x4s I bought last weekend. That means I need to get that repaired approach trestle installed, just to get it off the table saw. It also means the dogs are hanging out with me in the barkyard as I work on getting the concrete block "caps" put in place and levelled, at the proper height to support the bridge, and I actually have to dig down to get them in the correct position. I start out using the flat shovel, but the puppy just doesn't want to leave it alone, and I'm afraid I'm going to hurt him with it if I'm not careful. Ann says it would probably be easier with the small hand shovel and grabs it for me.
I need to go down another 2" or so, a little shovelful at a time, moving the dirt to the concrete blocks beneath the bridge that block the dogs from going under it. Eventually there will be a water feature that runs under it, as well as another bridge that will hopefully keep them from doing that. For now it keeps them from hurting themselves on the sharp ends of the threaded rod that model the prototype tension rods of the Howe truss structure. The other day I noticed that those rods were actually loose and needed tightened up, so while I was there, I "tuned" them... Like a bass guitar string! Now they "twang" instead of "twunk".
After a short break inside, I head back out to run the trains, but realize I still need to fix the approach trestle on the other end of the bridge. It has slowly "heaved" to where the track goes abruptly uphill on that end and "cocked" to here it twists the entire bridge. Upon closer inspection, I see that part of the problem is the scale 12x12 pile on the outside of the last trestle bent is actually cracked and broken. Time to pull the other side out and get it squared away with the block caps as well... More like dig it out. The dirt has covered the sills and grass grown around them.
It takes just as much digging on this end, if not more. As I'm "manhandling" the trestle, I manage to knock off a cross brace and loosen another. Rather than take the time to repair it like I did the first one, I decide to keep the table saw "unencumbered". I'll fix it and the pile later. I still need to get the linseed oil back from Nick so I can mix up the stain to coat the new pieces I used to repair the first one as well.
I found the problem with the new caboose not lighting up early this evening. A broken solder joint between the contact that joins the power leads coming up the side of the body with the circuit board along the underside of the roof. I grab my kit bag and empty it of the soldering iron and supplies. Right away I see that the lead from the base to the iron itself has been pulled loose. Add to that the lens of the magnifier for the "third hand" has been knocked out of the ring that holds it and it's time to re-evaluate keeping the soldering stuff with the rest of the kit. I think I'll just pick up another 12" bag next time we're at Harbor Freight and have a dedicate solder kit that doesn't make the trek from home to work and back every day.
In any case, I set up on the dining room table and quickly have the broken joint soldered and tested. Now to put it all back together and test the contacts between the body and the roof. It still works so I'm claiming victory. Then I recall I need to glue the window that had fallen out of the door before reattaching the roof! I head out to the garage to grab the wood glue since plastic cement would just frost the glazing and craze the paint. I put a dab in each of the four corners and let it sit for a couple hours to give the glue time to set up. A couple hours later and I'm struggling with getting the door closing spring and the keeper back in place. I finally get it back together and the roof back on. It will sit until tomorrow to give the glue plenty of time to dry.
(Sunday, 9 December 2018)
Raining cats and dogs this morning, and much of the afternoon. So much for coating the new parts with stain and linseed
oil. Yesterday the weather reports called for rain later in the morning, clearing up early to mid afternoon... Yeah.
Right. Already raining. I have to go out in my robe to fetch the new NW2 engine from the tracks and put it in the garage
as well as retract the awning. It just gets stronger the longer it goes on. Nick finally makes it over with Klaus, and
the pup is soaking wet. Nick even towelled him off. I'm left to watch the pups while Nick and Ann head to the grocery
store in the rain.
When they're back, we're all still hanging out inside, because it's still raining. The dogs are back and forth between inside and outside, but mostly inside. The rain finally stops and I have to go force the water off the awning. It rained so hard that it stretched it. I really need to make that "attachment" to pop it up like a tent to keep the rain running off of it, not collecting it and stretching it. Normally the one side will fill until it's heavy enough to tip the balance that way and most of it runs off the side... Looks like heavy rain overcomes the balance and just fills it to where it trickles off both side constantly, slowly filling between the two.
It's been sunny for about an hour now, so I decide to try to run the trains. I grab the power pack from my room and head out to the patio. Then I grab the new NW2 engine from the garage and set it up to run. Now for the bobber caboose to clean the track ahead of the engine... As it makes it's way around the lower loop along the the mini picket fence, it catches on it where the dogs have managed to push it too close to the track. The abrupt stop derails every car and almost breaks one of the new couplers on the engine. I get everything back to square and start running again. It makes it around once before it starts to sprinkle again. I quickly grab the engine and set it back in the garage. Then unplug the power pack and set it in the garage after disconnecting the track leads.
Later on, as it nears dusk, I want to see the caboose run with the glowing lights that I've just fixed. I set everything back up, but I'm having trouble with the new NW2 engine and the boxcars playing nice together. And now it looks like I'm still having trouble getting the new caboose to light up too! Even though I fixed the broken solder joint, it's still not working 100%, flickering on occasionally. Really not liking these unreliable "connections" between the body side and the roof. I have a similar problem with that style of connection in the Bachmann passenger cars. At least that's what I think the problem is now... I finally gave up in disgust after stepping in fresh dog shit chasing the jerking, struggling engine to give it another push and put everything away. Sigh.
Looks like I really need to look at getting at least a preliminary control tower put together and a way to switch blocks between cabs. Next weekend maybe...
(Saturday, 15 December 2018)
Next weekend is here... I had brought the newly constructed "Annie" version of the ten wheeler in from the weather. It really
didn't seem to matter what I did with the track, or the track power, or anything for that matter. It just wasn't running as
well as it first did. I knew it probably didn't help that it sat out in the weather for a few weeks, with rain splashing up
from the patio. Being pummeled by the jolly ball, knocked over repeatedly, it just isn't a good environment to subject it to.
I decided to have a closer look at it tonight, and what I find is a bit different than what I thought I'd find, and a bit more
concerning as well.
Originally I thought being out in the weather had caused the internal brass "connections" between the wheels and the motor to corrode enough that I'd need to open the guts back up to clean the contact points and apply some dialectric grease. The first thing I did was assess the performance of the engine with the power connected directly to the pilot truck contacts. This should bypass any connectivity issues. I crack the throttle and I'm astonished to hear how "crunchy" it sounds... Like there's dirt in everything! I didn't think the "splash erosion" of just the small amount of sand and dirt on the patio splashing up onto the engine would cause so much havoc. Now I know. And I know what I have to do.
I think of these things as rugged, able to withstand a lot of abuse, perhaps because of their size. While the jolly ball may have scratched some paint and broken a small corner of the cab roof loose, I've learned that I can't leave them out in the weather at all, at least not where the dirt can splash up on it. I should have known when I put away the box cars I left sitting across the bridge and all the water just poured out of them it wasn't a good idea. Actually hearing all that dirt in every bit of the delicate mechanism grinding away at all the pieces as they moved against each other was enough to convince me that I shouldn't leave it out in the weather. I shouldn't leave any of it out in the weather.
At first I tried just lubricating the moving parts, but it actually made it worse. Most of the noise seemed to be coming from the crossheads, the guides for the piston rod as it exits the cylinder and its connection to the connecting rod. It was like lapping compound, not so slowly polishing the plating off the parts. It takes a lot more work, and a lot more time, having to disassemble all the side rods and related nechanism just to clean the dirt out of it. Unfortunately, it looks like it's already polished the nickle or chrome plating down to the base copper plate on the crossheads on the one side. And that side continues to be difficult. I have to take the connecting rod back off, more than once, to clean even more dirt out of there!
Now that I have it running without the crunching, I clean the driver wheel treads with alcohol as best I can. I think I could continue to clean them until next weekend and still have more dirt come off on the Qtips! I turn the engine over and place it on its wheels on a short section of track, temporarily setup on the desk, and crack the throttle. It's touchy, but much less persnickety than it had been last time I ran it outside. In fact, it takes some doing trying to find a spot where it stalls and would need a bit of prompting to get moving again. That's good enough for now. I set it aside on the longer tracks over on the counter over the cabinets.
When I brought the engine in, I brought the tender along with it. Water poured out of it like it had the box cars, maybe not quite as much, but enough to know I shouldn't leave these out in the weather. I tested the 9 volt battery for the steam sound at that time, but it only read around 5 volts, so I threw it away. Now that I have the engine back in working order, it's time to have a look at the tender. I put a new battery in, bend a paper clip to act as the shorting bar, and twist the volume knob on the bottom until the switch clicks on the sound system... And hear nothing. Not a good sign. I short the contacts in the connector. Still nothing.
I take the top off the tender, but don't see anything obviously wrong. Great. I ruined one of those new sound systems I bought to replace the old one. It's getting to be too late to start trying to troubleshoot this thing, let alone try to come up with a schematic diagram to help. I think I remember finding one online, but perhaps I'm confusing that one with the one I just found for the charging circuit board in the new USA Trains cabeese I just bought. Guess I've learned my lesson here.


(Friday, 25 January 2019)
I'm looking at ideas for the clock tower of the station. I had started writing some arduino code to exercise a stepper motor to control the hands of the clock based on NTP, with the idea that I can set the clock to the correct time all the time, and not have to worry about keeping four clocks synchronized - even be able to do quarter hour chimes. Thinking about it, I can even set it up to be a "fast clock" for operations if I want... But I doubt I'll have folks over for operations. Not any time soon anyway. I've been looking at different sets of clock hands on Amazon, and finally Googled them and clock faces, because I was having trouble finding hands that were the right length.
I decide I'm sick of looking at clock hands for now, and if I don't have the plan for the clock tower, I won't have anyplace for the clock to begin with. I had started to revise my drawings in SketchUp awhile back, but put it on the back burner when I started thinking about and working on the control tower. It was all still right there waiting on me. I spend the afternoon modifying the drawing to approximate what I have now as far as the station platform goes. I'll need to measure things tomorrow to double check. Unfortunately, I get to the point of starting on the station clock tower, but don't get much further than that. Finally snowing in Deshler tonight. Snowing like crazy. I'm watching it on YouTube while looking at sites dedicated to DIY clock making and repair now. There are many choices...
(Saturday, 26 January 2019)
I've ordered a clock for the station tower. We'll see how that works with the government shutdown and it coming from Canada via US air mail... Something tells me I should have spent the extra few dollars for the shipping option with a tracking number. Guess we'll see. Not sure why their site kept pushing the made in USA thing if they're a Canadian company, but I get of feel like I've been baited and switched on... Sort of anyway. It's a nice unit, complete with glass bezel and polished brass rim. I decided that until I can figure out a mechanism that allows me to drive four clock faces from one stepper moter, we only really need one clock, facing the patio.
Just got back from Skycraft... THEY HAD PIANO HINGES!!! So I bought three of them, about six feet long, that will (hopefully) allow me to finish the station platform roof the way I wanted. Someday.
(Saturday, 6 April 2019)
Going to fly in the B-17 today, but I'm nowhere near as excited about it as I was at first. Maybe because we had things all worked out the first time. Maybe because it's an effort, a labor even, just to get there in time... Dunno. They told us mechanical issues when we rescheduled, but I think it was really because they hadn't sold enough rides to make it worth their while to even fly there. After all, he did say their bread and butter was the Sun n Fun... Hopping in the shower now.
Nick sent an email and left a voicemail for the guy scheduling the flights. We need to know if we'll have to buy tickets to the airshow just to get to the plane, and whether there's a special place to park, or a different part of the airport , or what... As we're leaving for the show this morning, we still haven't heard back from the guy. I'm guessing he's not expecting us to show up so he won't have to refund the money or something... How would we know when he can't be trusted to return our communication? We head to the show anyway, unprepared for anything.
Wow. What a disappointment. The guy in charge of this circus is a real winner... NOT! You can't make this shit up. Where do I start? First, we've had our tickets since the Tico airshow, so he's had our money for over a month now. He sent Nick an email saying we could reschedule for another upcoming event in Central Florida, a gift certificate, or a straight up refund. At the time, Ann said to just take the refund and be done with it. Turns out she was right, that's what we should have done... As far as the B-17 flight anyway. When Nick was finally able to speak with him on the phone, we were able to find out that event was the Sun n Fun in Lakeland, so we rescheduled for then. Then is now.
Long story short, watching what should have been our flight spin up and roll out is about all I can stand. When we're finally able to talk to them, they agree to refund the money. Good thing too. I don't want to have to call the bank and have them take the money back... Come to think of it, I may still have to, knowing who I'm dealing with here. We stick around long enough to see her get airborn, then head back to the flex. I down another bottle of water before we get to the car, and another on the way home, hoping to finally re-hydrate now that we're out of the sun.
Nick's having problems getting a signal, so I bring up Waze on my phone and get us back on I-4. Unfortunately, now's that time of day when I-4 gets really congested, and ALWAYS in the same places coming from Tampa toward Orlando. Then it tells us, estimated time in traffic, 37 minutes. More like, traffic jam, next 37 minutes. Bumper to bumper, creeping along for miles. At first Waze has us going on some back roads, like US 33, but that's only because I told it our destination was home, not Skycraft. Guess it doesn't make any difference now, no matter which way we go, it's going to be a long time before we get anywhere.
Maybe 45 minutes or so later, we exit I-4 and get on the 429. From there it's a pretty uneventful drive to Skycraft. I want to just get in and get out, usually a losing proposition for me. Nick still wants to browse, even though he knows what he's looking for. I manage to keep going long enough to find some gears for me. He finds some replacement brushes and connectors and stuff he needs for the drive motor on the mill. All in all, it's another enjoyable visit to Skycraft. We head back out the way we came, and towards home. We were going to ask Ann if she wanted to go to Applebee's, or even Chili's, or wherever, but before we can even say anything, she tells us she's cooking chicken on the grill and it should be ready about the time we get there.
Home, just in time to eat! Boy that sure was nice, and I let Ann know it too. After the day we've had, it's certainly welcomed. Once we're done, the plan is to bring Klaus over and let the two puppies play in the barkyard... While we wait for them to arrive, I set the doodlebugs to chasing each other around the track. Brigel knows he wants to chase them and knock them off the rails, but can't decide which one to chase, so he chases both! One at a time of course. It's comical to watch, as Ann and I sit and enjoy the show. About that time, Nick's back with his pup.
As we're sitting there, Ann asks me if I have a tape measure in the garage. I grab it for her, wondering what she's measuring for, until I see where she's measuring... It's around the bridge, 30" x 57". She's wanting that pond under there again, isn't she? Yep. That's exactly what she's measuring for. As much as I'd like to take time to plan the entire water feature before doing anything, I realize that incrementally, a pond will at least replace those ugly concrete blocks. We both say incrementally about the same time...
(Saturday, 20 April 2019)
My back is telling me to take a break after linseed oiling the twelve footer tongue and groove planks for repairing the gable end of the other house, but I decide to power through and get all the lumber oiled. By the time I get to the cedar, I'm really ready for a break, but finish them first. Now I can take my gloves off and sit down for awhile. While I didn't plan on it, I decide to oil the interlocking tower roof assembly while I'm set up to do it. I put on another pair of gloves, grab the roof assembly, and head back to the workbench with it. Ann comes out to see what I'm up to as I'm finishing up the underside of the roof assembly. I flip it over and get the top, applying liberal coats of oil to (hopefully) protect the laminations from the elements. We shall see. I still need to see about using some wet or dry sandpaper as the "simulated shingles" roofing material to see how well it holds up.
I know the ¼" plywood roof for the station didn't hold up to the elements well at all, with the laminations separating and the unsupported ends broken off by the dog jumping over them but not quite clearing them. Gotta love how the damned instructions say it was already weatherproofed! Sure it was... In what universe? Maybe if it had been totally encased in something else to totally protect it from the weather it would have been weatherproof. I am so sick of these "modern" building materials and methods, untried and untrue, and that should be their motto. What I can't get my head around is all these people that want a new house. A new house built using all these modern materials, using these modern construction methods. All of them are meant to maximize profits, at your expense! But they don't realize that, so like lambs to the slaughter they go...
Anyway, totally encased it will be... At least the new roof will be. As unprototypical as it will look, I'm thinking about using ½" plywood as the substrate, instead of the ¼", somehow disguising the ends with what would be the "gingerbread" trim. It will be covered with copper clad board I got at the same auction where we purchased the Bridgeport mill. I still need to figure out the best way to attach it while keeping with the prototypical look of copper roofing. Can I solder sections together? Will I still need to use the copper tape for the overlap to keep out the elements? Will the adhesive on the tape hold up over time, exposed to the elements? How will I simulate the raised ribs where the prototype sections overlap if not with the tape? Flattened copper wire perhaps, soldered to the back of the cladding?
(Sunday, 16 June 2019)
Six months later and the station roof is in pretty sad shape. It looks like something out of a Hobbit set, or some Smurf cottage roof, except it isn't blue...


(Sunday, 16 June 2019)
Six months after installation and the station roof is in pretty sad shape.


<< Previous | Garden Scale | Beginnings | New Beginnings | Third Incarnation | Additions | Station | Pond | Downtown | Expansion | Tower | Future | Next >>