Our 2018 Kitchen Rennovation To The Nest
<< Previous | Kitchen | Demolition | Plaster '70s Wall | Plaster Cabinet Wall | Wall Cabinets | Sink Cabinets | Plumbing | Plaster Sink Wall | Flooring | Cabinets | Countertop and Sink | Finishing Touches | Next >>
(9 February 2018)
Cabinets are being delivered today between 2:30 and 6:30. Good thing I work from home on Fridays. So Ann texts me at 12:30 that the guy called
and could be there in 30 minutes, but she told him no. She also wanted to let me know she's leaving early so she can be here to help corral
the dogs and inspect the cabinets with me. Come about 1:30 or so I'm outside in the back yard with the dogs and hear a truck pull up out front
and stop. Great... The guy didn't listen, and Ann is going to be pissed! I hurry inside, making sure the dogs are closed in the back, behind
the closed bedroom door for extra measure. I figure what the hell? They can deliver the cabinets, but I'm not signing anything until I have
inspected EVERY cabinet, toe kick, and trim piece they deliver.
So I head out to greet the guy and he seems proud that he's here early. I caution him that the traffic for the parent pickup line for the high school is about to start backing up in front of the house. He doesn't seem at all concerned about it and asks where I want them to put the 23 boxes of cabinets. I tell him the front porch and he wants to see how much room and where to put everything. I tell him the overflow can go in the living room, but rather doubt we'll have any. He says he'll move the truck and they'll start unloading. I watch as he pulls the truck up to block both our driveway and the neighbors'. And they're taking their time about it, bringing a box at a time and sitting it on the front porch. Meanwhile, I'm opening every box as they bring to have a quick look, and to let them know I'm looking at every box. As they are inspected, I move them behind the front door, trying to fit them together in a fashion I can still get to them easily if need be.
I'm carefully tracking in my head all the pieces we should have and all the pieces I've seen so far. The 4' penninsula cabinet with the lazy susan, the sink base, and the pantry are all that are left. I see them leave the penninsula cabinet by the front steps while they go back and get the pantry. By this time the parent pick line is starting to back up the street, thankfully not before Ann is able to pull into the driveway past the neighbors'. She comes storming up yelling who's in charge and are you the guy I talked to on the phone and can't you fucking tell time? Wow... Looks like he picked the WRONG day to get on her bad side! She isn't finished either, letting him have it about the line of traffic and how she needed to be here to help inspect and she left work earlier than planned to and that's why I said don't show up early and... I could go on, but I think you get the point.
She heads around back to check on the dogs and call Lowe's to complain. I turn to the guy and tell him simply, "She's not happy". Then turn back to inspecting the pantry, chuckling to myself. Ann heads back through the house and lets them know she's reporting them and calls the guy at Lowe's and lets him know how unhappy she is while he's sitting there with another customer, furiously writing down what's Ann is telling him and... Again, I think you get the idea. I know the guys are out there waiting for a signature and Ann says to close the front door and make them wait while she tries to inspect everything. By now the dogs are no longer closed in the back of the house either, so I'm expecting the worst. When she's finally satisfied we got what we ordered and it's the right color and there's no damage, she opens the door and they tell her they need a signature. She let's them know that she's already talked to someone about how upset she is and how she's going to write down how unhappy she is that they couldn't follow directions and things may be damaged and how poor the service was, etc., etc.
So by now when they go to leave the traffic is backed up around the corner, as it usually is by now, and they're trapped because the only way out is through the closed gate blocking traffic from entering or leaving that end of the street. I'm still chuckling about it and Ann wants to know what I've checked so far. We go about opening every box all the way and inspecting everything closely. No damage that we can see, but it's definitely beer thirty, and the traffic has dissipated enough that she can run down and grab some at the liquor store.
I received the email notifications this morning that the appliances have shipped as well. Should be getting a call from the freight company about delivery any time now... Bueller? Bueller? Bueller? As we're sitting out on the back patio having a beer, Ann gets a call that they will be delivered, yep, Monday. Looks like I'll be working from home Monday.
(10 February 2018)
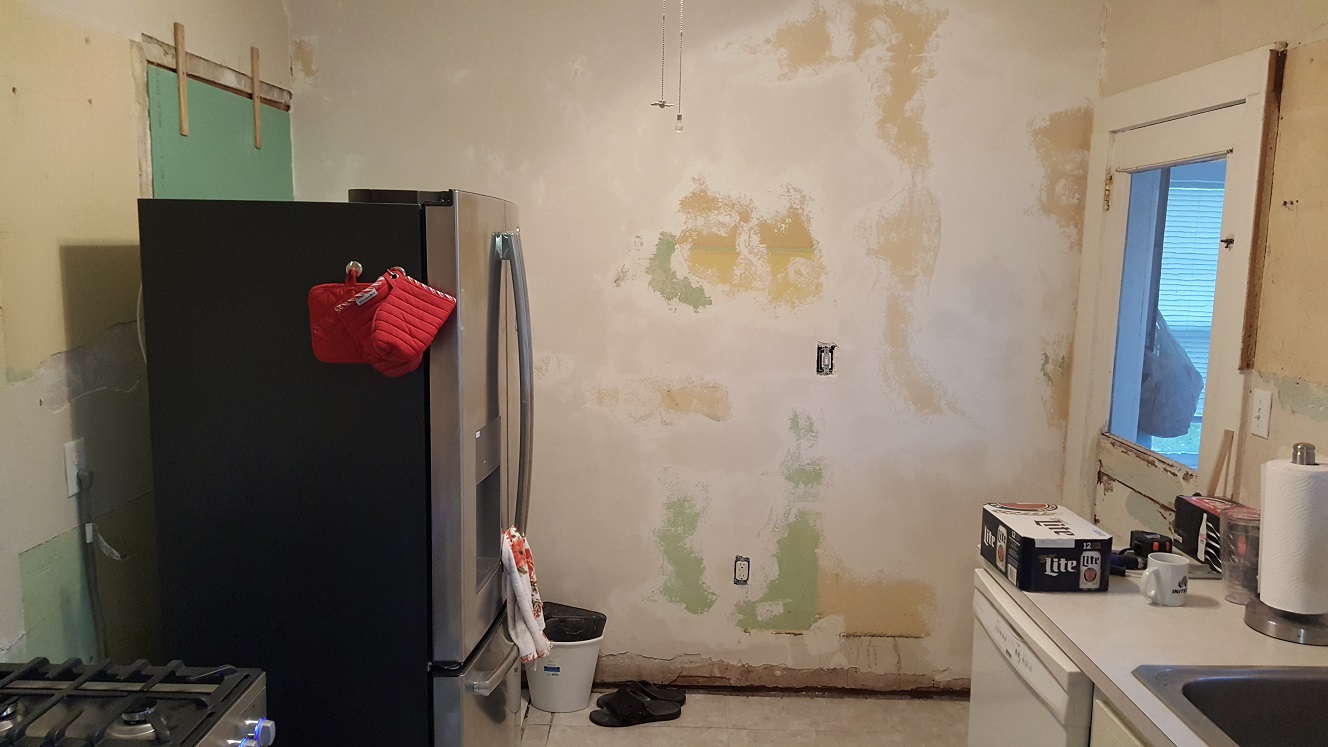
So now that the cabinets are here, it's time to get going on this plaster repair and walling off the old doorway into the hall. I start
to remove some of the old panelling adhesive with a putty knife and "peeling" more of the loose top coat plaster off. The idea is to use the
adhesive caulking trick to secure the base coat to the wall and then use the hot mix compound to attempt to repair the top coat plaster.
I'm back and forth with whether to add sand to the mix, mainly because I'm not sure how well I'll be able to match the grain size to the
old plaster. Ann thinks we can just use the gadget that she used to put the texture on her ceiling to texture the walls to make it uniform
without the hassle of selecting the correct sand. Probably the easier, albeit messier, of the two.
<< Previous | Kitchen | Demolition | Plaster '70s Wall | Plaster Cabinet Wall | Wall Cabinets | Sink Cabinets | Plumbing | Plaster Sink Wall | Flooring | Cabinets | Countertop and Sink | Finishing Touches | Next >>
The Loose Top Coat Removed To Reveal... Most Of The Top Coat Was Loose


Ann and Nick are off to Lowe's to pick up the drywall and studs and mixing buckets and such that we'll need to start the wall repairs and reconstruction while I stay behind to see about getting the floorboards out of the old doorway. Normally I wouldn't think twice about just putting a new sill plate down over the existing floorbaords, but these appear to have been refinished when the ENTIRE floor was refinished, so they match. And again, normally that wouldn't matter, except I have this floor hatch in the hall that is missing a few bits here and there that these pieces of matching finish floorboards will be perfect for replacing. At least that's the plan. Thankfully they are blind cut, i.e. they don't have the tongue and groove bits that help to strengthen and interlock the flooring, mainly because they were filler pieces added to match between the kitchen and hallway floorboards.
Interestingly enough, they aren't straight either, meaning the flooring wasn't perfectly parallel between the two rooms, almost like that door was added as an afterthought... Dunno. Also found a row of what appears to be tacks along the length of one of them, with what looks like linoleum underneath, and they're not coming out easily. In fact, they're not coming out at all... That's going to be rough on the saw blade when I try to rip it to size. There are a lot of things about this house I wish I could just ask the original builders and owners. So now with those boards up and out of the way, it's just a matter of time before Ann and Nick are back from Lowe's and I'm back to work on the plaster repair.
So let me give you a little background about plaster construction techniques. In a nutshell, they way the old plaster walls and ceilings work is the base (scratch) coat of plaster is pushed onto the wooden lathe and squeezed through the small openings between them. When the plaster sets up, the plaster that squeezed through forms a "key" that provides the structural support needed to hold the plaster in place since the plaster does not adhere to the wood lathe. Once those keys break, from settling or vibration or excessive flexure or some idiot pounding and screwing drywall over it, that support is lost and the now the loose plaster starts to crack. If it's the ceiling, then not only does it crack, but it begins to sag, and may eventually come crashing to the floor. We're looking to solve this loss of structural support as well as restore the plaster finish coat and original appearance.
One way I found that others had used to repair plaster in the past, while looking at something totally different on an old home hardware store site, is using plaster "buttons". These are metal washers shaped with a bit of a curve or cup to them such that screwing it into the lathe beneath the plaster would draw the plaster back to lathe, essentially restoring the structural support that had been lost. Then they are plastered over, hiding them. I ordered some in a couple of different sizes when I ordered the stainless steel window screen hangers and brass window lock for the bathroom window. We had been discussing how we were going to fix the living room ceiling that has gotten much worse this winter, probably from running the gas furnace too much, like tripling the gas bill too much.
Ann finds the Big Wally's site looking for plaster repair tips and techniques. So the site explains what I've just told you about the way they used to build these houses, and how this glue stuff of theirs can be injected into holes you drill in the plaster, then screwed back together using their plastic plaster buttons. Essentially you glue the wall back together. They give you a couple of tubes of goo, a spray bottle of conditioner, and some plastic buttons - for about $70. All I can figure is the glue must be made with gold or something. Others that have used it say it works, but the goo is mighty thin and if you're not careful, it will squirt out the other holes - like right in your face. The other complaints are related to the glue as well, and range from it continuing to ooze from the holes even after initial cleanup and the buttons ending up glued to the wall and in both cases once the glue has cured it's nearly impossible to clean it from the wall.
Other sites recommend a similar approach, but are sharing their experience, rather than trying to sell you something. Their approach uses adhesive caulk injected into the holes instead of the expensive spray bottle of pre-conditioner and tubes of runny goo. They also recommend using some of the brown shipping tape to wrap the plaster buttons so that they don't stick to the wall with the adhesive caulk. Now keep in mind all of this so far is just to reattach any loose base coat plaster, not repair or replace damaged or missing top coat plaster. We have a few small areas on the large wall in the kitchen that may need some reattachment, but by far it's more the repair of damaged and missing top coat plaster that it needs.
Big Wally's also has a tub of plaster (gallon? two? dunno and they don't tell you). From the MSDS it appears to be old style lime plaster, the kind that takes weeks to set up, but may be what you need if you have that style plaster and have issues with damp. Other sites will recommend gypsum plaster (plaster of paris) or just straight wallboard joint compound. Well, I can tell you from experience, you don't want to use just straight joint compound. It will shrink and crack, like it did where I tried to put a blank in place of an old outlet box I had removed. Granted, I didn't use the drywall tape, but the point is I won't be able to. When I tried to replace a large area of missing top coat plaster where the old backsplash was adhered to it, It really shrank and cracked, over and over again. Having used plaster of paris in the past in my HO scale model railroading days, I can tell you it's good for making scenery or filling holes in plaster, but its short working time and rock hard demeanor once cured make it less than desirable for replaceing top coat plaster or other repairs.
So we decided to split the difference and use "hot mix" joint compound like we did in the bathroom, which really did work well to blend together the drywall with the ceiling plaster. We used the 20 minute set time formulation in the bathroom, but it was just a bit too quick for joint and taping work for my liking, and it still took a day or more to actually cure enough to sand. For the kitchen, I'm using the 45 minute cure time formulation. To that end, I started the prep work this morning to remove any of the loose top coat plaster. Unlike last time, Ann covered everything with dropcloths, and I aimed for the waste basket as I used the putty knife to get between it and the base coat. Most of the time I missed, but at least some of it I didn't need to pick up off the floor and put in the waste basket.
Ann tried for a bit to help remove some of the remaining panelling adhesive, but finally gave up. I was hoping that I had already removed most of the loose plaster, but man was I wrong about that! I knocked on the wall with my knuckles to find the spots that sounded hollow, and there were a lot of them. The more I removed, the more I found. I think more than half the wall's top coat is now in the trash barrel to go out to the curb! Not what we were hoping for. Ann is concerned that as much of the wall that now needs repaired may call for just total replacement with drywall. I think it's to soon to tell and would rather try the hot mix and see where we go from there. At this point I would have to remove all of the remaining top coat plaster just to keep the drywall from cracking when screwed down anyway.
First I need to find some screeding boards. Armed with a couple that should work, I mix a batch of the hot mix and apply it, in less than 20 minutes. Wow, that went quick. I clean the tools and debate whether I should wait and see how the first application does or continue with another batch. I decide I have enough daylight left for a second batch, so I mix and apply it, in less than 20 minutes... Hmmmm. Guess I could have used the 20 minute stuff this time. Oh well, having a longer working time than I need is not really a dfrawback since it all gets used up. And while I could make about 50% more when mixing, and it would probably make more of a mess when mixing, I still would have plenty of working time left if I had any left to work with. I think I need to screed much more slowly and move the screed board back and forth while pulling it along. Something to keep the mud from sticking to it and leaving hollows as it's pulled along.
So with two applications on, I can see that I made the second one a bit soupy, and it's taking quite a while longer to dry than the first. We'll see where we're at in the morning...
(11 February 2018)
Morning has arrived and the hot mix appears to have set up overnight. It doesn't look or feel damp, so guess it's time to get the remaining
first coats on. Then I'll see if I need to knock down yesterday's first coats and try a second, perhaps top finish coat, as well. It will
really depend on how much energy I have after spreading what looks to be at least two 50# bags worth of plaster. Guess I'd better get busy!
One 50# bag, or six batches later, the wall is a bit over half covered with a first coat of hot mix... Wow. Did I say try a second coat? I'll be lucky to get a single first coat on! Taking a break now and perhaps I will change gears and look at framing the new drywall in. Dunno. For now, I'm going to sit here and update this chronicle of out efforts for a bit.
Ann has been busy all day (so far) doing the garden thing in the back yard. We had a hard freeze a week or so back and it killed pretty much everything growing. Covering them may have saved them, but most of the plants are showing some new growth. The fancy bougainvillea and the ficus tree are toast though. She and Nick just got back from the yard stop and Lowe's in Leesburg and an estate sale down on 11th Avenue and who knows where else? They were gone the entire time it took me to apply the hot mix, nearly three hours!
I spent the last hour or so updating this and as I'm processing some more pictures, I hear the first guests to the neighbors' BBQ arrive. Uh oh, time to step it up. Ann and Nick are back from Lowe's once again, and I'm back to the garage with one of the old 2x4s that used to frame the doorway partition, now cut to be the new sill plate. A couple of new 2x4s cut to height later, and I'm installing studs for the drywall in the hall. With one of the 4x8 sheets cut to height and width, I wrangle it into place, wind in some screws, and call it done for now. After a quick cleanup, I'm off to the showers and over to the neighbors' for some food and drink.
(12 February 2018)
The appliances are supposed to be here in the afternoon. We shall see... I'm working from home today in anticipation of their arrival. Good
thing too, since they're paving the last mile of my trip to work today, tomorrow, and Wednesday, 7:00AM - 5:00PM. Wonderful fun. I may see
if I can work from home tomorrow too. I guess I'll have to tough it out Wednesday though, perhaps jump off at Colonial and run down to Alafaya
and up to the other end of Challenger Parkway. Again, we shall see.
So while we're waiting, let me fill you in on how I went about planning the screeding of the first coat of "mud". One of the pieces I chose to screed with was an old floor board somewhere between 26" and 27" long and about an inch and a half wide. I laid the board across the "islands" of remaining top coat plaster and drew a line at the boundary extremes, i.e. right before the board would fall into the "abyss". This allowed me to load up the areas between the islands and my marks with mud and then screed off the excess, following the tops of the islands as a depth guide of sorts. This does an okay job of filling in the areas small enough to be bridged by the board, but leaves open areas where you can't reach. But those can be filled in by a second coat.
I have a longer screed board, about 48" long by ½" by ¼" to bridge the larger gaps and help to level the second coat with the existing top coat plaster. That may leave more imperfections, but my concern is the larger areas where there is no guide whatsoever. I may have to use some of the "lumber" I cut up as the cross bracing for the garden scale railroad trestles, about 1⁄8" thick by ½" wide, as a guide for the other end of the screed board. It doesn't have to be perfect, but I'd rather not have to deal with levelling out waves in hardened plaster.
Ann just texted me (~10:40AM) saying they should be here in the next 30 minutes or so with the appliances. Got the dogs in the back again and moved the little shop vac and the new sink, still in its box, into the kitchen to make a spot for the delivery. Crossing our fingers they aren't the victims of yet another shipping mishap... But as you can see, we're not quite ready for them yet anyway. Well, the good news is they arrived without damage and I texted Ann to let her know. The bad news? We're not ready for them yet!
Nope. The bad news? I should have taken the microwave out of the box... And I would have found that it had been dropped on the corner, denting it in and what should have been the flat sealing surface for the door. I'm a damned idiot for not checking it closer, but when I looked at it originally I saw none of this. I'm guessing the shipping company knew that unless someone took it out of the box, they waouldn't spot it either, and were betting on it. Too late to do anything about it now. Live and learn. But it's that can't do anything right feeling and I'm not very happy about it. I had one job...
So the last thing I have to think about is the repair of the opening around the outlet and the light switch. The outlet needs to be lower on the wall, so a new hole and more damaged base coat plaster. The enlarged opening needs reduced to just the switch opening, restoring the integrity of the lathe in the process, then reattaching the now loose base coat plaster and top coating. I'll probably back the lathe with some of the ¼" by 1¾" stringers I made for the garden scale railbed then wind some drywall screws in to secure them.
Similarly, I think I'll attach those same strips to the top side of the new opening for the outlet before cutting it out to hopefully maintain the structural integrity and reduce the excessive vibration that would break any exisitng plaster keys. It may just work. I find that cutting along the outline in the plaster with a razor knife, all the way down to the lathe, then removing the plaster first helps to keep the blade of the scroll saw from instantly dulling and then shaking the wall apart. Securing the outline with the strips should secure the loose ends as well as provide a cutting guide. We shall see.
(17 February 2018)
After leaving work early Thursday, and taking a sick day Friday to let it run its course, I'm not looking forward to today. Ann asked
if we should work on the electrical for the kitchen this last Tuesday or Wednesday, and even though we tried to discuss it, I could tell
I wasn't explaining myself very well, and finally just asked if we could just stop talking about it altogether. Well, now that it's
still on the agenda, and we haven't discusssed what it is we're trying to accomplish, it's time for the usual "what are we doing"...
Nick has been here 45 minutes already, since 8:00 really, and we're just getting moving.
I start with my usual, "We're not going to be finished with all the electrical this weekend" and was met with the "I know that" repsonse. So when their expectation of just getting done what needed done to finish up the drywall was thrown out there, it got a lot easier to plan. So before I get too much more into its execution, let me tie it in with the previous thoughts on cutting the holes out of the plaster for the new outlet box locations. The thought of finishing the drywall made cutting those holes easy, that is to say much easier than cutting them out of the plaster, not to mention the major mess it creates compared to simply cutting drywall with a razor knife.
We decide to just run the new outlet in the hall off of the closest bedroom outlet circuit and pull the new refrigerator feed too. Both of these need to come down through the top plate of the door opening we're closing in with drywall, so those holes get drilled. First through the top plate from the bottom, then up in the attic down through the wall top plate. Nick then fished his fiberglass rod extensions through the holes, taping the two 12/2 NM cables to it, and pulling them up into the attic. As we're trying to figure out if we have enough length to land the new refrigerator line in the breaker panel, I notice the sheathing is skinned, meaning we'll have to open up the new 250' spool we just bought instead of being able to reuse the old cable. No matter, we just tape the new one to the old one and pull it up and over to the panel.
Fishing the new cable out of the wall and into the panel took a lot less effort than it had in the past, so in a matter of just a few hours, we pretty much had the wire run for the two new outlets going into the drywall. Ann and Nick wanted to go to the diner for breakfast, saying they would bring me something back if I wasn't feeling up to it, but I figure I might as well go with them. If my digestion isn't up to it, best to know before we plan on a full day's effort from me. As we're sitting in the living room after returning home from the diner, I'm telling Nick my thoughts about the wood and the holes to be cut in the plaster, mainly to avoid all the vibration from the scroll saw. He suggests we instead try the Dremel Saw Max, like a mini circular saw, but with "blades" made from a composite material like those of a die grinder or cutoff wheel.
Another what the hell moment, Ann and Nick head to Lowe's while I finish landing the new refrigerator feed in the breaker panel. Earlier we discovered that the outlet in the wall next to the light switch was somehow on the same circuit as the stove, which Nick confirmed when previously in the attic. Eventually, we'll need to cut a new hole in the plaster above the stove for the over the range microwave, and feed it with that same branch circuit. But not today since we won't know where exactly it needs to go until we are actually fitting the new cabinter placement. Today's goal will be to try out the new Dremel Saw Max approach by moving that outlet next to the switch lower on the wall where it really should be.
As I'm drawing out where the hole goes, Nick mentions the instructions recommend using blue painters tape around the hole to minimize the chipping of the masonry. While I go grab some tape and a sharpie, he sets me up aith his makeshift vacuum attachment and off we go. The masonry blade plunges right through the plaster and a bit into the underlying lathe. Because I'm plunge cutting, I can't get all the way into the corners - unless I overrun, which I did a bit on one of them. I easily finish off the corners with the razor knife and pry out the plaster with the new cat's paw from Horrible Freight. Then switching blades, the wood lathe is next. Again, the corners prove difficult, and this time I use a drill bit to get them the rest of the way.
I must say, as quickly and easily as that went, I think we have a winning approach for the remaining holes. Because there is very little vibration, I don't have to shore up the lathe at all, either before or after cutting. The old work box went right in and tightened down no problem., that is, until I try to push the now wired outlet into the box. When I laid out the cut, I tried to center it on the opening between the lathe, but missed a bit high. I had to take out a bit more from the bottom of the opening, leaving the top with very little "meat" behind the ears of the old work box. Thankfully, one of the pieces of lathe I had just cut out fit perfectly between the ears of the box and the lathe behind the plaster. Now it's really cinched down in the opening and does not move at all - just what we want!
I flip the breaker back on and set the clock on the stove and that's done too! While Nick was up in the attic, he prepared the junction box for the new outlet in the hall, but left it disconnected until the outlet is installed - for obvious reasons. I sit down and I can tell Ann is expecting more, mainly by how she keeps asking "what's next?" For me, a rest. After all, I'm still not 100% recovered from my illness. I really need to move the water line for the refrigerator, well not exactly move it, but drill a new hole for it further out from the wall. I already had to cut a notch in the new wall frame base plate 2x4 to accomodate it, but with the drywall going in, it has to emerge through the floor but outside the new wall. So that needs done and the remaining studs need cut for the new wall I explain to her.
There was a bit ore discussion about how I didn't want to use the spade bits, and how it would be difficult to protect the copper line, and where is that drill bit kit, and... I finally just go out to the garage, grab the spade ¼" and 5⁄16" bits. I used the drill to just make a slot most of the way from where it was to where it had to go, leaving that last bit to be hand chiselled out. Back to the garage for the chisels. A few whacks on one side, and a few on the other, and it's done. Now back to the garage with a couple of 2x4s to be cut to length for new wall studs. A couple more trips to the garage to fine tune the length and the center stud for the drywall in the hall is in.
I guess a bit of explanantion is in order here. Since the original opening for the door frame not only had to accomodate the plaster wall thickness on both side, but also the wider dimensions of older 2x4s actually measuring 1¾" x 3¾" unlike today's ripoff 1½" x 3½", I had some choices to make. The first would have been to start with 2x6s and rip ALL of them to size (too heavy towards to end of the rip without a rollout table - which I don't have), offset a pair of 2x4s for every one stud location (wasteful), or rip one of the two 2x4s I just cut to length into three pieces of just the right thickness and daughter them to the three studs already in place. Almost forgot, I'll have to rip a fourth piece to extend out the new base plate as well.
I'm hoping I made the right choice and begin to cut the drywall to fit on the kitchen side. With it cut I can finally move it out of the hall and out of the way of installing that new outlet in the already hung drywall. Ann and Nick are off to pick up supper at Tiajuana Flats, another test of my intestinal fortitude. Thanks for thinking of me, I'll be fine... Well, they get back with it about 5 minutes before I'm done cutting the drywall, but soon enough it's done and leaning against its new frame in the kitchen. That's it, time to clean up a bit and eat supper. If it could have waited another 15 minutes, I could be done...
Deaf ears... It always falls on deaf ears I think to myself. After supper, I get busy installing the new hall outlet while Ann and Nick are off grocery shopping. Before they leave, I realize I'm down to my last outlet and don't have an outlet cover for it, unless I use an old ivory one with the new white oulet. Yuck, unless we have one of those 6 way plug blocks that can just plug in and cover it, at least until Ann can order the new dark ones and push button light switches that is. Ann says there should be one in the drawer in the white cupboard in the laundry room. Sure enough. A short while later and it's done.
When they get back from the grocery store and things are put away, Nick heads up in the attic one last time to land that last circuit in the junction box. Flip the breaker on and one new outlet, installed and operational! So tomorrow I'll probably concentrate on fixing the lathe around the now lonely light switch and shore up its mounting before getting the rest of the first coat of mud on that wall.
(18 February 2018)
Mud, mud, and more mud. A-whole-nother bag of setting joint compound. Six more one gallon bucket sized batches.
That's what it took to finally get the first coat of mud on that wall! Hooray! I'm happy it's done but it took
the entire day and I get ahead of myself once again. I get a late start this morning, looking at the hole in both the
lathe and plaster that needs repaired. After a bit of exploring I find the lathe is not flush to itself or wall or
anything else. I'll need to back the entire opening with some of that ¼" x 1½" stringer stock I was
talking about earlier, the stuff I make my garden scale elevated railbed from. The only problem is that piece of metal
that runs the length of the top of the opening, all the way between the studs.
While I try to bend it out of the way enough to get a good measure of the size those backer pieces need to be, I'm thinking it may have to come all the way out. Looks like around 8" should be enough to not only pull the unspported lathe together, but also tie them together with the solidly mounted portions of the wall. Off to the garage I go to slice up some backer pieces on the table saw. A few minutes later and I'm fitting the first piece in place, thinking there is also another piece of lathe backing the opening a bit higher up. I drill through the lathe and run a drywall screw through both the lathe and the backer. There, that should hold it while I drill and screw a few more places.
I place the second and realize that piece I thought was an extra piece of lathe was really just part of the existing lathe that had split in two. So the next piece of backer goes in to try to tie that altogether as well. It's too bad the first piece is already secured more than I want to take apart and try to put back together because it's still a bit loose and not pulling everything together as tightly as I'd like. Oh well, I press on since I'll be attaching a piece of drywall over the lathe and maybe that will pull it tight. Time to get that piece of metal out of the way.
It takes a lot of pounding with the hammer and flatbar, but I finally manage to get the nail that was holding it to the stud to pull sideways out of the stud and from behind the lathe that covered it. Some quick work with the metal snips and I cut it away from the other end, still attached to the other stud. The next few go in quickly and securely. As I put the last one in place, I realize I need to make sure an old work box will fit, and sure enough, the opening it just right. I already had to take the chisel to the existing opening in the lathe to allow for the slightly larger "footprint", but hadn't thought about the width until I got there.
Funny how something I don't think about and don't plan ahead for just falls right into place... It certainly doesn't happen that often. In fact, it doesn't ever happen, and it's certainly well appreciated! Time for another break while I sit and think about the next steps. The steps that include mud, and the strategy of its application. I'm thinking it's time to break out the 4' screed "board". It's not much of a board, more of a long and skinny stick, twice as long and much more flexible than the chunk of floor board I had been using. That should allow me to use the existing islands of plaster, that much farther apart, and help to fill in the areas I wasn't able to cover with the shorter one.
Time to mix up some mud, but I almost forgot, first I'll need to cut that little chunk of drywall to fit the hole I just shored up. Using one of the leftover pieces from fitting the doorway, I measure in 4" to remove the narrower rolled edge, then another 5" for how tall it needs to be. With that cut, I measure the 9" length and cut it to size. With it in place, I realize that the bottom is a bit too thick. I probably should have measured that rolled edge 5" and not 4" like I did, but whatever, I screw it in and it's good enough. We'll fix it in post... Post first coat of mud that is. As perfectly flat as I'd like it to be, it will never be that flat, so we'll just hide that with a little more mud on the finish coat(s). But that's in the future, time to mix up some mud.
I started to mark out where my extended reach would now cover with the 4' screed, but soon decide it doesn't matter, I'm going to cover this wall with a first coat of mud, whether it's flat with the remaining top coat or not. The first batch went on quickly and filled in a major portion that was still just base scratch coat plaster higher up the wall. The next batch covers another such area next it and and one a bit lower. I wanted to remember to try filling in over just the bare lathe at the bottom in the corner by the old doorway. The old baseboard had been wedged and it pulled all of the plaster off with it trying to get it loose from the wall. But it's too late, both batches are spent before it dawns on me, maybe because the ladder was blocking my view of it.
Third batch goes on filling in more of the top of the wall, but leaves me enough to try squeezing it through the openings between the lathe to form the keys that will hold it, and subsequent coats, in place. It feels as if I'm pushing way more through the lathe than necessary and I'm soon out of mud. The last bucket of mud, for now at least, fills in along where the new drywall sits. It also fills in the remaining areas that can be reached without a ladder, with the exception of the patch behind the door to the side porch. That's it for now, I've used all four mixing buckets for the second time, time to sit down for a bit and rest.
Ann has been out in the backyard most of the day planting and rearranging and making it nice to sit outside again. Nick has been at his car club's Dyno Day all day, so thankfully I've been on my own to get things done at my own pace today. Just as I sit down, Ann comes through and invites me to join her on the patio under the awning and enjoy the fruits of her labor so to speak. I grab a beer and head outside for a bit to see what she's been up to. As we're sitting there and I'm admiring her handywork and we're chatting about things, Nick calls to say he's on his way home. Once my beer's done, I head back in because the mosquitoes have already found me, and are biting. While enjoying another beer, I decide to get out the installation manual for the new stove and see what we're looking at.
By now, Nick is here and slight change of plan. They're going to go pick up some "picnic" supper at Publix, like some fried chicken and potato salad and cole slaw. I debate whether I have enough time to mix up a batch and apply it and clean up before they get back or not and decide to just wait until after supper. No sense pushing it. When they get back I'm glad I waited. It is delicious and worth the wait. They even got some banana pudding with Nilla wafers for dessert. Alright, time to get back to work and mix up some mud. That batch has most of the top of the wall done in the corner by the door to the side porch. Good thing since the neighbor is already after me about coming over and having a beer.
"One more bucket" I tell him. So that's that, looks like I'm mixing up the last of that bag of joint compound and getting it put in place. As I'm mixing it, he walks by with a fresh beer in his hand, further taunting me. Time to get this done. First I get the large area behind the door then move on to along the bottom where the baseboard will sit. Nick pops in to say goodnight as I'm busy finishing up the bucket. It's getting dark as I clean up the last of it, get the kitchen floor cleaned up, and head next door for that beer I've been promised. We chat for a bit and one beer turns into another. About halfway into that one I have to excuse myself to go get cleaned up and head home. After soaking in a hot tub, I'm still stiff and sore, but at least now I'm clean.
The night winds down as I think about what needs done in the morning. Tomorrow is Presidents' Day, and a work holiday for me if I want it, so Ann takes tomorrow off too. We can get more done that way. When we were talking about the electrical the other day, I told her I really wanted two days for just the mud alone, and now I have them and her help.
The First Coat Completed...


(19 February 2018)
Happy Presidents' Day! Or something like that... As much as I want to sleep in, the animals have other ideas.
Maya starts whining about 5:30AM, and before 6:30AM Ann is up with them. Then they're outside, barking their
heads off. Then they're inside, barking their heads off. Then I'm up and getting a cup of coffee, thinking of
joining her and discussing our plans of attack, but she's already heading out the door to get the Jeep from
over at Nick's house, hoping to catch him before he leaves for work. No such luck as she's back minutes later
to grab her keys to the Jeep and Nick's house and head back over there. Another few minutes later and her she
is back with the Jeep.
So plans... She wants to go to Lowe's and get some more plants for the backyard. I tell her I need a fitting for the new stove but I'll need to see if I can find it the extras in the garage first. She comes out with the old flexible line from the stove that was too short, still in the bag, but it looks like it has the adapter from ½" NPT to ½" flare that I need. Nice! So Ann proceeds to clean up the old stove while I'm looking for the wrenches I'll need to disconnect it and connect the new stove. You'll never guess where they're at! I'll just have to make do with the one I have.
I guess it wouldn't be such an issue if the connection to the old stove wasn't being such a pain about coming apart. No matter how I tried to get the water pump pliers on the stove side of the connection, I couldn't get it to fit or get a grip and then be able to put any leverage on the adjustable wrench. I need two all sixteenths wrenches! I finally managed to bump it loose and find there was pipe join compound on the flare fitting threads. Well there's your problem! No worries now that it's loose.
With it disconnected at last, I installed the new fitting on the new stove as Ann finished cleaning up the old one for the neighbors. With that done, we moved the old stove out of the way into the dining room and got the new one moved in and installed. So now Ann moves on to cleaning the wall behind the stove and refrigerator. Maybe I should have waited to connect up the new stove until after that, but not sure where we would have put it since they traded places in the dining room. Besides, we really need to make sure the new one works before giving the old one up.
Ann had found a TSP substitute since I guess now TSP is banned? What's TSP you ask? Tri-Sodium Phosphate. It's used to clean and prep walls, a strong "detergent", if you will. Not sure why it's no longer available, but at least whatever she found did the trick. She mixes up a bucket of the cleaner and fills another bucket with clean water to rinse with. I move the ladder for her a couple of times and a short time later she's done. No more of that disgusting "roach goo" and dead husks stuck to the wall! Sorry. TMI? At least now we can move cabinets in and work on that wall without worry of contaminating anything.
With that done, Ann is off to Lowe's for her plants and I'm back to processing pictures and other essentials for updating this page. I asked her to look for a wider putty knife for the skim coats of plaster while she is there.
She is busting her hump working in the yard, raking, planting, mowing, bagging, etc. After her third visit to the rerigerator for water with me still sitting in my chair with the laptop, she looks at me with that "WHY AREN'T YOU WORKING ON THE WALL I JUST CLEANED?" look. Then she asks what I'm doing on the laptop, and I know it's time to get busy doing something. And something I do, like getting the second coat of the plaster applied! Well, not all at once for sure, but another four batches of mud go on the wall quickly, and it seems to be a good thing too.
The plaster seems to be setting up a bit more quickly than before. Even though it's only taking me about half and hour to apply each bucket's worth, by the end of the bucket, the plaster is setting up. So I'm not sure if it's the buckets themselves having some of the old plaster left behind that's causing it or if it's just that I'm applying it over already cured plaster that's accelerating the setting. While it doesn't seem like there's anything left but a trace of old plaster in the buckets, nothing that is visible to the eye at least, it may be still the cause. Just to be sure we should probably get some new mixing buckets.
The Second Coat Completed Still Wet...


Ann has already had her shower and cleaned up from all the yardwork, declaring it's beer thirty. Finishing up clean up from the last batch of mud, I decide to join her for beer thirty. So I thought we had already discussed it and decided we are not going out for dinner... Wrong. She asks if I need to get a shower before going out to dinner. Wait. What? Oh well, with no place in particular in mind, I suggest Mellow Mushroom. I really want a calzone, but I leave it up to Ann and Nick where we go. They both think Mellow Mushroom sounds good. Again, wrong...
We go out to Mellow Mushroom for dinner, and are sadly disappointed, like pretty much every place we've been out to eat at recently... WTF universe? Ann's theory is that it's Monday. We should avoid going out to eat on Mondays, since the last two times we've been unhappy with the experience, it has been on a Monday. I don't know what to think, but I do know we don't go out to eat and pay all that extra to be waited on to NOT be waited on. Did I say that right? When I'm paying someone else to cook my meal and bring it to me, I want the food to be good and hot and brought to the table all at the same time. I'd also like my beer not to go empty. Doesn't seem that difficult.
Anyway, we speak with the manager and get some freebies, but end up having to wait even longer while they prepare yet another set of calzones for us. Great. Now that they're hot, unlike the ones they brought us the first time, it's time to leave - so they can get... cold. Whatever. Nick eats half of his when we get back to the house and I take half to work for lunch the next day. Then we both have the other halves for dinner since we have to go to the maker space members meeting later that evening.
More to come, so stay tuned...
The finished product will hopefully be well worth the effort and all the headaches.
<< Previous | Kitchen | Demolition | Plaster '70s Wall | Plaster Cabinet Wall | Wall Cabinets | Sink Cabinets | Plumbing | Plaster Sink Wall | Flooring | Cabinets | Countertop and Sink | Finishing Touches | Next >>