Our 2018 Kitchen Rennovation To The Nest
<< Previous | Kitchen | Demolition | Plaster '70s Wall | Plaster Cabinet Wall | Wall Cabinets | Sink Cabinets | Plumbing | Plaster Sink Wall | Flooring | Cabinets | Countertop and Sink | Finishing Touches | Next >>
(Wednesday, 2 May 2018)
Snowing in Flagstaff again this morning. Wow. Beginning of May and snowing... So nothing much else happening this
week while we wait on the new floor finish to cure. The kitchen is still off limits, but since everything is in the
dining room or on the front porch disconnected, doesn't really matter. Nick's been hosting us for dinner so we don't
have to worry about cooking or cleaning up. I forgot how much I missed not having a kitchen sink and the k-cups are
just getting old. Guess I still just really want this kitchen to be done. After supper we discuss building a shed for
the motorcycles sitting in Nick's attached garage. So I'm going over some of the options in my head and we get "stuck"
on how much concrete it will take to put in a slab next to his detached garage...
Now I'm wondering why when last time we talked about the bikes, Nick was pleased he installed the wall cabinets, which freed up a lot of wasted space in his garage. Ann reminds me he's buying a new motorcycle this weekend and all of sudden he doesn't have room for all of them again. Turns out it's just my motorcycle that's in the way... But it doesn't dawn on me until the next morning at work that instead of going to all the trouble to build a place to store the motorcycles why don't I just make make room in my garage? If we move the Coke machine into the shed and I turn the bench by it so it sticks out from the wall there should be plenty of room for both motorcycles.
(Friday, 4 May 2018)
May the 4th be with you... Working remotely today. Went out to dinner for Mexican last night at La Cabana up in Eustis. It
was okay. Service was good, food not quite hot. Not sure what to think but every, and I mean EVERY Mexican restaurant I've
ever been to tells me to be careful, even the plate is hot! Nick sent his back to have it warmed up, I just dealt with it
not being steaming hot. It was "warm", but again, not hot. At least they had margaritas and fried ice cream. Fun times.
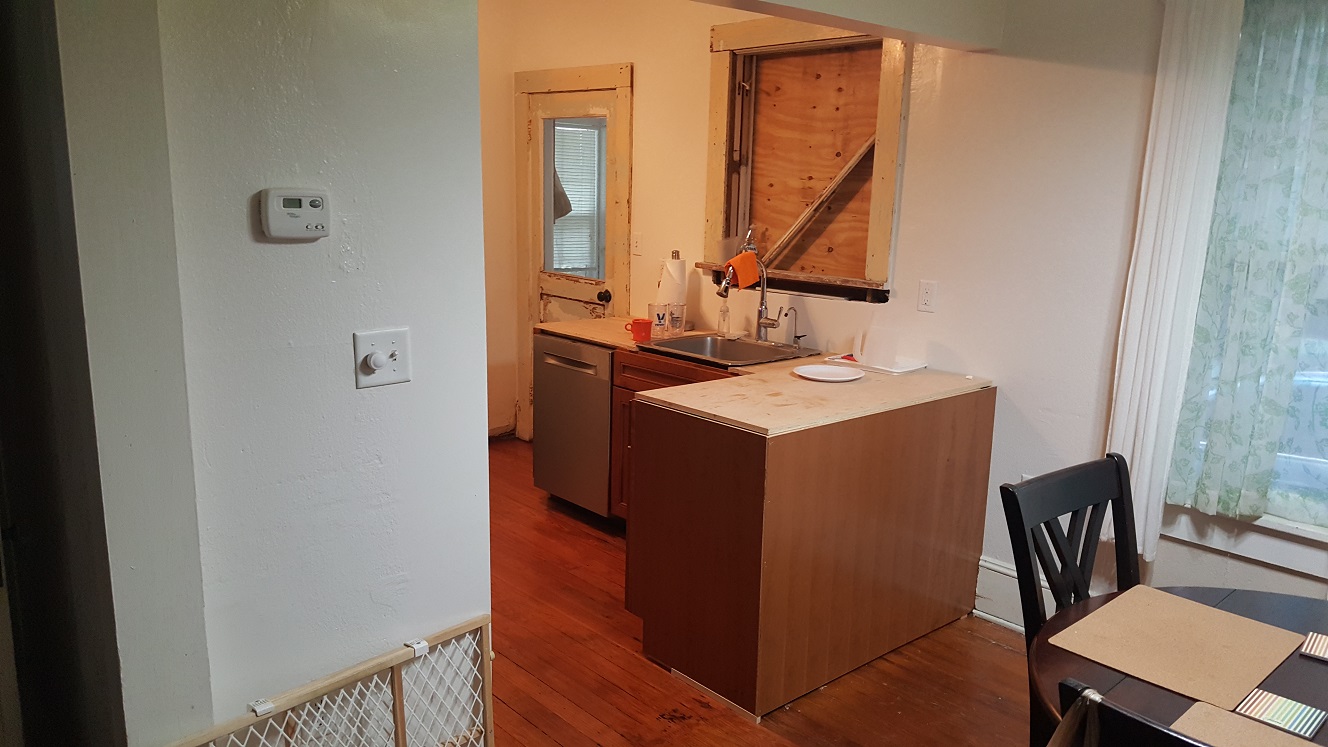
On tap for today, replacing the glass in the upper sash of the kitchen window the I broke scraping the paint. It didn't
actually break into pieces, or even all at once, but started as a stress fracture where I pried just a bit too hard. My
putty knife slipped down between the frame and the glass with just enough force to cause it to start to crack most of the
way up, stopping a few inches from completely splitting the pane.
The next day I noticed it had finished completely spltting in two. I put off doing it at the time because other tasks were higher priority in the big scheme of trying to get everything ready to sand and finish the floor. Well now that's all done, and we'll be able to move the cabinets and appliances back in, this time hopefully for their final placement. But first, before the sink base is in the way and while I'm still able to walk on the not quite fully cured floor where it will be hidden under cabinets, it's time to fix and finish the window. Besides the window glass, I still have to attach the trim pieces I removed, and the bottom piece still needs trimmed shorter. I figure I'll get the sashes out first so I can measure the glass and go get the replacement cut, then do the rest.
First I remove the stops for the lower sash, raising it up to get to the bottom nails in the stops, when I'm hit in the face with a fresh blast of humid air and remember I need to remove the screen and put the hurricane plywood up outside first. I had already taken the chunk of hurricane plywood for the window out of the garden shed last weekend and leaned it against the house under the kitchen window, thinking I would get to this then, but we started on the floor before I could. Shortly after we bought the house back in 2014, I bought enough stainless steel "hangers" for screen and storm windows to replace the old rusted ones. Over time, rather than replace just the hardware, I slowly rebuilt most of the now rotted wood framed screens. I made plywood hurricane covers for all of the windows before hurricane Irma last year (2017), and then stored them in the shed afterward. In any case, a couple of screws to hold it in place later and the kitchen window is covered with plywood from the outside.
With that done, I remove the lower sash and set it aside. I slide the upper sash all the way down as it seems the "easiest" way to get the parting beads out of the frame is to pull them out from the top. This requires a good bit of flex, and it you're not careful, they'll snap! Which is what's already happened to the one on the right. I've yet to come across any treatise of how to do this any differently though. It looks like I've already glued it back together once and run a couple of brass screws into the repair, but apparently not with enough bite for them to have been usefull since it split apart again. Sigh. I'll have to glue it again. Looks like last time I barely got through the one piece with the screw into the other. Perhaps if I move the screws closer together they'll have enough "stick out" into the other piece to hold better this time.
With the parting beads out of the way, I remove the sash cords holding the weights from the upper sash and its free as well. Now for the hard part - scraping all that old glazing compound out to get the broken glass pane out. Originally I thought about getting the measurements for the new pane of glass to go pick it up so that I would be able to get that out of the way early enough to let the glazing compound set overnight and hang the sashes back up tomorrow. Looks like I'm not going to Lowe's until later. I need to remember to check and see whether I have another tube of the caulking based glazing compound before I go though.
<< Previous | Kitchen | Demolition | Plaster '70s Wall | Plaster Cabinet Wall | Wall Cabinets | Sink Cabinets | Plumbing | Plaster Sink Wall | Flooring | Cabinets | Countertop and Sink | Finishing Touches | Next >>
I had hoped to get to Lowe's by lunchtime. It's not a total loss though, I manage to get some things moved around in the office to where I can begin to disassemble the HUGE dog crate that's been blocking the "secret passage" between my office and the back door. It's like one of those puzzles you put together and take apart, except it's been so long since I did I forget how we put it together... About all I remember is it took both Nick and I to put it together and I'm hoping just I can take it apart.
Anyway, did some quick "googling" to get a first look, then head to the garage to see about at least getting room to work on the window sash. Then I hear a car door out front and remember Ann has a new dresser being delivered today between 11:00 AM and 2:00 PM and I wonder if that's them. And it dawns on me, there's the reason why I was sitting here all this time waiting . Had I gone to Lowe's earlier, they probably would have shown up then and I would have missed them and Ann would not have been happy, to say the least. I head back inside to check. Nope. Not them. I decide while I'm sitting here to look up what sort of wood to replace the the parting bead with - if I can't get the old one glued back together properly, or worse yet, snap it again trying to put it all back together after I've glued it again.
I find that because these windows and frames are built from old, slow growth wood, they are the most rot resistant of any windows made, either then or now. With the proper maintenance, they should last a century or longer, as long as they're not already rotted from lack of maintenance. Wow. Now I'm really glad I didn't try to rebuild the side frame of the window in the bathroom that had begun to rot. New wood has very low resistance to rot, even pressure treated wood, and it's not like you can get creosote any more either. The best I can find is the copper based stuff, like for ground contact pressure treating, but we all know what happens to treated fence posts in ten years or so... They rot. When I finally do have to replace that window side frame, I'll have to find a place that deals in reclaimed wood to get some of that old growth pine to replace it with.
While I started reading to see what wood to replace the parting bead with, I also saw articles on repairing windows, where replacing the old style glass you lose that old style "wavy" character, and where you can get the old style glass if so desired. From what I was just reading, the linseed oil based glazing compound is far superior to the caulking in longevity, 80 years vs. 20 years... Great. Just what I wanted to know now that I skipped ordering the old school stuff online since nowhere local carries it anymore. Oh well, if all I have is the caulking based stuff, I'll have to go with it for now. I will have to take another look at the oil based stuff for the living room upper sash frame that needs repaired though. So I guess I'll be gluing that parting bead back together for now.
They finally deliver Ann's new dresser. Of course, right in the middle of parent pick up, so they have to park the truck at the end of the street and roll it down to our house on a dolly! If the dumb @$$es would have delivered it like they promised, between 11:00 and 2:00, it wouldn't have been a problem (for them). Me? I'll be here all day... I have them set it down in the living room and ask if we can go ahead and open it up. The one guy says no we can't and walks back out the front door. A little irritated, I say sure we can, and I grab my knife to start cutting this damned thing open. I'm not having a repeat of the appliances! The other guy decides to help me with it. I look it over and best I can tell it's fine. The guy has me sign the paperwork and I figure we're done here... Nope.
I hear another knock at the door and it's the guy that said they couldn't open the box. Now he's telling me he needs to take a picture of it for Amazon and wants my electronic signature on is phone as well. But... He can tell I'm wondering why he's bothering me again and says he would have got it the first time but he had to go move the truck for the busses. Well that explains it. He must have said he can't open it, knowing he had to go move the truck at the end of the street. It must have caused even more of a traffic headache for the parents than parent pick up already is. Now I'm just chuckling at these knuckleheads. They called Ann to let her know they were running behind and would be a few minutes past 2:00. When Ann told me that, I looked out the window at the line of cars already lined up all the way down the street and around the corner, I just said to myself sure they will...
By now it's going on 3:00 PM and I'm thinking I'm not going to make it to Lowe's before everyone's home from work anyway. I glued the parting bead back together, clamped it profusely, then laid it on the floor next to the lower sash since I really didn't want to set it on anything else. I went out to the garage to continue scraping out the rest of the glazing compound and the rest of the paint off the upper sash. Soon enough I have the glazing compound cleaned out and find only two glazing points holding the entire pane of glass in. It takes a bit of coaxing, but I finally manage to get both of them loose and remove the pieces of glass, which I promptly deposit in the curbside trash bin. Ann said she was shooting for being home around 4:30. I'm watching the security camera monitor as I'm trying to get the last of the paint off and see her pulling in the drive.
I'm almost done and the more I look at it, the more I realize it's seen weather, and a lot of it. I head in the house to meet Ann and see what the plan is. Don't really remember at this point, but time to do that maintenance the article was talking about. I do end up sanding, then linseed oiling it, even though I wasn't going to. I have to break into the stash of new brushes because all I had was the 4" brush, still sitting in the mineral spirits in a quart yogurt container. I forgot to clean it out so now it's gummed up with a layer of nearly cured linseed oil floating over what's left of the mineral spirits that has yet to evaporate. That too is promptly deposited in the curbside trash bin. I find the yogurt container for the linseed oil and pour some from the big gallon can into it, hopefully just enough to coat the sash frame.
With a piece of carboard on the table saw top and gloved hands, I coat the entire frame and set it aside to dry. Then I find another quart container to hold some mineral spirits to clean the brush with. I pour from the gallon can until the brush bristles are just covered. Let's hope I get to cleaning this one before it starts to gum up too. Chances are that I will be repeating the linseed oil treatment for the lower sash sooner than later, so shouldn't happen. I try to finish removing the paint from the window apron trim, but it's being fairly stubborn, and will wait for another time. I find that sometimes when left to sit, by having exposed the area around a stubborn spot somehow makes it less stubborn the next time? Maybe it just seems less stubborn since my hands have had a chance to rest. I'm pretty much done for today. Tomorrow will be the big day, the day we finally install the rest of the cabinets!
Later Nick is heading to Lowe's and I ask him to get piece of glass cut for me and he tells me there is nowhere safe to put it in the jeep? That's fine, I'll just plan on getting it in the morning I tell him. I mention it to Ann about how it sounded strange that he couldn't find a safe place to put it, but she said he probably just wanted to go there, get his stuff, and get back to what he wanted to work on. Good enough. Like I said, I'll just get it in the morning. Then I hear my phone's message sound. It's Nick asking what size the glass is, 12" x 22"? Nope. 16" x 28". So I don't know if Ann texted him after I said something or he thought about it later, but I run out to the garage to double check and make sure I remembered the dimensions correctly.


(Saturday, 5 May 2018 - Cinco de Mayo)
Cinco de Mayo... already? Ann and Nick are off to (potentially) pick up his new motorcycle. He rode his old CTX up to trade in on
it and Ann had to follow in her car since the CTX is still in her name. Nick texted a bit after 9:00 AM that they made it there. It
gives me a little time to myself this morning. Time to update this a bit more and relax a little before having to jump into getting
the kitchen all back together this weekend - since Ann scheduled the countertop installers to come measure Friday... Meaning everything
has to be in place, including all appliances, so they can measure and make plywood templates to take back with them - used to cut the
countertop material to an exact fit. It's a tall order, but we should be able to finish most, if not all, of it this weekend. Hopefully
they'll be back around noon and I'll have the new glazing in the window sash by then... Nope.
Out in the garage, nearly finished scraping the rest of the paint off of the window apron, and they're back! It's not even 11:00 and Nick is on his new CB motorcycle. I head in to wash up and have a look at the new beast. I can tell he's both excited and proud of his latest "toy". It looks nice and shiny and new. Had only one mile on it when he took possesion he tells me. They head over to his place to drop off the new bike, go pick up some lunch and head back to the house. I asked Nick to help me with getting the cabinets and appliances back in place and final installed. I know it's going to be a lot of work, but I'm not sure he realizes just how much. He agrees and we dig in.
I start with the level from the wall cabinets over the stove and mark plumb about where the base cabinets need to sit. Nick helps me get the one on top of the stack down and put it in place on the mark I made. Then the other goes into place. I measure between the face frames and... It's too narrow? I look and see the wall cabinets have a full side panel, flush with the face frame, while the base cabinets do not. In fact, the side panels are 3⁄16" inset from the face frames. That explains it. I mark a ¼" wider and move the cabinets to match. There. 24" wide as it should be. Since these will be stand alone cabinets, I don't have to worry about connecting the face frames. I check the level, thinking about how we had to shim the one about a ¼" just to make it level, having to adjust the jig to hold the wall cabinets accordingly. This time, now that we've sanded and refinished the floor, it's damn near spot on! And even between the two cabinets! Wow. If anything, they may lean back toward the wall a tiny bit. I'll take it.
I find the studs and drill the cabinets, first with a 7⁄32" wood bit until it emerges against the wall, then a 7⁄32" masonry bit to get through the plaster. Then I wind in the screws and recheck the level and the opening measurement. Still good. Now we get to the challenge... How do we shim and mount the surround panel for the refrigerator? Carefully. And by carefully, I mean carefully avoiding all the obstacles in the way and not damaging the new floor finish with a piece of "furniture" that's two feet wide by eight feet long. With it set in place, someone needs to spot it so it doesn't just fall over, but that's not a problem while I'm looking over the fit. Nick spots it while I take some measurements. I'm thinking both panels are inset by 3⁄16" and twice that is 3⁄8". I just happen to have some 3⁄8" x 1 ½" strips already ripped in the garage, I'll just cut one to the height of the cabinet and we'll use that to shim the back of the panel to the base cabinet.
After a quick trip to the garage, I return with the new "shim" and others of varying thicknesses. We fit the panel in place with the new shim and I clamp the face frames together. Something doesn't look right... It's as if the back of the cabinet is more narrow than the front and it looks like we need a ½" shim and not the 3⁄8"? Another trip to the garage and thankfully I have a piece of ½" x 1 ½" strip leftover from prior operations. It's not the full height of the cabinet, but judicious placement of the fasteners will work around that. We put the new new shim in place and now it's obviously to thick? What's going on here? I grab my square and find the culprit. The cabinet maker is relying on the flatness of the ½" plywood panels for the sides. In this case, it appears the side of the cabinet actually bows in a bit, giving that illusion that the panels are somehow "off". We both knew almost immediately the original shim is the way to go.
I drill and fasten the face frames together and then get a screw in the back through the shim and into the base cabinet to hold it all in place. Now to check the fit with the wall cabinet at the top. My "calculations" show that a 1⁄8" shim should work, but with the trim in place to hide the gap, it won't allow the door to open. Glad Nick asked how to hide that gap. Thinking about it again, the calculations should have been ¼", not the 1⁄8" anyway. That means the trim could actually double as the shim, doing double duty and resolving both issues at the same time. It looks like it was meant to be that way, like it's just a piece of quarter inch quarter round molding between the cabinet side and the surround panel. Nice. We figure since it's already connected to the wall cabinet's face frame and the base cabinet front and back, we don't need to cleat or shim the back of the surround panel to the wall at the top.
Next we need to deal with the pantry and somehow affixing the base "box" to the rest of it. The pantry itself has nylon "feet", or buttons stapled to it around the base and I'm not sure why? It's supposed to sit on a base, and the base is just four pieces of plywood fastened together, how are these plastic buttons supposed to help? Anyway, we've got some work to do before we start worrying about those buttons. Nick starts clearing out all the stuff in the way in front of the pantry and I hang the chandelier as high up as I can so it's out of the way (hopefully). We take the door off and the drawers out and lay it down on the floor for better access to the bottom. I try matching up the base with the bottom of the pantry. They're not even the same size! The more I have to deal with things like this, the more I'm wondering if I got the "quality" I paid for.
Nick asks since we have a spare, shouldn't we try it? Sure enough, it fits better than the one that came with it, and now I don't feel as bad about it not getting cancelled when we found the original. We're thinking we'll just connect the two pieces together with a couple of chunks of 1x4 to screw into. Another trip out to the garage. I can't find any 1x4s, but I do have 2x4s and cut them to size. Now I don't have to worry about using those short drywall screws, I can just use the stainless trim screws I used for the shim work. I start by ripping those stupid plastic feet off since the ones in the front aren't placed properly and only the back ones contact, which would have rocked the pantry dangerously forward. With the 2x4s in place, I run a couple more screws through the back corner braces of the base into the ones on the bottom of the pantry.
Time to set it in place in the kitchen. Even though we're careful, I manage to hit the globes on the ceiling fan a couple times just to add some excitement. Nick is heading over to his house to get the jacking post while I look up where the studs are and mark their locations for drilling the cabinet over the refrigerator and the pantry. I had already coiled up the ¼" copper water line for the refrigerator when we were installing the surround panel so that much is done at least. When Nick gets back we lift the cabinet off the refrigerator and onto one of the sheets of masonite he's already brought over from his house. I had already moved the doors that were sitting in it out of the way in the living room. I measure for the holes and drill the cabinet. With that done I ask Nick to spot me while I put it in place, the jack post already set up close to the height it needs to be.
It takes quite a few more twists than I thought it would take, but eventually the jack post is holding the cabinet off the floor. The face frame lines up nicely with the surround panel frame, but it and the pantry are hideously mismatched? I had levelled it and had Nick help me place an 1⁄8" shim under the front of it. Apparently when I shoved it back flush against the wall it just rocked it forward on the shim. With the face frame clamped on one side and the post holding the cabinet up, I rock the pantry enough for Nick to get the shim back out. At this point, as long as the face frames are tied together flush and the cabinet and the pantry are mounted to the wall securely, I'm not real worried about it. The pantry looked to be a good ¼" taller than the cabinet with the shim, and still a bit too tall without it. I get the trim screws in the surround panel then turn my attention to the pantry side.
I clamp and hold the top of the frames while drilling for the trim screw. It shifts on me before I can get the screw wound in. A quick realignment and I wind it in. Now with that part of the frames being held together, we can align and clamp the bottom. Easier said than done, but once that trim screw is in I can drill the holes for the cabinet in the plaster and wind in the screws. Once again, I missed a stud? I used the measurements I had, and the top hole hit a stud, why not the bottom? Even though it should have been right around the edge of the old doorway opening, there should have been plenty of wood there to catch. If I missed the stud, I didn't miss it by much. Oh well, three other holes hit the stud, and it's supported on both sides at the front as well so I'm not going to worry too much about it. That leaves the pantry.
The plan here is to hit the header across the top of the doorway, which I had measured and marked and promptly covered with the cabinet before drilling the holes. That's one. So I measure down to about where I should be and drill a hole, first in the wood and then... straight through plaster? I should have hit lathe at the very least. I look at the pantry again and it appears that unlike every other cabinet, both it and the refrigerator cabinet are inset nearly an inch and a half? I drill a new hole that much higher and, that's two, end up going straight through nothing? That's it. I give up! Change of plan. I'm shooting for where I know studs will be, closer to the top and nearer to the left side of the pantry, and lower and close to the right side. Both of those hit, so I move to the lower portion of the pantry and put one more in to secure this monstrousity.
We take a break for supper, Ann and Nick going to pick it up. I decide to put up the trim while I'm waiting, all but the window apron that is. Time to go scrape more paint. When I see them on the monitor arrive with the food, I head in to clean up and wash my hands. KFC. Not bad, but again, fast food quality at sit down restaurant prices. I still enjoy it, but would rather not have had the BBQ flavor. Regular or extra crispy is just fine for me. Finally done eating, it's time to move the refrigerator back in. I have to "wash my hands again" before touching it. We're fighting with the retaining clip for the water line and finally get it squared away. Before we push it back, it needs all the dust and debris cleaned off. Nick gets the debris with the little shop vac and the dust is wiped down from the side. I had cut some masonite strips to go under the wheels to keep them from destroying the new finish and they seem to work well. I'm surprised this time the refrigerator pushes all the way back into the surround.
While I'm thinking the last thing is the stove, it takes a lot longer because of all the adjustments. I slice my finger wide open on a concealed sharp edge on the bottom of the drawer face while making the adjustments, and it seems like no matter how hard we try, we just can't get rid of the wobble AND maintain level. I have Nick help me move the dishwasher back in, thinking I'll just get the sink cabinet later myself, but decide we might as well put it where it belongs too. I'm ready to say that's it, but then Nick asks how I'm planning on keeping the dogs out of the kitchen and off the not yet fully cured floor. I tell him the gate and start moving everything off of the top of the pennisula cabinet. I lean the top against the wall and we move it close to where it will go. I final position it once the top is sitting on it. Now I'm wondering should I keep going and connect the water... Ann says that's it, be done and get cleaned up. Good idea... I can tell Nick is ready to be done and at his house doing anything but this.
(Sunday, 6 May 2018 - Revenge of the Sixth)
So as I'm sitting here updating this account and it's nearly 11:00 AM, I'm thinking I should get started at least getting the sink
cabinet levelled and mounted and everything back online. But it's pouring rain and I'll need to get to the garage to fabricate some
pieces to hold the pennisula cabinet to the wall. Ann and Nick just dropped off the groceries and now they're off to his house to
drop off his. Ann's leaving her car over there until Nick can have a look at the rear bumper and what it will take to pop it back out
since someone backed into it at work and dimpled it in, big time. She's bringing the jeep back to drive to work this coming week.
I start the levelling process for the sink cabinet so I can mount it to the wall. First I'll need the beauty panel for the other side of the dishwasher to find the highest point. I grab it from the front porch, set it next to the dishwasher on the floor, and place the two foot level on it. Wow. A quarter inch downhill over just the two feet from the wall? Wow. I grab a leftover piece of the ¼" trim I used to space the surround panel from the wall cabinet and shove it under the front of the beauty panel. There. Now it's level. Now the four foot level across the dishwasher to the sink. Wow. Downhill another quarter of an inch? That means the floor is sloping down away from the wall toward the center of the kitchen, by a quarter inch over two feet, or just a bit more than 1% grade.
I shove a chunk of ¼" stock under the front of the sink base. It's about level across the front of the dishwasher, but still runs downhill toward the right of the cabinet, by roughly another quarter of an inch over 30". Wow. Less than 1%, but still quite significant since the cabinet will be between a quarter and a half an inch off the floor in the front. At this point, I'm hoping the floor doesn't keep going downhill, but it's time to get this cabinet installed and everything reconnected. I'll deal with the pennisula cabinet later. To that end, I locate the studs, drill the holes to attach the sink base to the wall, and wind the screws in. Feels good and solid. Guess I'll move on to connecting the electrical for the dishwasher and garbage disposal.
I open up the plastic circuit box for the dishwasher and retrieve the push in connector. Hmmm... I forgot it was the 6 position one since that's all that Nick had at the time. In search of the 3 position push in connectors he got me, I find them in the big box of electrical stuff in the office. It's a first step to getting everything organized to go back out to the garage, and now a step closer, now that we're almost done with the kitchen. I will be done once I swap out the switch box on the '70s wall, that is. But that will keep for another time. They're coming to measure for the countertops on Friday, so these cabinets all need to be installed by then. For now, I'd be happy if the sink was installed, but the finishing the electrical is easier with it out, so...
There are two 12/2 NM cables coming out of the electrical box in the wall and through a hole in the back of the cabinet. I pull these through the the open knockout in the back of the metal box that will contain the dedicated disposal outlet, and pull the one for the dishwasher through the clamp in the knockout in the bottom, pulling it into the plastic junction box that came with the dishwasher. I actually fed the dishwasher feed through first, checking the length of the conductors, then pulling the disposal line into the metal box. Then I land the dishwasher conductors where they belong before tightening down the cable clamp to hold everything in place. After tigthening down the screw clamps on the conductors, I switch gears to the disposal outlet.
The ground wire had come loose from the screw on the outlet, so that gets tightened first. There are three grounds altogether, one from the box itself, one from the outlet, and one from the feed. And all three get pushed into the connector. I screw the metal box to the back of the cabinet then tighten the cable clamp for the dishwasher feed. Then I land the hot and the neutral under the screw clamp terminals on the outlet and screw the outlet to the metal box. Before I turn the power back on, I put the cover on the plastic junction box. Breaker on, no pops, and the disposal spins when I turn on the switch. Good. Electrical is done. Next is plumbing. I reconnect the power cord from the plastic junction box to the dishwasher and move it back into place... Time to plumb!
Starting with connecting the adapter for the hot water, then the dishwasher line, then the sink feed to the hot water supply valve. Next is the cold supply for the refrigerator, then the faucet feed, then the output from the water filter. Last is the feed to the water filter. Twist lock the disposal, add the trap and waste lines, and we're ready for the test. On goes the hot. Good. No leaks. On goes the cold. A brief spray from the push in connector on the input side of the filter tells me it isn't seated all the way. I pop it back out and push it all the way in this time. Good. No leaks here either. Turn on the faucet. Good. No leaks. I run the dishwasher rinse cycle. Getting a drip from the trap? I put the bucket under the trap, loosen the connections, then reposition so everything looks square and tighten everything back up. Faucet on. Rinse cycle running. Still getting a drip from the trap? Repeat. Still getting a drip!
This is maddening! This has never leaked, not a single time, for as many times as I've had it apart and back together, until now... I take it all back apart and visually inspect the connection to the waste line to the wall that keeps weeping. Aha! There's the culprit. Just enough flash to get caught between the sealing flange and the seat. I use the sharp edge of the electrical snips to remove it and "smooth" it. I feel another spot where the parting line from the mold halves is sticking out and "smooth" it too. All back together, Fingers crossed. No more drips. Yay! Problem solved. Now back to levelling the last cabinet, the pennisula cabinet. So first things first. I need to attach the 3" trim strip to the face frame of the sink base on the pennisula cabinet side, which will help space the two apart enough that the cabinet doors and drawers won't smack into each other, once the restrictor clips are installed that is.
So first I have to move the pennisula cabinet away from the sink base to give me room for the clamps to hold the trim piece while I drill the pilot holes, which also means at least one of the doors will have to come off. I took both off earlier since they both need restrictor clips installed. Turns out the trim piece is ever so slightly taller than the face frame of the sink base? I split the difference and screw it together. Now I can look at shimming the last cabinet and getting it installed. Or so I think... I start with a 3⁄8" shim and it's not even close! I lift the cabinet using the other long 3⁄8" as a lever and replace the first with a long half inch shim. Still not even close! Wow. The cabinet is still roughly half an inch low next to that trim piece from the sink base. I add another 3⁄8" shim and it's a bit too tall? I swap it for a chunk or quarter inch and it's close, but now the end away from the wall needs to go way up for 1t to be level. I don't even want to think about what this means.
The ½" piece on the end of the pennisula cabinet needs another 3⁄8" shim on top just to get it close, but now the whole thing is wobbling terribly and leaning away from that trim piece on the sink cabinet. I would put a shim under the back side, except is just that cardboard crap with the thin wood veneer, which would probably bend or tear apart under the cabinet's weight if I tried. I slide another chunk of ½" under the back corner near the wall and that does the trick. For now at least. I'll have to think about this one some more... A lot more. There are so many things wrong with this scenario. None of which I can do much about. I didn't think the floor sloped that badly. On the other wall the floor was pretty much flat once sanded and finished. But on this side it's a disaster and I'm not sure why it's so much worse than the other side. Unless the foundation has settled or the lot has slumped or both. Perhaps prolonged exposure to water leaking? After all, the floor still has some water staining after all that sanding.
I can't change any of ths... First, the heaviest cabinet is essentially jacked up off the floor and sitting on blocks. Not the most stable arrangement. Second, the cabinet doesn't really mount to the wall. Not in the sense that a side of the cabinet is pressed up against the wall and screwed in like every other cabinet is. Third, and this is the reason why it doesn't mount directly to the wall, the beauty panel that covers the "naked" back of the cabinet is 48 ½" long while the cabinet is only 45"? I'm not sure why the cabinet is shorter, but because these cabinets didn't come with installation instructions, how would I know? Even the online instructions are brief and I'm sure the guy at Lowe's would just tell me to go look at the models... About all I can tell you is a 2z4 is about as wide as the difference in lengths between the cabinet and the beauty panel. Coincidence? I think not.
But why in the Hell would you want to place a 2x4 on edge between the wall and the side of the cabinet? I guess you could just toenail it into the wall then screw the cabinet to it, but I will probably screw another 2x4 flat against the wall and screw the one on edge into it for better strength and rigidity. There is only one stud that it lands on, so it needs to be as solid as it can be. Still thinking about that one too. For now at least it's roughly in place and provides much need counter space. Speaking of counter space, I'm thinking now that the front of the dishwasher opening is another ¼" taller, I may be able to use that 1x3 to stabilize the beauty panel like I wanted. I haven't tried to slide the dishwasher out from under it yet, but since I've been sliding all the appliances on a piece of masonite to protect the floor, it will probably still be a tight, unforgiving fit.
Ann has been moving things back into the kitchen over the course of the day. A little here, a little there, while I'm taking a break or thinking about something and not in the kitchen. It started when she and Nick went to the grocery store and got back to put things away, like I said earlier. But now that everythng's as done as it's going to get today, I ask if she's ready to run the dishwasher. She loads it and runs its, setting the freshly opened bag of dishwasher "pouches" on the dirty dish counter, as I point out the old one still under the sink, already opened. Shrug. Next she asks me if she can move the dining room table back in. Sure. I don't see why not. The closer we get to back to normal, the better. Now once I can get rid of the rest of these boxes full of tools, and things like the new sink and faucet that are waiting on the new countertops to be installed, I'll really feel like things are back to normal.
(Monday, 7 May 2018)
Another Monday. Yay. I'm thinking since I'll be home early, I'll be able to fashion some of the support pieces I'll need to mount
the cabinet. Nope. An accident has traffic backed up to where I get off the new highway, and the stupid Waze thing takes me to the
next accident caused by impatient people trying to get around the first accident, and both blocking my way home. I end up having
to double back twice and try a third route before I can finally make it home, half an hour late. By now Ann's ready to make supper,
so there's no way I'm taking the kitchen all apart. I do have an idea about how I'd like to make the shimming a bit more sturdy
though. I figure I can just attach a 1x4 "frame" around the bottom perimeter of the cabinet at the correct height to better support
it. I say "frame" because I'm not sure how well anything will attach to that cardboard crap on the back, especially that beauty panel.
But using the frame I'll have a hefty chunk of wood to back it up.
Another one of those "how the hell is this supposed to work" moments... How to attach that beauty panel to the back of the cabinet? I'm thinking the way to do it without fasteners showing would be to run the screws into the back of the panel from inside the cabinet. I'm not sure how else you would do it. I certainly wouldn't want to run screws into the edge of the plywood side and hope for any strength whatsoever. And then where else? Along the top where I would hope it wouldn't show because of the overhanging coutertop? Then what hides the fasteners when we're sitting down at the dining room table, just about eye level with them? Trim maybe to hide them? Just so strange that the cabinet isn't full sized and the panel already attached, or better yet, part of it! But even if it was, what will hide the near inch gap along the bottom? Good question... Ann is thinking some of that modern "baseboard", stained to match the floor. We'll see. I need to think about mounting the cabinet first.
Thinking about it now, maybe a 2x4 mounted to the cabinet end by the wall that butts up against the wall, not necessarily attached to the wall, should give a substantial mounting for the other end of the panel that will have trim to hide the fasteners. It means I'll still have to fasten to the edge of the plywood side though, but at least there's a piece of corner molding to hold the corner in shape. I guess if I really wanted to I could screw into the top and cover it with molding as well. The bottom, well, let's just say we are going to have some shaping and staining in our future just to fashion a suitable "baseboard" to cover that huge gap off the floor. I guess the simplest thing would be to use the new router table and fashion a molding similar to that provided. It's a quarter inch thick that's ¾" wide with a quarter round along one edge, almost like screen molding, but missing the other quarter round. I would fashion the new one to be somewhere between an inch to an inch and a half wide, which would be twice as wide as the provided molding, yet still thin enough to (hopefully) not catch a toe.
(Tuesday, 8 May 2018)
What a way to start the day... As I'm getting dressed to leave for work, I'm hearing an electronic beep, but I don't know what
it is or where it's coming from. Nothing I can do about it until I'm dressed anyway. I walk into the kitchen, thinking I'll
get my lunch together and hear the dishwasher "running", and the display on top of the door is flashing "E:15". Great. We have
yet to use the damned thing half a dozen times and it's already fried! I'm really thinking we've been had by Goedeckers again.
I try to reset it by holding the Start button for 3 seconds like it says, but it's not listening to me or any of the buttons.
Fine. Don't want to listen to me? How about you go without power? The ruthless reset with the breaker appears to have changed
nothing. The pump motor immediately starts again, and it's still ignoring my button pushes, but now the display is dark and
doesn't show anything. Great.
I don't really have time to deal with this right now. Because I have an hour commute to work, if I don't leave within a very narrow window, it takes me even longer. I try turning the breaker off longer, thinking maybe it didn't totally bleed the power from the controller. I put my lunch together and pour the rest of the coffee into my travel mug and turn the breaker back on. Same thing. Pump runs, no buttons, no display. I figure I don't really want to leave this thing running all day with no one here to keep an eye on it, so I just turn the breaker off and leave a note about it on the whiteboard on the refrigerator, lock up and head to work. I text Ann about it when I get to work, before I even have a chance to look up the problem. She replied Nick looked it up and it's fixable, but that's all she knew. Guess I should have looked it up myself before stirring things up.
Turns out it's a common thing with these Bosch dishwashers... Because they are higher end silent type models, they actually have a sensor for water overflow! Guess that's why they're more expensive, because it's an actual float and a microswitch to tell the controller electronics that something is leaking into the plastic base pan. It automatically goes into "flood" mode, meaning the controller turns on the pump and leaves it on in an attempt to reduce or avoid flooding the kitchen. It locks out the control buttons so you can't tell it to run again until the problem is fixed. Kind of smart, but really annoying until you know why. The cause? There could be a number of things causing water to drain into the pan: 1) A leak in the water supply or shutoff solenoid; 2) The door was opened while it was running (both of us guilty); 3) A door seal or internal seal is leaking.
The quick fix? Drain the water from the plastic pan beneath the tub one of two ways: 1) Remove the door and then the cover over the pan, a total of six screws, then using a "turkey baster" or other means, remove the water then put everything back together; or 2) Remove the two screws from the mounting brackets holding the dishwasher to the cabinetry, pull it out of the opening, tip it back 45° and let the water dump out onto the floor, then wipe up the water and put it back together. So I'm wondering why running the pump for all that time this morning wasn't able to adequately drain the water from the pan? And while both Ann and I openend the dishwasher while it was running, the last time (last night), she and Nick didn't realize I hadn't mounted it to the cabinets yet and it tipped forward. So unless only tipping it backward drains the pan, I'm still not sure where the water in the pan came from.
When I get home from work, I grab a piece of the masonite from the porch and slide the dishwasher out onto it, thinking this will be a good test of whether it will slide out under that front crossmember or not... Not. As in not a good test since the beauty panel isn't secured to the wall or the floor with anything, only the crossmember, and it just wants to keep coming forward with the dishwasher. In any case, I tilt it back, but don't really hear any water rushing out. There may be a cup or two of water on the masonite, enough to leave a puddle that flowed over the edge and onto the floor. I mop it up with what few paper towels are left and turn the power back on. Wow. Everything is fine now. What a pain in the... I go to shove it back when I notice the "strain relief thingy" that's supposed to keep all of the wires and hoses and stuff going out the one side has snapped out.
And this time it tore the "barb" that holds it in right off the end. Great. I grab the one from the other side, which is now essentially the spare, and replace the broken one. Nearly all the way back in and I hear the damned thing pop out again. Screw it, I'm done with this assinine design! Those things can just stay loose. At least the dishwasher is back online. I sit down to cool off and the dogs are bugging to go outside, so outside we go. Brigel and I play ball until he's pooped out, literally. Sorry. TMI? We head back inside and not two minutes later Ann pulls in. I pop my head out the door and let her know I've already got the mail. I figured while I had the chance I got the recyclables out to the curb and grabbed the mail from the mailbox while I was out there. Then Nick pops in with the food for cooking. Ann and Nick are cooking supper and I'm back outside to play ball with the dog to keep him from under foot while they cook.
After supper I get started making the "frame" for the pennisula cabinet. Well, kinda sorta... Ann and Nick run down to Lowe's to pick up a couple of 1x4s while I look at "perfecting" the shims. By perfecting, I mean measuring the "exact" thickness. By exact thickness, I mean as close as I can get using a digital caliper, or any measuring device for that matter, with wood. Most of the shims are two pieces, both of "nominal" sizes, like ½", 3⁄8", ¼", etc. For example, the end of the cabinet has both a ½" and a 3⁄8" shim stacked together. Nominal size would be 7⁄8", but the stack together measures 15⁄16"? You see my dilemma... How to cut an exact fit shim if the size isn't exactly correct? It looks like that end is just a tad high anyway, so I grab the chunk of 1x6 I've been using to piece together the dirty dish counter, for its nominal ¾" size and swap it for the too tall stack I already have there.
Well now, if 15⁄16" is too tall and ¾" is too short (actually a tad over the nominal ¾"), I guess I'll have to go with 7⁄8"? Normally I wouldn't care about sixteenths of an inch, but I want to make sure this cabinet is sturdy and permanent because once the countertop is installed over it, it is permanent. There's no taking it back out after that, short of taking out the entire countertop and backsplash, sink and all! I have a few shorter pieces of 2x4 left from previous operations, so I grab one and head to the garage to rip it to size. I set the table saw fence to 7⁄8" and rip one shim that thickness. Well, usually what I do first is set the 2x4 (or whatever stock I'm ripping) between the blade and the fence, snugging it, then remove it and set the width to about an eighth inch less and rip a side square. Then I set the width I want to rip and flip the 2x4 around so the sides are parallel to each other, or at least as parallel as you can get them using a table saw on wood. From there, if I'm making successive cuts, those will be parallel too.
So I take my new one piece shim and swap it for the 1x6 and now it's back to too high? Guess I should have measured it first... As I said, I usually don't worry about sixteenths of an inch, but in this case, it looks like the indicator for the saw fence position is a little off. You guessed it, by about a sixteenth! My nominal 7⁄8" shim actually measures 15⁄16". Back to the garage to set the width a tad more narrow. There. An actual 7⁄8" thick shim and it's perfect. The cabinet is level across its entire 4' dimension. It looks like that end is level too but the end by the wall runs downhill slightly toward the sink. Alright, time to get the next stacked set of shims perfected. This time it's a 3⁄8" and a ¼" shim stacked together, nominal 5⁄8", but looks a tad short for meeting up with the trim piece from the sink. I experiment with some different combinations, and ¾" is too tall, so 5⁄8" it is. Fence set for 5⁄8", I start to rip another shim but it's trying to climb the blade and leaves a definite flaw, so I cut a second one with no issues.
Well, no issues until I set the good shim in place. Still too short and that long side looks like it's going downhill toward the wall a bit now? It looks like 11⁄16" is the magic number. Back to the garage. Hopefully this is the last cut because I'm out of 2x4, at least this one anyway. The 11⁄16" shim does the trick. Level, except for that back corner by the sink still looking a bit low. I have a chunk of ½" under that corner, but it is totally loose and free to move. Turns out I have a 5⁄8" shim just the right size for the job. I slide it under that corner but it's still too high? That's okay. I'll just rip that bad 5⁄8" shim down to 9⁄16" and split the difference. I slide it under that corner but it's loose? I have a look with the flashlight and it appears the quality control for that corner didn't include making sure the toekick and the side panel met flush. The toekick would be off the floor with the side sitting on the floor, so I lift the cabinet side onto the shim and now that corner is too tall.
I'll just have to live with the shim being a little loose in the corner, after all, it will have a 1x4 frame supporting it soon enough. All that's left are the 2x4 spacers to offset the cabinet from the the sink base and the wall. The one for the wall is easy, just a chunk of 2x4. For the sink, a chunk of 2x4 will need ripped to 3" wide to match the trim piece. I grab the last 2x4 I have left from the old doorway and head to the garage. I don't really want to rip the entire 2x4 to 3" since I'll need a piece that's 3½" for the wall so I grab the chopsaw and cut it to 34½". Now I can rip just that piece. I head back and place it bewteen the back corners of the sink and pennisula cabinets and... The 2x4 could have been 35" tall, but the biggest problem is the damned offset of the face frame of the sink base to the side, a whopping ¼"! Moving too fast and just wanting to be done I guess. All the other cabinet sides are either flush, if they will show, or slightly inset if not. So why is this one the oddball?
It doesn't matter now. What's done is done. I can work around it with a chunk of ¼" shim. I still need to cut the 2x4 for the wall and all of the 1x4s for the frame. But to measure for the 1x4s, I'll need to tip the cabinet on its side. But not tonight. It's already close to 9:00 PM and time to be done for now. I'm already making stupid mistakes by not thinking things through before doing and I really don't like to be the one making all the racket after 9:00 anyway. I still have a few more evenings to get this done, right?
(Wednesday, 9 May 2018)
Working remotely. Since I barely got the shims and spacers cut last night, I feel like I'm running out of time on this. I
have today and tomorrow left, and maybe part of Friday morning, but I'm not counting on that. So while I'm waiting
on my machine at work to finish losing its mind over updates, and then the VM losing its mind over updates, I'll be
able to start the long process of waiting on a huge production database extract. I was supposed to have something to discuss
Monday afternoon, but it's already Wednesday and I still don't have a stable, working development environment. I'll
get there, it's just taking a LOT longer than I expected. I'm hoping once the VM is finally
working, I can just use a copy of it here at home to isolate it from my personal machine.
I'm at the point I need to tip the pennisula cabinet over and start measuring and cutting 1x4s. I also need to think more about how I'm going to mount those beauty panels, both the one for the cabinet and the one for the dishwasher. I'm still leaning toward capturing the one for the cabinet from the back from inside the cabinet. For the dishwasher, I'm thinking I'll need some sort of cleat into the floor and into the bottom of the panel. I have that crossmember at the top in the front, but the one in the back at the top was too long and needs trimmed to size. None of it's going to get done unless I get busy and start doing it. The hurry up and wait of work is really starting to wear on me. While I'm waiting, I start doing...
The pennisula cabinet is my biggest concern at the moment, so I take everything off the top and out of the inside, then tip it over on its back. I get the measurements and head to the garage with 1x4s in hand. Chopsaw back up on top of the table saw. Chop, chop. Back inside to fit them. The ends are a snug fit, but the long sides are somewhat loose. I was afraid they would be too tight and I'd have to go back and trim them. Nope. I was hoping for an exact fit so I could draw them together tight in the corners with reinforcement of some type, but a screw through one into the other will have to be good enough. Using the "perfected" spacers to align them, I clamp them in place, one at a time, and screw them tight. Happy with the result, I flip the cabinet back up onto its new "base".
I place the levels and see it's not quite as perfect as it was with the "perfected" spacers, so I put the one under the end, but still needs some adjustment. By sliding the spacer toward the dining room corner, things seem to come back to the way I had it, but I can't have a chunk of wood sticking out an inch from under the cabinet! Back out to the garage with "perfected" spacers in hand. I figure while I'm at it and already have the saw set up I'll rip the floor cleat I'll need for the dishwasher panel as well. I find a piece of old pine from the side porch that I've already ripped that is very close to ¾" x ¾" that should clean up nicely and cut it to length just a bit less than the inside dimension of the panel. The chop saw comes back off the table and onto the floor. I set the rip fence on the table saw and slice the "perfected" spacers to ¾" wide, followed by the new cleat, then head back in.
The spacer for the end goes in fine but protrudes ever so slightly. I can live with that for now. Next its time to set the spacer in place for where the two cabinets will be joined together and... It still sticks out quite a bit? Turns out the plywood thickness for the toekick isn't ¾", but rather 15⁄32". Not even ½", because profit. Back out to the garage to trim this spacer to 15⁄32". Now it fits fine too, so I turn my attention to attaching the cabinet permanently. By permanently, I mean I'll still be able to take it apart if I need to, until the countertop is installed over it. Before I do that though, I need to attach some 2x4 to the wall to give the cabinet something solid to mount to on that end, and make up the difference between the cabinet length and the beauty panel length. Back out to the garage.
Chop saw back on the table saw. I cut what's left of the 2x4 in half, giving me two chunks, each about 21" long. Back inside, I attach one of them to the wall stud, using some 2½" screws. It's in there solid. Then I attach the other to it on end, in an "L" arrangement. With that and the other chunk of 2x4 (and another ¼" shim) to space it away from the sink equally, I'm able to put the cabinet in its final position. Before I can permanently attach it though, I'll need to cut that baseboard to fit, and that's going to take some doing. I left enough of the spacers sticking out to hold the panel off the floor equally with the cabinet so that all I need to do is hold it in place and mark the baseboard where it needs cut. With that done, the panel gets put back into "protective storage" and the cabinet moved out of the way.
Since the last few times I used the Dremel saw it smoked like crazy cutting wood, I figure it's time to put on a new blade. With that and the shop vac connected, I make quick work of slicing through the baseboard as far as it allows me to, leaving a couple inches to hand "cut" with the chisel near the floor. To do that that took me as long as it did to change out the blade and setup the saw and vacuum. I was hoping to salvage those pieces to go around the corner on the other side by the stove cabinet, but it split into multiple pieces. Oh well, at least now I can permanently attach the cabinet, once it's back in place that is. Using the same 2x4 / shim spacer trick as before to ensure even spacing from the sink cabinet, I drill a pilot hole from inside the cabinet into the trim piece on the sink base and wind in a trim screw. Repeat for the cabinet end and the wall mount. Repeat for both mounting points, but lower.
Looks good and it's fairly solid. It certainly isn't going anywhere short of using destructive force. Time to figure out how to attach that panel to the cabinet... I really don't want to screw it in from the outside and have to hide the fasteners, but it looks like it will be too thin to capture from inside the cabinet, even using the shortest screws I have, 1 1⁄8" fine thread drywall screws. I retrieve the panel from the front porch and put it in place with a couple quick clamps to hold it there. Everything fits nicely, even the cut in the baseboard. Time to cut the corner mold to fit. I have one piece that's eight feet long, but need less than three feet of it. A quick measurement and out to the garage for one last cut for today. Back inside, I use another quick clamp to hold it in place. Done as it's getting for now.
Anyway, we discuss the "baseboard" trim we had talked about before. I tell Ann my thoughts on making the pieces to resemble the trim we alrady have but twice as wide. She's not sure what I mean so I grab the piece leftover from cutting the trim for the refrigerator surround and put it in place to demonstrate that it's not quite tall enough to cover the gap it needs to cover. She says she's concerned that even though the floor stain is close, it won't be close enough, and that stained pieces will be noticable and draw attention to themselves. She wants to just use the trim we have. I suppose you won't notice the gap unless you're right down on it, so that's the plan, but it's still bugging me.
Later I'm thinking I can use the trick like I used for the refrigerator surround, but lay a trim piece flat beneath the trim that will cover the gap. I may have to rip the trim piece that lays flat, but it would give that quarter round feature between the trim and the floor. Ann says no. Guess that's it then. Next she asks if the panel is already mounted, but the answer is no, I'm still trying to figure out how to do it. I explain I don't have short enough screws to catch it from the back like I want to and Nick asks why we can't get some. I tell him we may be able to find some inch long screws, but I've never seen any shorter than the ones I have, but that's in bulk. They may have something that would work in the little packages, the ones that don't have quite enough in them, and for an outrageously high price to make up for it...
After supper I decide to chance running screws through the panel and into the edge of the plywood cabinet end. I drill pilot holes and land the screws. Nick says guess I didn't like his shorter screws idea. I told him we still have time to get them, but I wanted to be able to take the clamps off and restore the lost workspace. I told him I didn't like how the cabinet was shorter than the panel and how I wouldn't have anything to screw into by the wall where trim could hide it and it would look stupid to have trim by the wall and then another piece several inches away just to cover the screws into the edge of the cabinet. Then he tells me that reminds him of what he was reading in the pennisula cabinet installation instructions he looked up for me awhile back.
They recommend installing cleats to help support the countertop since the cabinet woun't be flush against the wall. Cleats eh? Hmmm... That might just work to give me something to screw into that will be hidden by trim. He says he's been meaning to say something but kept forgetting. Not a problem. In fact, now I think I know how to get the panel by the dishwasher installed too. He heads home and I turn my attention to installing the cleat on the floor for the dishwasher panel, but I need to wait for the dishwasher to finish... Wait! No I don't, but that's okay because it just beeped it's done. I remove the crossmembers I've already cut to size the give me a 24" opening and use them to hold the level in parallel with the side of the sink cabinet and draw a line on the floor where the cleat will go.
Using the panel as a guide for how far from the wall to place the cleat, I set it in place. I drill a pilot hole near the front, then follow it with a bigger bit to countersink, and finally wind in a screw. Repeat for the back. Test fit the panel. No problems. The cleat isn't as solid as I'd like, so one more screw goes in the middle. That's it for now. I screw the crossmembers back in place and put everything back where it goes. I'm feeling much better about what's left to do before Friday now. I'm glad I was able to take the time today to get it done. Thankfully I've been able to switch back and forth between the kitchen and work, concentrating on one while waiting on the other, and vice versa.
(Thursday, 10 May 2018)
When I get home from work it's time to put on the finishing touches. Cleats for support to start. I measure the
distance from the side of the sink base to the beauty panel and it dawns on me, I should have set the height of
the wall mount so that a chunk of 1x4 or even 2x4 would fit on top of it. Let's just check and see if... Nope. I
guess I'll be using that nice piece of leftover 1x3 for this cleat then. I put on my work clothes and head to the
garage. A quick cut and it fits like a glove. I drill a pilot hole through the beauty panel into the end of cleat
and wind in a trim screw to hold that end in place. Then I drill the cleat to screw it into the wall stud, holding
the other end in place. There. Done. Now to get that dishwasher beauty panel captured from the inside through the
floor cleat...
Which means pulling the dishwasher back out. Which means getting the masonite from the front porch and setting it down in from of the dishwasher. As much as I'd like to test whether it will fit under the crossmember, I need to move the one in the back to flush against the wall to act as the cleat on that side of the sink. Unfortunately, as much as I tried to get the plaster flat, it's not even close to flat on either side... Sigh. That's alright, I'll just use a chunk of that ¼" shim behind the side by the beauty panel, then I can run a trim screw into it about the same place as it already was. I move the dishwasher out onto the masonite and off to the side out of the way. Well, out of the way enough to allow me access to the back of the floor cleat.
I move the panel and shim into place and check for level. Not even close? Now what? After some futzing around I finally manage to get it level across the face frames and nearly level from front to back. I drill a pilot hole and countersink then wind in the screw in the front. Checking the level and it's off again? Really not sure what's going on here... I back the screw out, get the panel level again, then wind the screw back in. Perfectly level? Wow. Quick! Get the back screw in before everything changes again! With a third screw in the middle, and the front crossmember in place, the panel is secure. After a quick sweep with the handheld vacuum, I start to push the dishwasher back into place, but I stop as I remember I wanted to check that overflow pan for water before I put it back in.
I see there is another puddle, about the size of the puddle I mopped up last time it lost its mind and went into "flood mode", but wonder if that's not just the normal state. In any case, I make a mental note and push it back in place, pulling the lines back through the opening in the side of the sink base. Not bad, it fits right under that front crossmemeber, even with the added height from using the masonite. All that's left is to raise the front up on the shims to level it out and... DOH! Stupid dishwasher! It's in flood mode again! Of course it waited until just after I put the masonite away on the front porch to pull this shit again! I pull the shims out and it stops? Nope. Out it comes again.
This time I mop up the water in the bottom and set it back in place, except the insulating blanket on the sink side catches and I have to pull it out, again, to reposition the blanket, then push it back into place, again. Now the only thing I'm confident about this dishwasher is I'll need to get the installation guide back out and read how to level it and mount it to the cabinets properly. I'll also need to see how much of a pain it will be to take it apart to drain the water rather than pull it out once it's installed. Maybe I should just install a permanent vinyl tubing drain line with a plug I can just open when it does it again. I'm really hoping once it's installed correctly and permanently this problem will go away. Guess we'll see...
When I was attaching the cabinet to the sink earlier, I had both the "lazy susan trays" hanging out the front of the cabinet to keep them from getting sawudst on them and out of the way, but I noticed the front corner of the cabinet wanted to lift off the floor without much persuasion, so I'll still need to put a floor cleat under it if there's time before they get here to measure tomorrow.
(Friday, 11 May 2018)
Working remotely today. Updating this account. Waiting to hear from Ann when the countertop guys will be here.
She just text me saying the counter guy will be here around 11:00 AM. That gives me some time before I
have to corral the dogs but I guess I should start moving things off the temporary counters now... There. That's
done, but I won't have time to undo the cabinet and get the cleat under the front corner before the guy gets here,
so what are my options? I guess I could do nothing and hope the weight of the countertop will be enough to balance
the weight of the extended tray(s). I don't know how strong or brittle the material is so I don't know how much
to trust it. I could just run a screw through the 1x4 base into the floor, toenail fashion. It has the virtue of
being the simplest solution, albeit not very elegant. Or I could just take the cabinet back out and install the
cleat.
I move the dogs into the back of the house and close the hall door a bit before the guy gets here, which isn't much after 11:00. Nice. He has a device case, a tripod and a clipboard as he walks up to the house. I don't know it's a tripod until he takes it out of the "sleeve" and sets it up in the middle of the kitchen. The device is a laser rangefinder thingy tied to a tablet based computer application. All the guy has to do is set up white reflective "targets" in strategic places and tell the application where they are as he "shoots" them with the laser and takes a reading. I ask him if I'll need to take the sink out and he says when they come to install it but for now it can stay. He does mention he'll need the template for the new sink so I dig that out of the box that's been sitting in the living room for the past month at least and now has a bunch of stuff stacked on it.
The sheet of paper with the rough dimension is just sitting on top, so I grab that first, then dig out the actual template. I text Ann to make sure she still wants the sink flush and not the reveal and she confirms so I tear off the outer portion of the template that allowed for the reveal. Then he asks if we are going to flush the front of the stove with the cabinet doors and drawer faces. I tell him we can and he says we'll have to since there's a piece going across the back behind the stove and then the backsplash on top of that. Wow. I was wondering how that was supposed to work. At first I thought about asking when they measured, but figured it would be extra work for them to put something along the back of the stove, and potential increased cost for us, so I decided not to bother.
Thinking nothing was going there, I hadn't installed a cleat, so I figure I better ask if he needs me to put one in. He says to support it yes, so I'll need to put a cleat along the back of the stove too. When I saw him using the laser to "make the template", I was concerned about taking the pennisula cabinet back out to put in a cleat to hold that front corner down to the floor. But after hearing I can add the cleat without having to worry about it affecting his measurements, I'm thinking I should probably just go ahead and do it since it seems like the meeasurements aren't so much for exact height but more for where the cabinet faces and the walls are in relation to everything else.
I'm back and forth with whether to take that cabinet all the way back out just to put in a cleat, but finally tell myself to just get it done with! I wind out all the screws securing it, after marking the position of the base on the floor, and move it out of the way. Using something roughly ¾" wide, I mark the position of the cleat, then head to the garage to cut another one. I drill a pilot hole, countersink, and wind a screw in closest to the corner. Unfortunately the next one splits the cleat on that end. I was afraid of that. The third one in the middle goes in fine though. I put the cabinet back in place, carefully lifting it over the cleat, and secure it in position. A quick check shows it's level so I drill a couple pilot holes and wind the screws through the base and into the cleat. Nice and solid now!
Before I headed for the garage I measured the opening behind the stove for the cleat. While I was out there to cut the cleat for the floor, I also cut the cleat for behind the stove out of my last chunk of nice 1x4. It seems a shame to hide it behind the stove, but it saves me yet another trip to Lowe's. I still have the window sashes to finish, one of which is still in the house. The upper sash already has a coat of linseed oil, but the lower sash still needs the paint scraped off and oiled, as does the window sill. The window frame still looks to be in good shape and painted, and it looks like it may not be easy to get that paint off, so I probably won't oil it. Ann picked out the trim paint so I can actually paint the sashes and the sill while it's still apart. I may put the parting beads in place to paint them while everything is apart as well. If I remember to that is.
The baseboards still needs the paint scraped as well. Not sure if I'll be able to reuse the cap and shoe molds, meaning I don't know if I'll be able to get the old paint off of them or not, but I'm going to try. The reason is simple. I can't get the same size moldings, let alone the quality, as they made them back then. Nowadays you get the low quality, finger jointed, smaller crap because it would cost too much to make 'em like they used to. Anyway, my choices are limited. I may be able to order something close to the originals through Romac and the mill they use. Or I could try to run the shapes myself, with multiple passes through the router, and multiple bits. Or I could get a shaper head for my table saw and fashion my own cutters with that exact profile. I'll try to salvage what I have first. It just seems easier.
(Saturday, 12 May 2018 - Happy Birthday Matt!)
Took a trip over to Palm Bay to visit with the folks, celebrate Mother's Day and my brother Matt's birthday since
he and Cindy are down from Ohio. We spent an enjoyable day together. Matt put some new channel apps on mom's FireTV
stick and we enjoyed a preview of the "EyeCandy" channel on PlutoTV. Tubi was another one, and he was saying he
has them on his phone too. We watched some movies with mom as Matt and I swapped couches between the living room
and her room. The one we moved from her room had extended legs on it to raise it up and make it easier for her to
get in and out of to lay down when not in her "hospital" bed. She's on hospice care now.
While I was away, Nick and Ann loaded up the truck with the limbs and such he had cut from the tree in his front yard a while back. Three loads worth, and there is still some left, but it's dried up enough to be easily put out with the yard trash since it sat there so long. I find this out when I text Ann to let her know I made it there okay. She says to give everyone a hug and have fun. I told her I would tell her the same thing, but going to the dump doesn't sound all that fun. She says it depends on your point of view.
(Sunday, 13 May 2018)
Nick's at autocross, Ann waiting to hear what time he runs so she/we can go watch. I'll probably sit this one out
and let them enjoy some Mother/Son time together. I have a lot of clean up and reorganization to do with all the
tools and trim and such. I'd like to get the new sink installed just to be sure there are no surprises before the
countertops are installed. We'll see. Now that everything is back together and operational, I'm reluctant to take
any of it apart.
Meanwhile, Ann is busy outside waiting to hear from Nick. Roses deadheaded, fountains bleached (and filled with water), next thing to do is mow. Ann got a text from Nick saying he was running his heat now, but because it will take as long to get there as the heat would run, she's not going to go. She texts him back to say she hopes he won't be disappointed. Nah is the answer. Now she can mow the yard, which she has been putting off until she heard from him. But now she's hungry. Time for her to cook some breakfast. Then laundry. Then vacuuming. Me? I'm left to grab a bowl of cereal.
As Ann is cleaning, she asks me what the gray plastic piece on the table goes to. I tell her the same thing I told Nick when he asked, it broke off of something in the pennisula cabinet and the little rubber things are probably bumpers of some kind. Well this time I'm pretty sure I know where the bumpers go, but still not sure where the plastic piece goes. I noticed when I had the "lazy susan" trays out that the top one was almost slamming closed, unlike the bottom one whose slow closer was working fine. First I put the bumpers back in place and sure enough that's where they came from. I can see why the top one would have come loose with all that slamming, but the bottom one?
I'm guessing it just wasn't installed properly to begin with since it looks like the part that pushes into the mounting hole is kind of bent over, and it takes particular attention to be sure that it pops back into place and stays there without popping right back out. The top one just popped right back in and its mounting looked straight. Now, why isn't this slow closer working on the top one. I pull them out, one at a time and compare them, looking for where that plastic piece might go... Sure enough, on the bottom one it looks like that piece is still in place along the back side of the inner arm that holds the tray as it swings out. And when closing it appears there is a "pin" of sorts, albeit plastic coated, that engages with a piece that pivots on top of a mechanism where that plastic fits, much like a cover over that mechanism. I think I'm onto something here...
By comparison, the top one does NOT have that piece, and the mechanism has popped out of the space it appears it should otherwise fit inside. The other thing I notice is that pin doesn't engage until the tray is about to slam closed, further indicating the mechanism is not in the place it should be. I'm looking at the plastic piece and on the back it has one tab that is curved, almost like it should fit around a shaft or pin of sorts, and another tab that looks like it should snap over something flat as if to hold it in place. So I'm thinking the mechanism has to go back in place, and somehow between pushing along the length of it and twisting the part that "captures" the pin on the tray as it closes, it "snaps" back into place. Cool. Let's see if it works. Sure enough, that was it. Even better. Now let's snap that plastic cover piece back on...
Great. It looks like the piece the curved tab would wrap around is now snapped back into place, and no matter what I try, I cannot get that piece to snap on or the mechanism to rotate back out like it was. Unfortunately, that appears to be the only way to get that curved piece around the part of the mechanism it would fit on. Well, that's good enough for me. Maybe someday it will pop back out again and I'll be able to put it back on. For now it can sit on the floor on the cabinet, waiting, just in case.
(Monday, 14 May 2018)
Working remotely today. For now it's more of the same hurry up and
wait stuff. So time for me to see about getting some of these excess tools and stuff out of the way and put away.
I manage to get most everything out of the living room, with just a small box of tools I still need on the front
porch, but the new sink and faucet are still sitting there in front of the fireplace and another small box of
power tools I'll need and the sanding tool and screens and...
I think you get the idea. As much as I've already taken care of, there's probably still that much left until the dining room and hallway plaster is done, not to mention moving the ethernet jack to the other side of the wall by the office. I keep telling myself I need to get another toolbox for just the tools I'll always need, in addition to the specialty toolboxes I already have. One is for copper, brass, and threaded pipe plumbing. Another is for plastic plumbing. And the last is for sprinkler and outdoor plumbing. I also have a number of just plain cardboard boxes with assorted fittings and such for different sizes of plastic pipe. Another for just the drain snake, but all of those can stay in the garage where they have a place, until I need them. Then I can just carry them to where I need them and put them away when I'm done.
As many times as I've had to put all the tools in a cardboard box, it would be nice to have a tool box meant for just that sort of thing. Guess I'll have to make that happen. Granted, it won't help with all those specialty power tools, like the Dremel saw or the multitool, but it's a start and a lot easier to deal with than a cardboard box and having to remember where I last used a tool to find it when I need it again. My memory ain't so good no more, and as much as I like to joke with Nick that the tool I'm looking for is probably over at his house, I think the time has come to buy another toolbox. I may even get some new tools to put in it. Who knows?
(Friday, 18 May 2018)
Working remotely today and updating this account. Nick found the problem with the dishwasher
wanting to go into "flood" mode every three or four days. We were in the kitchen, Wednesday night IIRC, and
as I'm unloading the dishwasher, we hear it start to run. Great, we think, here we go again. Sure enough, it's
not listening to the control panel again. Time to figure this out once and for all!
First I grab the manual for the dishwasher and look to see if it says anything about how to service... Nope. There's an online guide for how to "fix" the E:15 error code, but it's not really fix, just an explanation of what the code means and how to get it back out of flood mode. The code isn't showing again. Good thing I made it a point to look and see what the error code was the first time. I've yet to see the code appear again, not since the first time it started doing it. For this error code it says remove the four screws that hold the door cover on then remove it to expose two more screws the hold on the cover to gain access to the basin beneath the tub. At first all I see is about a dozen screws all around the door that are holding the cover on. I almost give up but decide to look again and see if I can find the four screws they're talking about.
Sure enough, there are four screws that hold the entire door to the spring loaded hinges, connected to the dishwasher on either side. I start to loosen one and it quickly becomes obvious that the spring loading is going to be the problem. It's already difficult to try to align the door with the hinge and get that screw back in. I can't imagine trying to get the door back on both hinges and all the screws back in, once the door is off that is. And what do I do with the door once it's off? Just lay it on the floor? Sure. That sounds like a good plan. I can almost hear the grit grinding between the new floor finish and the brushed stainless steel already.
Granted, I could put something down to keep that from happening, but then how do I work around it while trying to get those last two screws out, right where the door is now laying and in the way? Nope. I can pop that kick panel off and wind in the legs, then remove the two screws that hold the dishwasher to the cabinetry and slide it out to expose the entire machine, not just a small opening I'd need a turkey baster just to get into to remove the water. Now I can just move a section of the insulating blanket out of the way and mop up the water with some paper towels. But this will be the third time it's happened, and while it's out, we're going to find the problem and fix it! It's funny that the first comment to the online "fix" is, "How does draining the water fix the leak?"
Nick and I are both looking around to see if we can see anything that may point to the cause of leak. It really doesn't take much water to set it off either. Maybe a quarter of an inch of travel in the float actuates that micro switch. We're thinking that maybe the drain line got nicked and has a slow enough leak to cause it to happen after a several runs. Nick thinks he sees a droplet building up along a section coming out of the pump, but it turns out to be nothing. We set it up to run through an entire wash cycle, without dishes and soap, and monitor it up until it drains. Nothing. Then Nick notices that there are a couple drops in the back near where the water supply connects.
Hmmm... That would be that used "garden hose" to compression fitting adapter I grabbed off the old dishwasher. I swing it out and sure enough, it looks as if the seal on the garden hose end is weeping, and there is just enough of a little shelf or "lip" sticking out beneath it that would catch any dripping and route it to the pan under the dishwasher, right where Nick saw them. I grab the water pump pliers for Nick and he's able to tighten the fitting almost another quarter turn. Wow. I thought I tightened that more than that... Nick's already gone home by the time the cycle completes, but it looks like that's got it. I load the dishwasher this time, add the detergent, and run another entire cycle. Still no leaks. I'm going to call this fixed.
I slide the dishwasher back into place, adjust the legs, and install the kick panel. I wind in the screws that hold it to the cabinets the next morning. I still need a better resolution to securing the beauty panel to the pennisula cabinet. Guess I should see about getting some shorter wood screws that will work before they install the countertops, but still no word about when they are coming to install them. I should probably finish the toe kick panels and trim installation before then too. Baseboards would be nice too. I still need to do quite a few other things too, some related to the kitchen remodel, some not. But for today, I need to make some more progress on work, so hopefully the updates have finished installing and I can get back to it.
(Saturday, 19 May 2018)
Ann and I went to the flea market today. We got there about 9:30 AM, hoping to find some good deals on some fresh
vegetables, new sunglasses, and a new "spinner thingy" to replace the worn out one in the flower bed out front.
There are two main sections of the flea market, at least, two covered and under air conditioning sections. One above,
up on the hill, and one below. There are plenty more sections outside, both covered pavillion style, and open to the
elements. But you could really lump them into the out back or just outside section. Our first stop for sunglasses is
the upper section, which has a main unit that is under air, and is connected to another covered part that is open to
the outside air. We pick out what we're looking for and head down that aisle to the outside part and the around to
the next aisle over to one of the vegetable markets.
Ann has a look at what they have, then we continue on, walking the rest of the upper section, and the outback portion behind it to have a look at the flowers and succulents and such. We did find a very nice "hair clip" for Ann, made from music wire to allow it to be flexible and strong. It's funny too, because I waited on her to put her plastic hair clip back in when we first got out of the car. She had to take it off when we got in the car to avoid breaking it and the general discomfort of having to keep her head off the headrest. That's what sold her on it. At first she wasn't really even going to try it on, but when the lady says you can leave it on when you're sitting in the chair, Ann says that right there just sold me on it! It's silver in the shape of a bow with a paw print in the middle.
We return to the first vegetable market, after seeing that the rest of them have about the same deals, make our purchase and head back to the car. My foot is bothering me for whatever reason, and I ask Ann if she wants to just walk down to the lower section, but she says that's a long way with my foot bothering me and we should just drive down there and park. For once, I'm the one that wants to go look, not Ann. She was ready to move on to the grocery store, but something is telling me I should go have a look for train stuff. Train stuff like the track I need to add on to the back yard layout. We walk the entire lower section, and part of the out back behind it too. I am surprised to find a guy there that has quite a bit of model railroad stuff, and actually has a small HO and N scale layouts running!
I don't see any large scale, so I ask him and he says down by the pool table he has some garden scale. We head down to have a look. Sure enough his has three or four sets, one is a Bachmann Christmas set, another a "Tweetsie", or East Tennesse & West North Carolina (ET&WNC) set with a green engine like we already have. All in all in pretty good condition and at a pretty good price too. I don't see any track though... Bummer. I head back and ask him about it and he tells me there's not a whole lot around here large scale wise anyway. He'd been to a few estate sales and there were only two that had anything, and one they had a bunch of engines and cars, but not a single piece of track. We both agreed they must have sat on a shelf and been to only admire them.
I notice a bunch of old doors and wood sitting along the outside of the building and think maybe I can find some reclaimed old growth wood, but nothing like that. Maybe some "rough sawn" cedar planking complete with bark still on. This is a place that has things made from old barn wood, but it's already been made into something or other. We head back through the rest of the air conditioned parts then back to the car. From there, I stop for gas and we're off to Publix. We finally get home about 1:30 PM. Wow. Didn't seem that long. Ann off to TJ Maxx, etc. and I'm left rubbing my really sore foot. I finally take some ibuprofen and drift in and out of napping for awhile. Then Ann's back and I'm debating whether to go out to the garage to get something done or just rest my foot. Ann says I should just rest my foot, so here I sit wondering what else I can do. I take the lazy way out and not do anything else.
(Sunday, 20 May 2018)
I'm thinking maybe today I'll get more done on the window sashes? It's raining pretty heavily, and looks like it
will be raining all day, making it difficult to get to the garage and back, without getting wet anyway. I head
out to have a look at what state I left the garage in... Yeah, it's going to need some clean up and organization
before I can work on the window sashes, or work on anything for that matter. I do a quick bit of replacing
things and head back into the house. Ann and Nick just got back from the grocery store after going over their meal
plan for the week, filling in the blanks of what Ann and I didn't get yesterday. Of course, all the "junk" food was
on sale, so I stocked up on that. Unfortunately, mostly the carbs they're not allowed to have on their new diet.
Not sure when I actually did manage to get the windows done, but I did. I already had the upper sash cleaned up and linseed oiled for a week, but the lower sash still needed cleaned up and the dried and cracked spackling removed before I could oil it. I managed it a little at a time, using the catspaw, then found that the wallpaper scraper worked much better. And quicker. And quicker is better. I'm able to get it all cleaned up and oiled, but I still don't have any trim paint. Ann buys some. I use it. Without looking. But I should have... Because it is oil based. I don't realize it until I try to rinse out the brush with water, thnking it's latex...
Yeah, no. That's not going to work. I quickly head back to the garage, poking the brush into a container of mineral spirits. Great. It's going to take forever for that to dry enough for the next coat. I was hoping to have the window all back together, and it and the trim painted today. Not going to happen. So now Ann's mad at me because I put it back together with just one coat of the oil based paint. I even "cooked" the hardware to get all the years of paint and gunk off of it. Unfortunately, it looks like it was the el cheapo brass plated steel hardware, and a lot of the brass plating was already missing and showing rust where it was no longer plated. I put the hardware back on anyway. Ann's going to buy new, but we need something there until she does.
Obviously I'm writing all of this bit from memory and should have captured it when I was doing it. Guess I was just really in need of a break from working on the kitchen every weekend for the last six months. I can go back and look at the receipts for the paint and hardware and whatnot to give me a better idea of what happened what days, but other than that, I'm relying on my memory which ain't so good no more.
(Sunday, 27 May 2018)
(Monday, 28 May 2018 - Memorial Day)
Taking the day off... 8'D
<< Previous | Kitchen | Demolition | Plaster '70s Wall | Plaster Cabinet Wall | Wall Cabinets | Sink Cabinets | Plumbing | Plaster Sink Wall | Flooring | Cabinets | Countertop and Sink | Finishing Touches | Next >>